Epson Stylus Pro 9000 User Manual - Page 142
Choosing Paper and Layout Options, Select the type of paper you loaded in the printer from
 |
View all Epson Stylus Pro 9000 manuals
Add to My Manuals
Save this manual to your list of manuals |
Page 142 highlights
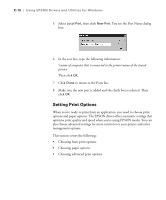
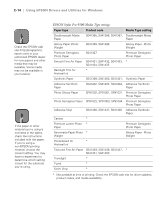
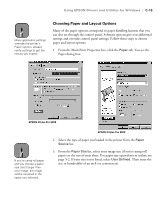
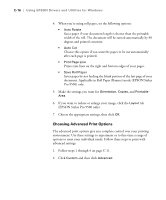
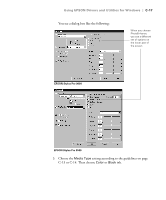
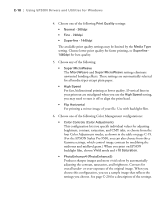
Using EPSON Drivers and Utilities for Windows | C-15 Note Many application settings override the printer's Paper options. Always verify settings to get the results you expect. Choosing Paper and Layout Options Many of the paper options correspond to paper handling features that you can also set through the control panel. Software options give you additional settings and override control panel settings. Follow these steps to choose paper and layout options: 1. From the Main Print Properties box, click the Paper tab. You see the Paper dialog box: EPSON Stylus Pro 9000 Note If you're using roll paper and you choose a paper size that's larger than your image, the image will be centered in the space you selected. EPSON Stylus Pro 9500 2. Select the type of paper you loaded in the printer from the Paper Source list. 3. From the Paper Size list, select your image size (if you're using roll paper) or the size of your sheet. For paper size equivalents in inches, see page 5-2. If your size is not listed, select User Defined. Then enter the size in hundredths of an inch (or centimeters). C-15
-
 1
1 -
2
-
3
-
4
-
5
-
6
-
7
-
8
-
9
-
10
-
11
-
12
-
13
-
14
-
15
-
16
-
17
-
18
-
19
-
20
-
21
-
22
-
23
-
24
-
25
-
26
-
27
-
28
-
29
-
30
-
31
-
32
-
33
-
34
-
35
-
36
-
37
-
38
-
39
-
40
-
41
-
42
-
43
-
44
-
45
-
46
-
47
-
48
-
49
-
50
-
51
-
52
-
53
-
54
-
55
-
56
-
57
-
58
-
59
-
60
-
61
-
62
-
63
-
64
-
65
-
66
-
67
-
68
-
69
-
70
-
71
-
72
-
73
-
74
-
75
-
76
-
77
-
78
-
79
-
80
-
81
-
82
-
83
-
84
-
85
-
86
-
87
-
88
-
89
-
90
-
91
-
92
-
93
-
94
-
95
-
96
-
97
-
98
-
99
-
100
-
101
-
102
-
103
-
104
-
105
-
106
-
107
-
108
-
109
-
110
-
111
-
112
-
113
-
114
-
115
-
116
-
117
-
118
-
119
-
120
-
121
-
122
-
123
-
124
-
125
-
126
-
127
-
128
-
129
-
130
-
131
-
132
-
133
-
134
-
135
-
136
-
 137
137 -
 138
138 -
 139
139 -
 140
140 -
 141
141 -
 142
142 -
 143
143 -
 144
144 -
 145
145 -
 146
146 -
 147
147 -
148
-
149
-
150
-
151
-
152
-
153
-
154
-
155
-
156
-
157
-
158
-
159
-
160
-
161
-
162
-
163
-
164
-
165
 |
 |