HP 9000 rp4410-4 User Service Guide, Fifth Edition - HP 9000 rp4410/4440 - Page 123
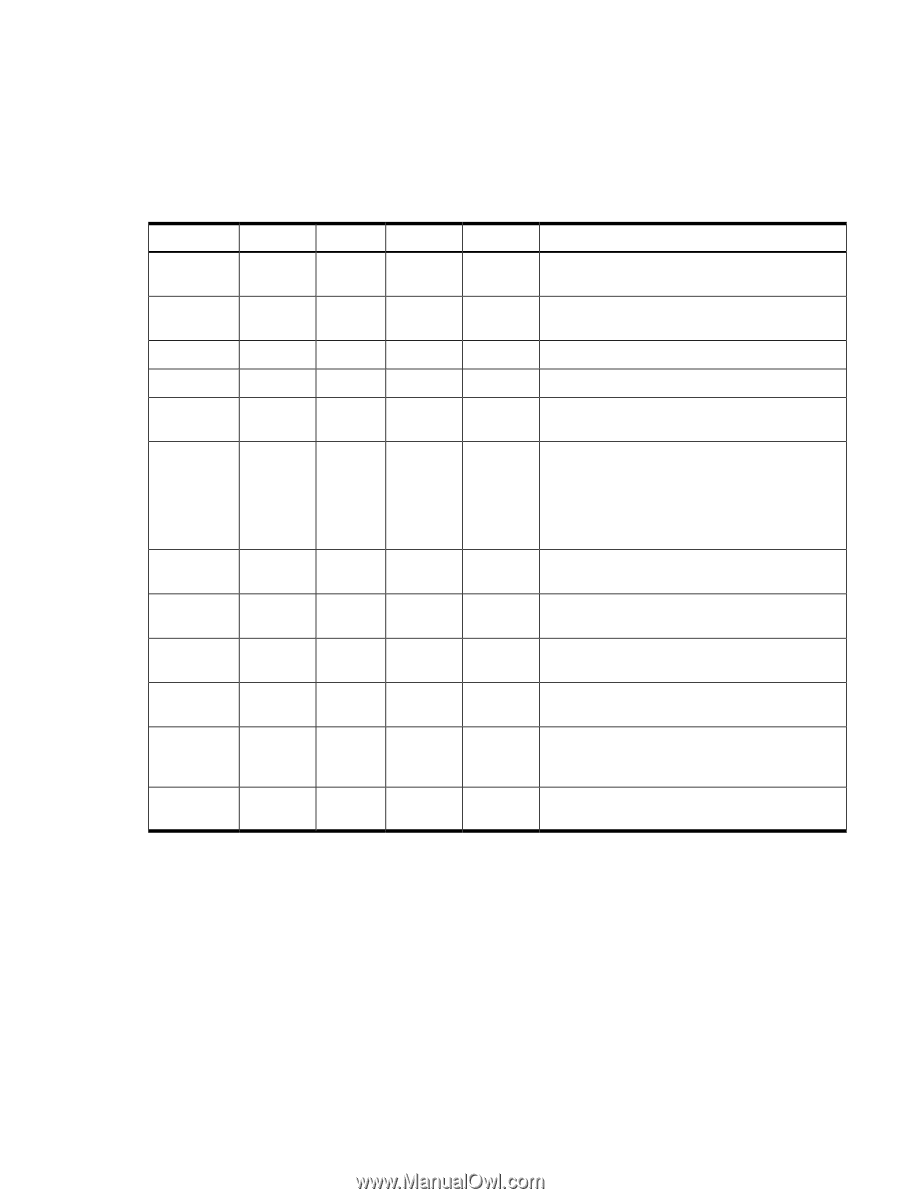
QuickFind Diagnostic Panel LEDs, Table 3-22 QuickFind Diagnostic Panel LED Definitions
 |
View all HP 9000 rp4410-4 manuals
Add to My Manuals
Save this manual to your list of manuals |
Page 123 highlights
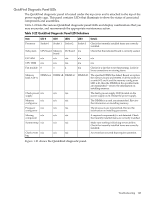
QuickFind Diagnostic Panel LEDs The QuickFind diagnostic panel is located under the top cover and is attached to the top of the power supply cage. This panel contains LEDs that illuminate to show the status of associated components and assemblies. Table 3-22 lists the various QuickFind diagnostic panel LEDs and display combinations that you may encounter, and recommends the appropriate maintenance action. Table 3-22 QuickFind Diagnostic Panel LED Definitions Item LED 0 LED1 LED2 LED3 Details Processor Socket 0 Socket 1 Socket 2 Socket 3 Check that recently installed items are correctly installed. Subsystem CPU board Memory I/O board n/a board Check that the indicated board is correctly seated. I/O VRM n/a n/a n/a n/a n/a CPU VRM n/a n/a n/a n/a n/a Fan module 0 1 2 n/a Check for a fan that is not functioning. Look for loose connections or missing items. Memory bank X (0-7) DIMM xA DIMM xB DIMM xC DIMM xD The specified DIMM has failed, Reseat or replace the memory board and DIMM. If all the LEDs for a rank (0-7) are lit and the memory config error LED is lit, then the DIMMs in the specified rank are mismatched-review the information on installing memory. Check power n/a supply n/a n/a The faulty power supply LED (located on the power supply) is lit. Reseat the power supply. Memory n/a config error n/a n/a The DIMMs in a rank are mismatched. Rreview the information on installing memory. Processor n/a config error n/a n/a The processors are mismatched, Review the information on installing processors. Missing n/a component n/a n/a A required component(s) is not detected. Check that recently installed items are correctly installed. System temp n/a n/a n/a Make sure nothing is blocking server airflow. Check that recently installed items are correctly installed. Check event n/a log n/a n/a An event has occurred that requires attention. Figure 1-21 shows the QuickFind diagnostic panel. Troubleshooting 123
-
 1
1 -
2
-
3
-
4
-
5
-
6
-
7
-
8
-
9
-
10
-
11
-
12
-
13
-
14
-
15
-
16
-
17
-
18
-
19
-
20
-
21
-
22
-
23
-
24
-
25
-
26
-
27
-
28
-
29
-
30
-
31
-
32
-
33
-
34
-
35
-
36
-
37
-
38
-
39
-
40
-
41
-
42
-
43
-
44
-
45
-
46
-
47
-
48
-
49
-
50
-
51
-
52
-
53
-
54
-
55
-
56
-
57
-
58
-
59
-
60
-
61
-
62
-
63
-
64
-
65
-
66
-
67
-
68
-
69
-
70
-
71
-
72
-
73
-
74
-
75
-
76
-
77
-
78
-
79
-
80
-
81
-
82
-
83
-
84
-
85
-
86
-
87
-
88
-
89
-
90
-
91
-
92
-
93
-
94
-
95
-
96
-
97
-
98
-
99
-
100
-
101
-
102
-
103
-
104
-
105
-
106
-
107
-
108
-
109
-
110
-
111
-
112
-
113
-
114
-
115
-
116
-
117
-
 118
118 -
 119
119 -
 120
120 -
 121
121 -
 122
122 -
 123
123 -
 124
124 -
 125
125 -
 126
126 -
 127
127 -
 128
128 -
129
-
130
-
131
-
132
-
133
-
134
-
135
-
136
-
137
-
138
-
139
-
140
-
141
-
142
-
143
-
144
-
145
-
146
-
147
-
148
-
149
-
150
-
151
-
152
-
153
-
154
-
155
-
156
-
157
-
158
-
159
-
160
-
161
-
162
-
163
-
164
-
165
-
166
-
167
-
168
-
169
-
170
-
171
-
172
-
173
-
174
-
175
-
176
-
177
-
178
-
179
-
180
-
181
-
182
-
183
-
184
-
185
-
186
-
187
-
188
-
189
-
190
-
191
-
192
-
193
-
194
-
195
-
196
-
197
-
198
-
199
-
200
-
201
-
202
-
203
-
204
-
205
-
206
-
207
-
208
-
209
-
210
-
211
-
212
-
213
-
214
-
215
-
216
-
217
-
218
-
219
-
220
-
221
-
222
-
223
-
224
-
225
-
226
-
227
-
228
-
229
-
230
-
231
-
232
-
233
-
234
-
235
-
236
-
237
-
238
-
239
-
240
-
241
-
242
-
243
-
244
-
245
-
246
 |
 |