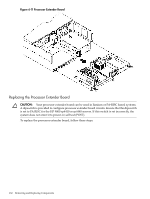
HP 9000 rp4410-4 User Service Guide, Fifth Edition - HP 9000 rp4410/4440 - Page 157
Removing Memory DIMMs, Installing Memory DIMMs, MB DIMMs loaded in quad 0 [connectors 0A, 0B, 0C
 |
View all HP 9000 rp4410-4 manuals
Add to My Manuals
Save this manual to your list of manuals |
Page 157 highlights
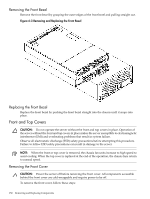
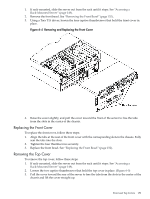
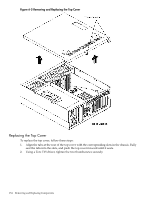
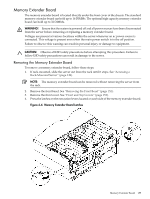
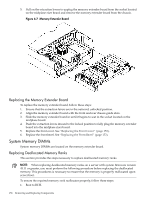
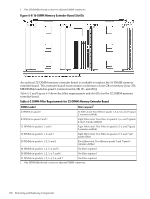
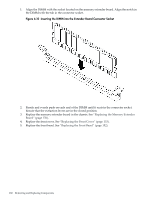
2. To view the deconfigured quad of memory, enter the in me command. 3. Enter the ser pdt clear command. The following message displays followed by a 30 second delay: If DIMM replacement is necessary, power down the system now: Use ^B MP:CM> PC -OFF -NC, then pull power cord and replace DIMM. Otherwise, the system will automatically reboot in 30 seconds. 4. You must remove power from the system within 30 seconds. 5. For instructions on removing and replacing the memory DIMM, see Removing Memory DIMMs Installing Memory DIMMs. Removing Memory DIMMs WARNING! Ensure that the system is powered off and all power sources have been disconnected from the server before removing or replacing system memory DIMMs. Voltages are present at various locations within the server whenever an ac power source is connected. This voltage is present even when the main power switch is in the off position. Failure to observe this warning can result in personal injury or damage to equipment. CAUTION: Observe all ESD safety precautions before attempting this procedure. Failure to follow ESD safety precautions can result in damage to the server. To remove system memory, follow these steps: 1. If rack-mounted, slide the server out from the rack until it stops. See "Accessing a Rack-Mounted Server" (page 149). NOTE: The memory extender board can be removed without removing the server from the rack. 2. Remove the front bezel. See "Removing the Front Bezel" (page 152). 3. Remove the front cover. See "Front and Top Covers" (page 152). 4. Remove the memory extender board. See "Removing the Memory Extender Board" (page 155). 5. Identify the DIMM to be removed and push the extraction levers found on either side of that DIMM slot outward to the open position. The DIMM ejects from the socket. 6. Remove the DIMM from the socket. Installing Memory DIMMs The standard configuration of HP 9000 rp4410 and rp4440 servers includes a 16-DIMM memory extender board. This extender board must contain a minimum of one GB of memory (four 256 MB DIMMs loaded in quad 0 [connectors 0A, 0B, 0C, and 0D]). Table 6-1 and Figure 6-8 show the filler requirements and slot IDs for the 16-DIMM memory extender board. Table 6-1 DIMM Filler Requirements for 16-DIMM Memory Extender Board DIMMs Loaded Fillers Required1 4 DIMMs in quad 0 Six fillers total: Two fillers in each quad 1, 2, and 3 8 DIMMs in quads 0 and 1 Four fillers total: Two fillers in each quad 2 and 3 12 DIMMs in quads 0, 1, and 2 Two fillers total: Two fillers in quad 3 16 DIMMs in quads 0, 1, 2, and 3 No fillers required System Memory DIMMs 157
-
 1
1 -
2
-
3
-
4
-
5
-
6
-
7
-
8
-
9
-
10
-
11
-
12
-
13
-
14
-
15
-
16
-
17
-
18
-
19
-
20
-
21
-
22
-
23
-
24
-
25
-
26
-
27
-
28
-
29
-
30
-
31
-
32
-
33
-
34
-
35
-
36
-
37
-
38
-
39
-
40
-
41
-
42
-
43
-
44
-
45
-
46
-
47
-
48
-
49
-
50
-
51
-
52
-
53
-
54
-
55
-
56
-
57
-
58
-
59
-
60
-
61
-
62
-
63
-
64
-
65
-
66
-
67
-
68
-
69
-
70
-
71
-
72
-
73
-
74
-
75
-
76
-
77
-
78
-
79
-
80
-
81
-
82
-
83
-
84
-
85
-
86
-
87
-
88
-
89
-
90
-
91
-
92
-
93
-
94
-
95
-
96
-
97
-
98
-
99
-
100
-
101
-
102
-
103
-
104
-
105
-
106
-
107
-
108
-
109
-
110
-
111
-
112
-
113
-
114
-
115
-
116
-
117
-
118
-
119
-
120
-
121
-
122
-
123
-
124
-
125
-
126
-
127
-
128
-
129
-
130
-
131
-
132
-
133
-
134
-
135
-
136
-
137
-
138
-
139
-
140
-
141
-
142
-
143
-
144
-
145
-
146
-
147
-
148
-
149
-
150
-
151
-
 152
152 -
 153
153 -
 154
154 -
 155
155 -
 156
156 -
 157
157 -
 158
158 -
 159
159 -
 160
160 -
 161
161 -
 162
162 -
163
-
164
-
165
-
166
-
167
-
168
-
169
-
170
-
171
-
172
-
173
-
174
-
175
-
176
-
177
-
178
-
179
-
180
-
181
-
182
-
183
-
184
-
185
-
186
-
187
-
188
-
189
-
190
-
191
-
192
-
193
-
194
-
195
-
196
-
197
-
198
-
199
-
200
-
201
-
202
-
203
-
204
-
205
-
206
-
207
-
208
-
209
-
210
-
211
-
212
-
213
-
214
-
215
-
216
-
217
-
218
-
219
-
220
-
221
-
222
-
223
-
224
-
225
-
226
-
227
-
228
-
229
-
230
-
231
-
232
-
233
-
234
-
235
-
236
-
237
-
238
-
239
-
240
-
241
-
242
-
243
-
244
-
245
-
246
 |
 |
