HP 9000 rp4410-4 User Service Guide, Fifth Edition - HP 9000 rp4410/4440 - Page 89
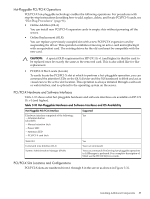
Hot-Pluggable PCI/PCI-X Operations, PCI/PCI-X Hardware and Software Interfaces
 |
View all HP 9000 rp4410-4 manuals
Add to My Manuals
Save this manual to your list of manuals |
Page 89 highlights
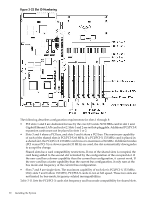
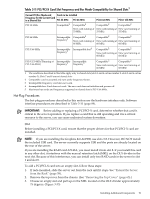
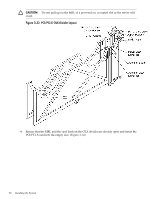
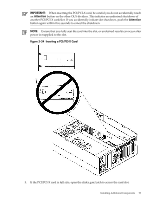
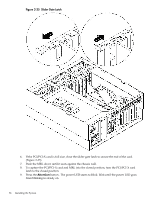
Hot-Pluggable PCI/PCI-X Operations PCI/PCI-X hot-pluggable technology enables the following operations. For procedures with step-by-step instructions describing how to add, replace, delete, and locate PCI/PCI-X cards, see "Hot-Plug Procedures" (page 91). • Online Addition (OLA) You can install new PCI/PCI-X expansion cards in empty slots without powering off the server. • Online Replacement (OLR) You can replace a previously occupied slot with a new PCI/PCI-X expansion card by suspending the driver. This operation combines removing an active card and replacing it with an equivalent card. The existing driver for the old card must be compatible with the new card. CAUTION: A special OLR requirement for HP-UX 11i v1 (and higher) is that the card to be replaced must be exactly the same as the removed card. This is also called like-for-like replacement. • PCI/PCI-X Slot Locate (Locate) To easily locate the PCI/PCI-X slot at which to perform a hot-pluggable operation, you can command the attention LEDs on the OLX divider and the I/O baseboard to blink and act as visual cues to the active slot location. This operation is always initiated through a software or web interface, and is optional to the operating system on the server. PCI/PCI-X Hardware and Software Interfaces Table 3-10 shows what hot-pluggable hardware and software interfaces are available on HP-UX 11i v1 (and higher). Table 3-10 Hot-Pluggable Hardware and Software Interfaces and OS Availability Hot-Pluggable PCI/PCI-X Interface Hardware interface comprised of the following: -Attention button (doorbell) -Manual retention latch -Power LED -Attention LED -PCI/PCI-X card latch Supported Yes Web GUI Command Line Interface (CLI) System Administration Manager (SAM) Yes Yes (rad command) Yes (sam command). Performing hot-pluggable operations in SAManager is preferred. For a complete description of SAM, see the HP-UX Reference Guide. PCI/PCI-X Slot Locations and Configurations PCI/PCI-X slots are numbered from 1 through 8 in the server as shown in Figure 3-32. Installing Additional Components 89
-
 1
1 -
2
-
3
-
4
-
5
-
6
-
7
-
8
-
9
-
10
-
11
-
12
-
13
-
14
-
15
-
16
-
17
-
18
-
19
-
20
-
21
-
22
-
23
-
24
-
25
-
26
-
27
-
28
-
29
-
30
-
31
-
32
-
33
-
34
-
35
-
36
-
37
-
38
-
39
-
40
-
41
-
42
-
43
-
44
-
45
-
46
-
47
-
48
-
49
-
50
-
51
-
52
-
53
-
54
-
55
-
56
-
57
-
58
-
59
-
60
-
61
-
62
-
63
-
64
-
65
-
66
-
67
-
68
-
69
-
70
-
71
-
72
-
73
-
74
-
75
-
76
-
77
-
78
-
79
-
80
-
81
-
82
-
83
-
 84
84 -
 85
85 -
 86
86 -
 87
87 -
 88
88 -
 89
89 -
 90
90 -
 91
91 -
 92
92 -
 93
93 -
 94
94 -
95
-
96
-
97
-
98
-
99
-
100
-
101
-
102
-
103
-
104
-
105
-
106
-
107
-
108
-
109
-
110
-
111
-
112
-
113
-
114
-
115
-
116
-
117
-
118
-
119
-
120
-
121
-
122
-
123
-
124
-
125
-
126
-
127
-
128
-
129
-
130
-
131
-
132
-
133
-
134
-
135
-
136
-
137
-
138
-
139
-
140
-
141
-
142
-
143
-
144
-
145
-
146
-
147
-
148
-
149
-
150
-
151
-
152
-
153
-
154
-
155
-
156
-
157
-
158
-
159
-
160
-
161
-
162
-
163
-
164
-
165
-
166
-
167
-
168
-
169
-
170
-
171
-
172
-
173
-
174
-
175
-
176
-
177
-
178
-
179
-
180
-
181
-
182
-
183
-
184
-
185
-
186
-
187
-
188
-
189
-
190
-
191
-
192
-
193
-
194
-
195
-
196
-
197
-
198
-
199
-
200
-
201
-
202
-
203
-
204
-
205
-
206
-
207
-
208
-
209
-
210
-
211
-
212
-
213
-
214
-
215
-
216
-
217
-
218
-
219
-
220
-
221
-
222
-
223
-
224
-
225
-
226
-
227
-
228
-
229
-
230
-
231
-
232
-
233
-
234
-
235
-
236
-
237
-
238
-
239
-
240
-
241
-
242
-
243
-
244
-
245
-
246
 |
 |
