HP 9000 rp4410-4 User Service Guide, Fifth Edition - HP 9000 rp4410/4440 - Page 194
Replacing an OLX Divider, U320 SCSI Enablement and Conversion Procedures, Time Required, Upgrade Tasks
 |
View all HP 9000 rp4410-4 manuals
Add to My Manuals
Save this manual to your list of manuals |
Page 194 highlights
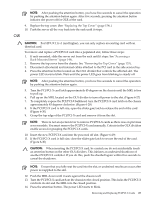
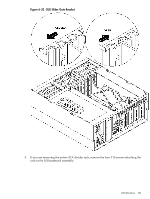
6. Using your fingers, push the two tabs that attach the OLX divider to the I/O baseboard and pull the OLX divider up sharply to disengage it from the I/O baseboard. CAUTION: When extracting the OLX divider, ensure that you release the locking tabs completely or you can damage them. If you damage the tabs, the OLX divider does not seat properly when you reinsert it. Replacing an OLX Divider To replace an OLX divider, follow these steps: 1. Insert the OLX divider into the available slot on the I/O baseboard and push down firmly to seat it into the slot. 2. If you are replacing the entire OLX divider rack onto the I/O baseboard, replace the four T15 screws. 3. To lock the rear edge of the PCI divider, slide the latch on the slider gate bracket closed. 4. Push down on the manual retention latch until it locks into the chassis wall. 5. Replace the top cover. See "Replacing the Top Cover" (page 154). U320 SCSI Enablement and Conversion Procedures This section explains how to upgrade the SCSI cards to enable U320 operation and how to optionally change the SCSI configuration (duplex to simplex) in the server. The U320 enablement process involves replacing the duplex PCA card (duplex configuration only) and the SCSI backplane (simplex and duplex configurations). You can configure the embedded backplane for internal SCSI hard disks drives in the HP 9000 rp4410 and rp4440 servers in either simplex or duplex mode. In simplex mode, both embedded internal hard disks are on SCSI channel A. SCSI channel B can be used for external devices. Remove the cover from channel B before connecting external devices. Do not connect external devices to SCSI channel A. In duplex mode, each hard disk is on a separate SCSI bus. Do not connect external devices to either SCSI channel A or B. Time Required Upgrading the server can require several hours, depending on preparatory time. Plan for an hour of system downtime. Preparatory time includes checking the upgrade kit, preparing an ESD-safe work station, and backing up your data. Upgrade Tasks Upgrade tasks depend on whether the server is configured for simplex or duplex operation. This section provides the high-level steps required to perform the upgrade. The actual upgrade procedures are provided below. Simplex Configuration Upgrade 1. Back up your data 2. Shut down the server (disconnect AC power) 3. Remove server components 4. Replace SCSI backplane 5. Install server components 6. Verify the upgrade installation 194 Removing and Replacing Components
-
 1
1 -
2
-
3
-
4
-
5
-
6
-
7
-
8
-
9
-
10
-
11
-
12
-
13
-
14
-
15
-
16
-
17
-
18
-
19
-
20
-
21
-
22
-
23
-
24
-
25
-
26
-
27
-
28
-
29
-
30
-
31
-
32
-
33
-
34
-
35
-
36
-
37
-
38
-
39
-
40
-
41
-
42
-
43
-
44
-
45
-
46
-
47
-
48
-
49
-
50
-
51
-
52
-
53
-
54
-
55
-
56
-
57
-
58
-
59
-
60
-
61
-
62
-
63
-
64
-
65
-
66
-
67
-
68
-
69
-
70
-
71
-
72
-
73
-
74
-
75
-
76
-
77
-
78
-
79
-
80
-
81
-
82
-
83
-
84
-
85
-
86
-
87
-
88
-
89
-
90
-
91
-
92
-
93
-
94
-
95
-
96
-
97
-
98
-
99
-
100
-
101
-
102
-
103
-
104
-
105
-
106
-
107
-
108
-
109
-
110
-
111
-
112
-
113
-
114
-
115
-
116
-
117
-
118
-
119
-
120
-
121
-
122
-
123
-
124
-
125
-
126
-
127
-
128
-
129
-
130
-
131
-
132
-
133
-
134
-
135
-
136
-
137
-
138
-
139
-
140
-
141
-
142
-
143
-
144
-
145
-
146
-
147
-
148
-
149
-
150
-
151
-
152
-
153
-
154
-
155
-
156
-
157
-
158
-
159
-
160
-
161
-
162
-
163
-
164
-
165
-
166
-
167
-
168
-
169
-
170
-
171
-
172
-
173
-
174
-
175
-
176
-
177
-
178
-
179
-
180
-
181
-
182
-
183
-
184
-
185
-
186
-
187
-
188
-
 189
189 -
 190
190 -
 191
191 -
 192
192 -
 193
193 -
 194
194 -
 195
195 -
 196
196 -
 197
197 -
 198
198 -
 199
199 -
200
-
201
-
202
-
203
-
204
-
205
-
206
-
207
-
208
-
209
-
210
-
211
-
212
-
213
-
214
-
215
-
216
-
217
-
218
-
219
-
220
-
221
-
222
-
223
-
224
-
225
-
226
-
227
-
228
-
229
-
230
-
231
-
232
-
233
-
234
-
235
-
236
-
237
-
238
-
239
-
240
-
241
-
242
-
243
-
244
-
245
-
246
 |
 |