HP 9000 rp4410-4 User Service Guide, Fifth Edition - HP 9000 rp4410/4440 - Page 212
Hot-Pluggable Disk Drives, Removing a Hot-Pluggable Disk Drive
 |
View all HP 9000 rp4410-4 manuals
Add to My Manuals
Save this manual to your list of manuals |
Page 212 highlights
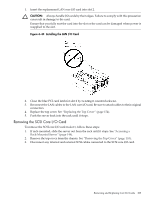
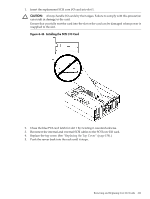
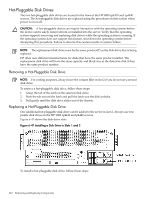
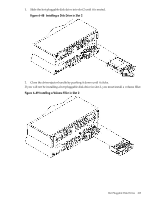
Hot-Pluggable Disk Drives The two hot-pluggable disk drives are located in the front of the HP 9000 rp4410 and rp4440 servers. The hot-pluggable disk drives are replaced using the procedures in this section when power is on or off. CAUTION: A hot-pluggable device can require interaction with the operating system before the device can be safely removed from or installed into the server. Verify that the operating system supports removing and replacing disk drives while the operating system is running. If the operating system does not support this feature, shut down the operating system before attempting this procedure. Failure to observe this caution results in system failure. NOTE: The replacement disk drive must be the same product ID as the disk drive that is being replaced. HP often uses different manufacturers for disks that have the same product number. The replacement disk drive will have the same capacity and block size as the defective disk if they have the same product number. Removing a Hot-Pluggable Disk Drive NOTE: For cooling purposes, always leave the volume filler in slot 2 if you do not use a second disk drive. To remove a hot-pluggable disk drive, follow these steps: 1. Grasp the tab of the latch on the selected disk drive. 2. Push the tab toward the latch and pull the latch out; the disk unlocks. 3. Pull gently until the disk drive slides out of the chassis. Replacing a Hot-Pluggable Disk Drive One additional hot-pluggable disk drive can be added to the server in slot 2. Always use low profile disk drives in the HP 9000 rp4410 and p4440 servers. Figure 6-47 shows the disk drive slots. Figure 6-47 Installing a Disk Drive in Slots 1 and 2 To install a hot-pluggable disk drive, follow these steps: 212 Removing and Replacing Components
-
 1
1 -
2
-
3
-
4
-
5
-
6
-
7
-
8
-
9
-
10
-
11
-
12
-
13
-
14
-
15
-
16
-
17
-
18
-
19
-
20
-
21
-
22
-
23
-
24
-
25
-
26
-
27
-
28
-
29
-
30
-
31
-
32
-
33
-
34
-
35
-
36
-
37
-
38
-
39
-
40
-
41
-
42
-
43
-
44
-
45
-
46
-
47
-
48
-
49
-
50
-
51
-
52
-
53
-
54
-
55
-
56
-
57
-
58
-
59
-
60
-
61
-
62
-
63
-
64
-
65
-
66
-
67
-
68
-
69
-
70
-
71
-
72
-
73
-
74
-
75
-
76
-
77
-
78
-
79
-
80
-
81
-
82
-
83
-
84
-
85
-
86
-
87
-
88
-
89
-
90
-
91
-
92
-
93
-
94
-
95
-
96
-
97
-
98
-
99
-
100
-
101
-
102
-
103
-
104
-
105
-
106
-
107
-
108
-
109
-
110
-
111
-
112
-
113
-
114
-
115
-
116
-
117
-
118
-
119
-
120
-
121
-
122
-
123
-
124
-
125
-
126
-
127
-
128
-
129
-
130
-
131
-
132
-
133
-
134
-
135
-
136
-
137
-
138
-
139
-
140
-
141
-
142
-
143
-
144
-
145
-
146
-
147
-
148
-
149
-
150
-
151
-
152
-
153
-
154
-
155
-
156
-
157
-
158
-
159
-
160
-
161
-
162
-
163
-
164
-
165
-
166
-
167
-
168
-
169
-
170
-
171
-
172
-
173
-
174
-
175
-
176
-
177
-
178
-
179
-
180
-
181
-
182
-
183
-
184
-
185
-
186
-
187
-
188
-
189
-
190
-
191
-
192
-
193
-
194
-
195
-
196
-
197
-
198
-
199
-
200
-
201
-
202
-
203
-
204
-
205
-
206
-
 207
207 -
 208
208 -
 209
209 -
 210
210 -
 211
211 -
 212
212 -
 213
213 -
 214
214 -
 215
215 -
 216
216 -
 217
217 -
218
-
219
-
220
-
221
-
222
-
223
-
224
-
225
-
226
-
227
-
228
-
229
-
230
-
231
-
232
-
233
-
234
-
235
-
236
-
237
-
238
-
239
-
240
-
241
-
242
-
243
-
244
-
245
-
246
 |
 |
