HP 9000 rp4410-4 User Service Guide, Fifth Edition - HP 9000 rp4410/4440 - Page 185
OLA, Accessing a, Rack-Mounted Server Removing the Top Cover
 |
View all HP 9000 rp4410-4 manuals
Add to My Manuals
Save this manual to your list of manuals |
Page 185 highlights
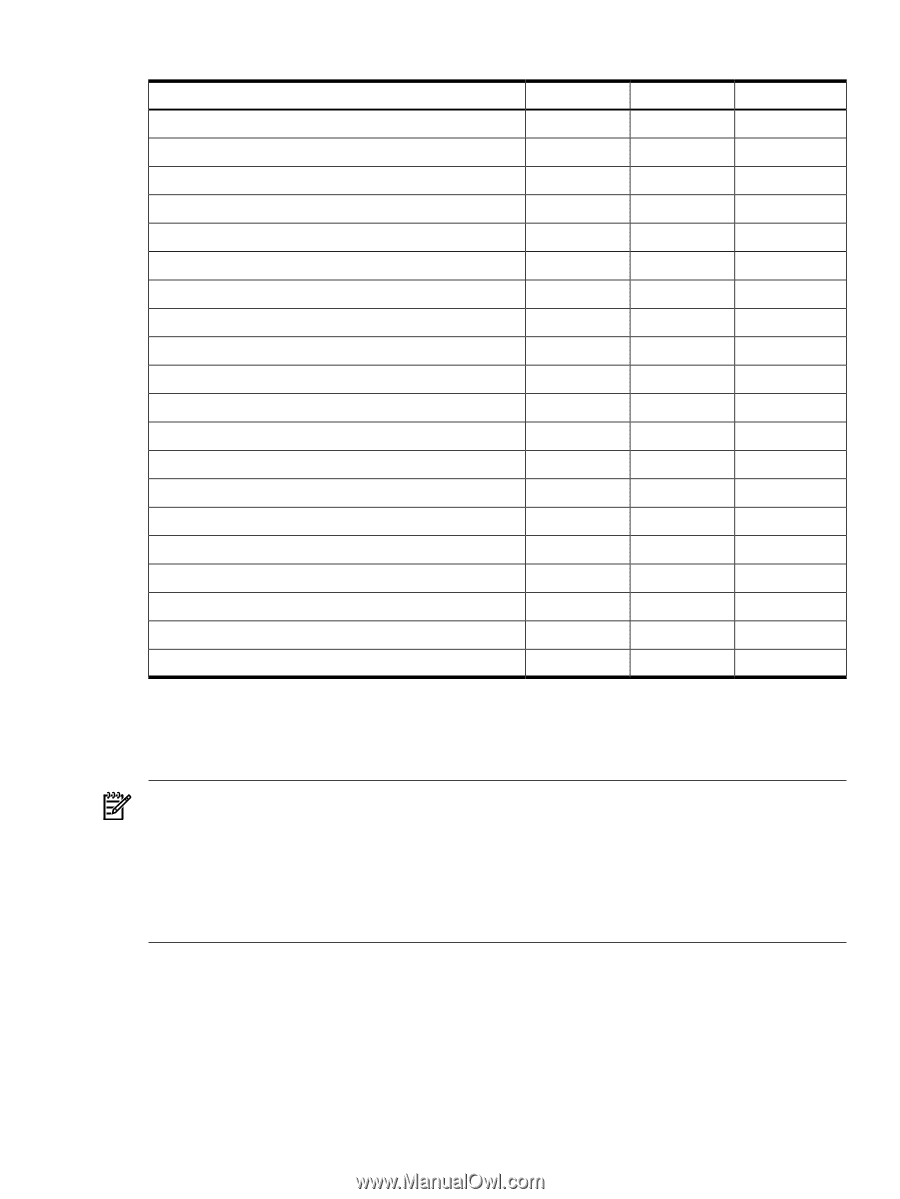
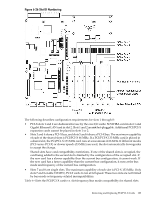
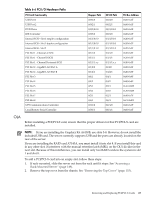
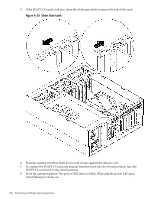
Table 6-6 PCI I/O Hardware Paths PCI Card Functionality USB Port 1 USB Port 2 DVD Drive IDE Controller Internal SCSI - Slot 1 simplex configuration Internal SCSI - Slot 1 duplex configuration Internal SCSI - Slot 2 PCI Slot 1 - Channel A SCSI PCI Slot 1 - Channel B SCSI PCI Slot 1 - Channel B external SCSI PCI Slot 2 - GigaBit LAN Port A PCI Slot 2 - GigaBit LAN Port B PCI Slot 3 PCI Slot 4 PCI Slot 5 PCI Slot 6 PCI Slot 7 PCI Slot 8 UPS Communications Controller Local/Remote Serial Controller Mapper Path 0/0/2/0 0/0/2/1 0/0/3/0.0.0 0/0/3/0 0/1/1/0.0.0 0/1/1/0.0.0 0/1/1/0.1.0 0/1/1/0 0/1/1/1 0/1/1/1.x.y 0/1/2/0 0/1/2/1 0/4/1 0/4/2 0/5/1 0/5/2 0/2/1 0/6/1 0/0/1/0 0/0/1/1 HP-UX Path 0/0/2/0 0/0/2/1 0/0/3/0.0.0 0/0/3/0 0/1/1/0.0.0 0/1/1/0.0.0 0/1/1/0.1.0 0/1/1/0 0/1/1/1 0/1/1/1.x.y 01/2/0 0/1/2/1 0/4/1 0/4/2 0/5/1 0/5/2 0/2/1 0/6/1 0/0/1/0 0/0/1/1 PCI Bus Address 0x00-0x1F 0x00-0x1F 0x00-0x1F 0x00-0x1F 0x20-0x3F 0x20-0x3F 0x20-0x3F 0x20-0x3F 0x20-0x3F 0x20-0x3F 0x20-0x3F 0x20-0x3F 0x80-0x9F 0x80-0x9F 0xA0-0xBF 0xA0-0xBF 0x40-0x7F 0xC0-0xFF 0x00-0x1F 0x00-0x1F OLA Before installing a PCI/PCI-X card, ensure that the proper drivers for that PCI/PCI-X card are installed. NOTE: If you are installing the Graphics Kit A6150B, use slots 3-8. However, do not install the included USB card. The server currently supports USB and the ports are already located on the rear of the server. If you are installing the RAID card A7143A, you must install it into slot 8. If you install this card in any other slot, it interferes with the manual retention latch (MRL) on the OLX divider in the next slot. Because of this interference, you can install only two RAID cards in the system in slot 1 and slot 8. To add a PCI/PCI-X card into an empty slot, follow these steps: 1. If rack-mounted, slide the server out from the rack until it stops. See "Accessing a Rack-Mounted Server" (page 149). 2. Remove the top cover from the chassis. See "Removing the Top Cover" (page 153). Removing and Replacing PCI/PCI-X Cards 185
-
 1
1 -
2
-
3
-
4
-
5
-
6
-
7
-
8
-
9
-
10
-
11
-
12
-
13
-
14
-
15
-
16
-
17
-
18
-
19
-
20
-
21
-
22
-
23
-
24
-
25
-
26
-
27
-
28
-
29
-
30
-
31
-
32
-
33
-
34
-
35
-
36
-
37
-
38
-
39
-
40
-
41
-
42
-
43
-
44
-
45
-
46
-
47
-
48
-
49
-
50
-
51
-
52
-
53
-
54
-
55
-
56
-
57
-
58
-
59
-
60
-
61
-
62
-
63
-
64
-
65
-
66
-
67
-
68
-
69
-
70
-
71
-
72
-
73
-
74
-
75
-
76
-
77
-
78
-
79
-
80
-
81
-
82
-
83
-
84
-
85
-
86
-
87
-
88
-
89
-
90
-
91
-
92
-
93
-
94
-
95
-
96
-
97
-
98
-
99
-
100
-
101
-
102
-
103
-
104
-
105
-
106
-
107
-
108
-
109
-
110
-
111
-
112
-
113
-
114
-
115
-
116
-
117
-
118
-
119
-
120
-
121
-
122
-
123
-
124
-
125
-
126
-
127
-
128
-
129
-
130
-
131
-
132
-
133
-
134
-
135
-
136
-
137
-
138
-
139
-
140
-
141
-
142
-
143
-
144
-
145
-
146
-
147
-
148
-
149
-
150
-
151
-
152
-
153
-
154
-
155
-
156
-
157
-
158
-
159
-
160
-
161
-
162
-
163
-
164
-
165
-
166
-
167
-
168
-
169
-
170
-
171
-
172
-
173
-
174
-
175
-
176
-
177
-
178
-
179
-
 180
180 -
 181
181 -
 182
182 -
 183
183 -
 184
184 -
 185
185 -
 186
186 -
 187
187 -
 188
188 -
 189
189 -
 190
190 -
191
-
192
-
193
-
194
-
195
-
196
-
197
-
198
-
199
-
200
-
201
-
202
-
203
-
204
-
205
-
206
-
207
-
208
-
209
-
210
-
211
-
212
-
213
-
214
-
215
-
216
-
217
-
218
-
219
-
220
-
221
-
222
-
223
-
224
-
225
-
226
-
227
-
228
-
229
-
230
-
231
-
232
-
233
-
234
-
235
-
236
-
237
-
238
-
239
-
240
-
241
-
242
-
243
-
244
-
245
-
246
 |
 |