HP Photosmart D7400 User Guide - Page 23
Set Bluetooth security for the HP Photosmart - reset
 |
View all HP Photosmart D7400 manuals
Add to My Manuals
Save this manual to your list of manuals |
Page 23 highlights
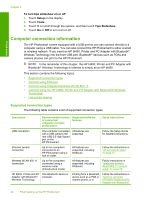
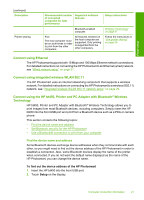
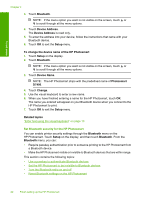
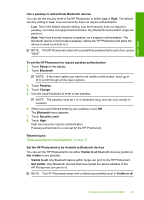
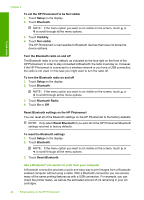
Finish setup Chapter 4 3. Touch Bluetooth. NOTE: If the menu option you want is not visible on the screen, touch or to scroll through all the menu options. 4. Touch Device Address. The Device Address is read only. 5. To enter the address into your device, follow the instructions that came with your Bluetooth device. 6. Touch OK to exit the Setup menu. To change the device name of the HP Photosmart 1. Touch Setup on the display. 2. Touch Bluetooth. NOTE: If the menu option you want is not visible on the screen, touch or to scroll through all the menu options. 3. Touch Device Name. NOTE: The HP Photosmart ships with the predefined name of Photosmart D7400. 4. Touch Change. 5. Use the visual keyboard to enter a new name. 6. When you have finished entering a name for the HP Photosmart, touch OK. The name you entered will appear on your Bluetooth device when you connect to the HP Photosmart to print. 7. Touch OK to exit the Setup menu. Related topics "Enter text using the visual keyboard" on page 13 Set Bluetooth security for the HP Photosmart You can enable printer security settings through the Bluetooth menu on the HP Photosmart. Touch Setup on the display, and then touch Bluetooth. From the Bluetooth menu, you can: • Require passkey authentication prior to someone printing to the HP Photosmart from a Bluetooth device. • Make the HP Photosmart visible or invisible to Bluetooth devices that are within range. This section contains the following topics: • Use a passkey to authenticate Bluetooth devices • Set the HP Photosmart to be invisible to Bluetooth devices • Turn the Bluetooth radio on and off • Reset Bluetooth settings on the HP Photosmart 22 Finish setting up the HP Photosmart
-
 1
1 -
2
-
3
-
4
-
5
-
6
-
7
-
8
-
9
-
10
-
11
-
12
-
13
-
14
-
15
-
16
-
17
-
 18
18 -
 19
19 -
 20
20 -
 21
21 -
 22
22 -
 23
23 -
 24
24 -
 25
25 -
 26
26 -
 27
27 -
 28
28 -
29
-
30
-
31
-
32
-
33
-
34
-
35
-
36
-
37
-
38
-
39
-
40
-
41
-
42
-
43
-
44
-
45
-
46
-
47
-
48
-
49
-
50
-
51
-
52
-
53
-
54
-
55
-
56
-
57
-
58
-
59
-
60
-
61
-
62
-
63
-
64
-
65
-
66
-
67
-
68
-
69
-
70
-
71
-
72
-
73
-
74
-
75
-
76
-
77
-
78
-
79
-
80
-
81
-
82
-
83
-
84
-
85
-
86
-
87
-
88
-
89
-
90
-
91
-
92
-
93
-
94
-
95
-
96
-
97
-
98
-
99
-
100
-
101
-
102
-
103
-
104
-
105
-
106
-
107
-
108
-
109
-
110
-
111
-
112
-
113
-
114
-
115
-
116
-
117
-
118
-
119
-
120
-
121
-
122
-
123
-
124
-
125
-
126
-
127
-
128
-
129
-
130
-
131
-
132
-
133
-
134
-
135
-
136
-
137
-
138
-
139
-
140
-
141
-
142
-
143
-
144
-
145
-
146
-
147
-
148
-
149
-
150
-
151
-
152
-
153
-
154
-
155
-
156
-
157
-
158
-
159
-
160
-
161
-
162
-
163
-
164
-
165
-
166
-
167
-
168
-
169
-
170
-
171
-
172
-
173
-
174
-
175
-
176
-
177
-
178
-
179
-
180
-
181
-
182
-
183
-
184
-
185
-
186
-
187
-
188
-
189
-
190
-
191
 |
 |
