HP Photosmart D7400 User Guide - Page 30
Integrated wireless WLAN 802.11 network setup, Related topics, infrastructure
 |
View all HP Photosmart D7400 manuals
Add to My Manuals
Save this manual to your list of manuals |
Page 30 highlights
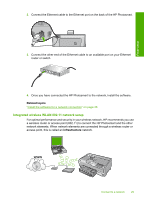
Finish setup 2. Connect the Ethernet cable to the Ethernet port on the back of the HP Photosmart. 3. Connect the other end of the Ethernet cable to an available port on your Ethernet router or switch. 4. Once you have connected the HP Photosmart to the network, install the software. Related topics "Install the software for a network connection" on page 36 Integrated wireless WLAN 802.11 network setup For optimal performance and security in your wireless network, HP recommends you use a wireless router or access point (802.11) to connect the HP Photosmart and the other network elements. When network elements are connected through a wireless router or access point, this is called an infrastructure network. Connect to a network 29
-
 1
1 -
2
-
3
-
4
-
5
-
6
-
7
-
8
-
9
-
10
-
11
-
12
-
13
-
14
-
15
-
16
-
17
-
18
-
19
-
20
-
21
-
22
-
23
-
24
-
 25
25 -
 26
26 -
 27
27 -
 28
28 -
 29
29 -
 30
30 -
 31
31 -
 32
32 -
 33
33 -
 34
34 -
 35
35 -
36
-
37
-
38
-
39
-
40
-
41
-
42
-
43
-
44
-
45
-
46
-
47
-
48
-
49
-
50
-
51
-
52
-
53
-
54
-
55
-
56
-
57
-
58
-
59
-
60
-
61
-
62
-
63
-
64
-
65
-
66
-
67
-
68
-
69
-
70
-
71
-
72
-
73
-
74
-
75
-
76
-
77
-
78
-
79
-
80
-
81
-
82
-
83
-
84
-
85
-
86
-
87
-
88
-
89
-
90
-
91
-
92
-
93
-
94
-
95
-
96
-
97
-
98
-
99
-
100
-
101
-
102
-
103
-
104
-
105
-
106
-
107
-
108
-
109
-
110
-
111
-
112
-
113
-
114
-
115
-
116
-
117
-
118
-
119
-
120
-
121
-
122
-
123
-
124
-
125
-
126
-
127
-
128
-
129
-
130
-
131
-
132
-
133
-
134
-
135
-
136
-
137
-
138
-
139
-
140
-
141
-
142
-
143
-
144
-
145
-
146
-
147
-
148
-
149
-
150
-
151
-
152
-
153
-
154
-
155
-
156
-
157
-
158
-
159
-
160
-
161
-
162
-
163
-
164
-
165
-
166
-
167
-
168
-
169
-
170
-
171
-
172
-
173
-
174
-
175
-
176
-
177
-
178
-
179
-
180
-
181
-
182
-
183
-
184
-
185
-
186
-
187
-
188
-
189
-
190
-
191
 |
 |
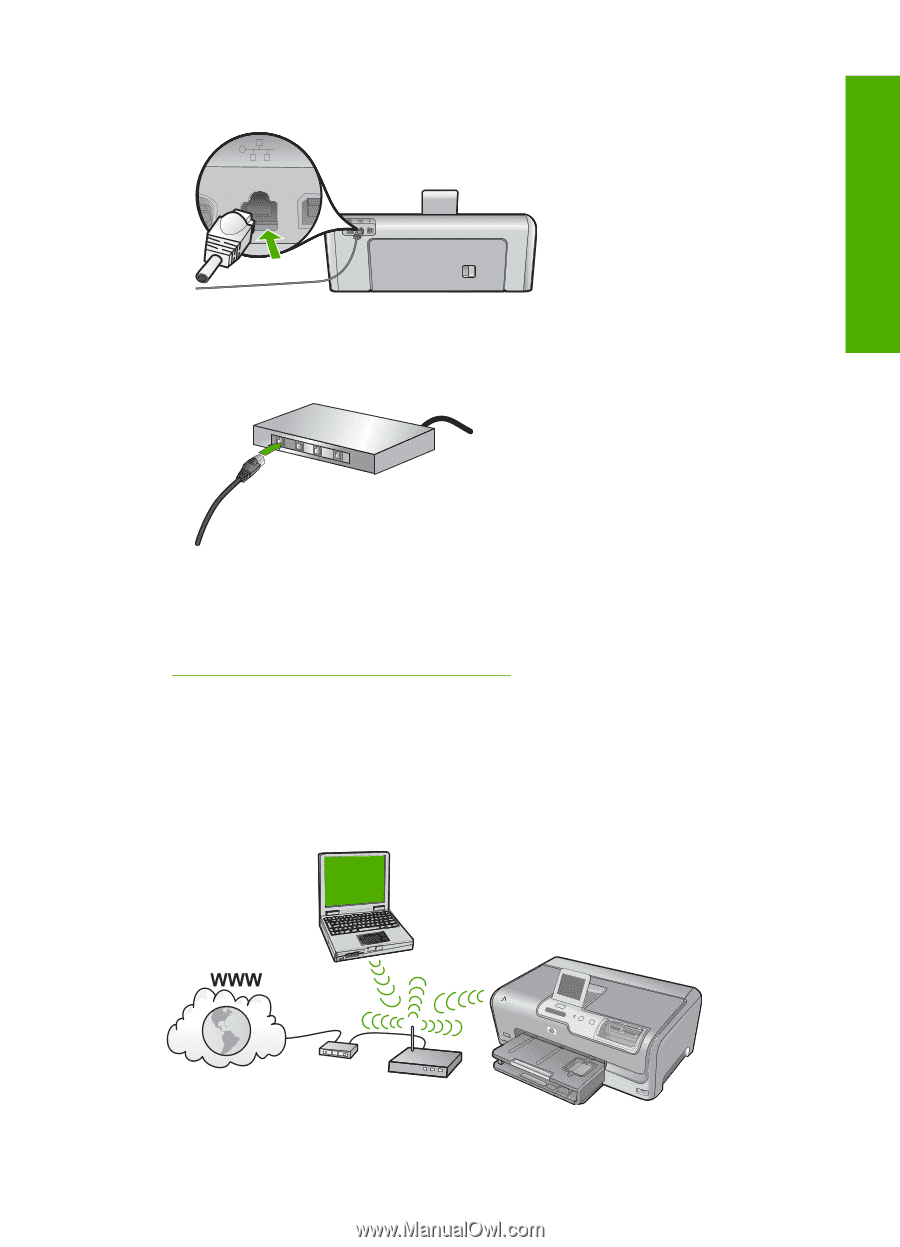
2.
Connect the Ethernet cable to the Ethernet port on the back of the HP Photosmart.
3.
Connect the other end of the Ethernet cable to an available port on your Ethernet
router or switch.
4.
Once you have connected the HP Photosmart to the network, install the software.
Related topics
“
Install the software for a network connection” on page 36
Integrated wireless WLAN 802.11 network setup
For optimal performance and security in your wireless network, HP recommends you use
a wireless router or access point (802.11) to connect the HP Photosmart and the other
network elements. When network elements are connected through a wireless router or
access point, this is called an
infrastructure
network.
Connect to a network
29
Finish setup