Insignia NS-FSDVDR User Manual (English) - Page 35
Recording from an external device, Protecting a DVD, Finalizing a DVD
 |
View all Insignia NS-FSDVDR manuals
Add to My Manuals
Save this manual to your list of manuals |
Page 35 highlights
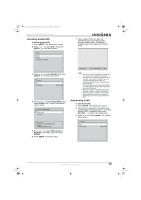
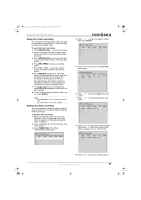
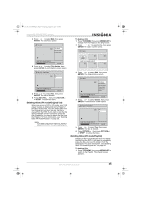
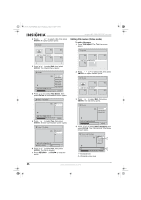
08-1031_NS-FSDVDR.fm Page 33 Wednesday, March 12, 2008 2:53 PM Insignia NS-FSDVDR DVD recorder E31-E32 DVD already contains 99 titles (maximum number) E33 DVD already contains 999 chapters (maximum number) E34 No space on the DVD for control information E35 PCA full E36 DVD formatted in Video mode has already been finalized E40 Some portion has not been recorded because of program overlapping. Recording did not start on time. E41 Power failed E42 No DVD in the tray at the recording time Recording from an external device To record from an external device, you need to select the video source in the Setup menu, then record. To select the video source in the Setup menu: 1 Make sure that the external device, such as a VCR or camcorder, is connected to your recorder. 2 Press SETUP. The Setup menu opens. 3 Press or to select Required Setting, then press ENTER. The Required Setting menu opens. 4 Press or to select Select Video, then press ENTER. The Select Video menu opens. Select Video L1 (Rear) L2 (Front) Video In Video In 6 If the external device is connected to the jacks on the back of your recorder, press 001 on the remote control or press CHANNEL or CHANNEL on the front of your recorder to select L1. Or, if the external device is connected to the jacks on the front of your recorder, press 002 on the remote control or press CHANNEL or CHANNEL on the front of your recorder to select L2. 7 Press REC SPEED to select a recording speed. 8 Press REC/OTR on the front of your recorder. Your recorder starts recording. 9 Start playback on the external device. 10 Press STOP to stop the recording. Protecting a DVD To avoid accidentally recording, editing, or erasing a DVD, you can protect the DVD. Note The DVD protection feature only works with DVDs formatted in VR mode. To protect a DVD: 1 Press SETUP. The Setup menu opens. 2 Press or to select Disc, then press ENTER. The Disc menu opens. 3 Press or to select Disc Protect OFF ON, then press ENTER. The Disc Protect OFF ON screen opens. Disc Protect OFF ON Yes No 5 Press or to select L1 (Rear) or L2 (Front), then press ENTER. The Select Video L1 (Rear) or Select Video L2 (Front) screen opens. 6 Press or to select Video In (if the device is connected to the A/V jacks) or S-Video In (if the device is connected to the S-Video jack), then press ENTER. 7 Press SETUP to close the menu. To record from an external device: 1 Turn on the TV and your recorder. 2 On the TV, select the video source that your recorder is connected to. For a list of common video sources by TV brand, see "TV video input sources" on page 12. 3 Press OPEN/CLOSE to open the disc tray. 4 Insert a formatted DVD with enough space for the recording into the tray with the label facing up. 5 Press OPEN/CLOSE to close the disc tray. Your recorder reads the DVD. This may take a while. 4 Press or to select Yes, then press ENTER. The DVD is protected. Note To remove DVD protection, select No in Step 4. Finalizing a DVD After you have recorded a DVD, you can finalize it so you can play it on another DVD player. Notes • Finalizing a DVD formatted in Video mode may take as long as 15 minutes. Finalizing a DVD formatted in VR mode may take as long as one hour. • The more blank space on a DVD, the long it takes to finalize. • Do not unplug the power cord or turn off your recorder while finalizing a DVD. To finalize a DVD: 1 Press SETUP. The Setup menu opens. 2 Press or to select Disc, then press ENTER. The Disc menu opens. www.insignia-products.com 33
-
 1
1 -
2
-
3
-
4
-
5
-
6
-
7
-
8
-
9
-
10
-
11
-
12
-
13
-
14
-
15
-
16
-
17
-
18
-
19
-
20
-
21
-
22
-
23
-
24
-
25
-
26
-
27
-
28
-
29
-
 30
30 -
 31
31 -
 32
32 -
 33
33 -
 34
34 -
 35
35 -
 36
36 -
 37
37 -
 38
38 -
 39
39 -
 40
40 -
41
-
42
-
43
-
44
-
45
-
46
-
47
-
48
-
49
-
50
-
51
-
52
-
53
-
54
-
55
-
56
-
57
-
58
-
59
-
60
-
61
-
62
-
63
-
64
-
65
-
66
-
67
-
68
-
69
-
70
-
71
-
72
-
73
-
74
-
75
-
76
-
77
-
78
-
79
-
80
-
81
-
82
-
83
-
84
-
85
-
86
-
87
-
88
-
89
-
90
-
91
-
92
-
93
-
94
-
95
-
96
-
97
-
98
-
99
-
100
-
101
-
102
-
103
-
104
-
105
-
106
-
107
-
108
-
109
-
110
-
111
-
112
-
113
-
114
-
115
-
116
 |
 |