Insignia NS-FSDVDR User Manual (English) - Page 7
Others, Accessories, Front
 |
View all Insignia NS-FSDVDR manuals
Add to My Manuals
Save this manual to your list of manuals |
Page 7 highlights
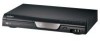
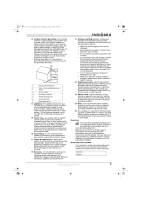
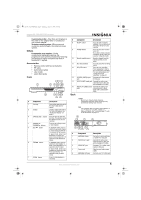
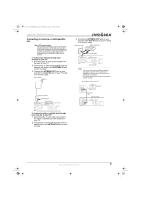
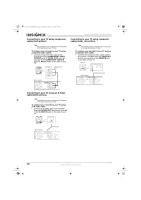
08-1031_NS-FSDVDR.fm Page 5 Wednesday, March 12, 2008 2:53 PM Insignia NS-FSDVDR DVD recorder Custom play order-Play titles and chapters in the order on the original DVD, or create your own custom playlist. Virtual surround system-Enjoy surround sound-like audio through a two-channel stereo system. Others Progressive scan system-Unlike conventional interlaced scanning, the progressive scan system provides less flickering and images in higher resolution than that of traditional TV signals. Accessories • Remote control with two AA batteries • RF cable • Audio/video cables • User Guide • Quick Start guide Front OPEN/CLOSE CHANNEL REV FWD STOP PLAY POWER REC SPEED REC/OTR S-VIDEO VIDEO L AUDIO R # Component Description 1 Disc tray Place a disc (label side up) in this tray to play back or record. 2 Display Displays status information. For more information, see "Front panel display" on page 6. 3 OPEN/CLOSE button Press to open or close the disc tray. You can also press this button to turn on your recorder. 4 CHANNEL / Press to go to the previous CHANNEL buttons or next channel. 5 REV button In playback mode, press to skip to the previous chapter or track. Press and hold for 1.5 seconds to fast reverse. In pause mode, press to go backward one frame at a time. Press and hold for 1.5 seconds to play backward slowly. 6 FWD button In playback mode, press to skip to the next chapter or track. Press and hold for 1.5 seconds to fast forward. In pause mode, press to go forward one frame at a time. Press and hold for 1.5 seconds to play forward slowly. 7 STOP button Press to stop playback or recording. # Component Description 8 PLAY button Press to start or resume playback. You can also press this button to turn on your recorder. 9 POWER button Press to turn your recorder on or off. If you have a timer program scheduled, press to put your recorder in standby mode. 10 Remote control sensor Receives signals from the remote control. Do not block. 11 REC SPEED button Press to select the recording speed. 12 REC/OTR button Press to start recording. Press repeatedly to start a One-Touch Timer recording. For more information, see "Using One-Touch recording" on page 31. 13 S-VIDEO (LINE2) input Connect an S-Video device jack to this jack. 14 VIDEO (LINE2) input jack Connect the video on an external device to this jack with a standard A/V cable. 15 AUDIO L/R (LINE2) input Connect the audio on an jacks external device to these jacks with a standard A/V cable. Back Caution Do not touch the pins inside the jacks. Electrostatic discharge (static electricity) may permanently damage your recorder. Note Your recorder does not have an RF modulator. If your TV does not have A/V, S-Video, or component jacks, see "Connecting your TV with an RF modulator" on page 11. IN OUT VIDEO IN IN L R ANTENNA AUDIO IN (L1) COMPONENT VIDEO OUTPUT S-VIDEO Y OUT PB/CB PR/CR VIDEO OUT DIGITAL AUDIO OUTPUT PCM / BITSTREAM L R AUDIO OUT COAXIAL # Component Description 1 ANTENNA IN jack Connect an outside antenna or cable TV to this jack. 2 VIDEO IN (L1) jack Connect the video on an external device to this jack with a standard A/V cable. 3 VIDEO OUT jack Connect a TV or other video device to this jack. 4 Power cord Plug this cord into a power outlet. 5 ANTENNA OUT jack Connect your TV to this jack. www.insignia-products.com 5
-
 1
1 -
 2
2 -
 3
3 -
 4
4 -
 5
5 -
 6
6 -
 7
7 -
 8
8 -
 9
9 -
 10
10 -
 11
11 -
 12
12 -
13
-
14
-
15
-
16
-
17
-
18
-
19
-
20
-
21
-
22
-
23
-
24
-
25
-
26
-
27
-
28
-
29
-
30
-
31
-
32
-
33
-
34
-
35
-
36
-
37
-
38
-
39
-
40
-
41
-
42
-
43
-
44
-
45
-
46
-
47
-
48
-
49
-
50
-
51
-
52
-
53
-
54
-
55
-
56
-
57
-
58
-
59
-
60
-
61
-
62
-
63
-
64
-
65
-
66
-
67
-
68
-
69
-
70
-
71
-
72
-
73
-
74
-
75
-
76
-
77
-
78
-
79
-
80
-
81
-
82
-
83
-
84
-
85
-
86
-
87
-
88
-
89
-
90
-
91
-
92
-
93
-
94
-
95
-
96
-
97
-
98
-
99
-
100
-
101
-
102
-
103
-
104
-
105
-
106
-
107
-
108
-
109
-
110
-
111
-
112
-
113
-
114
-
115
-
116
 |
 |