Intel SE7525GP2 Product Specification - Page 74
Entering BIOS Setup
 |
View all Intel SE7525GP2 manuals
Add to My Manuals
Save this manual to your list of manuals |
Page 74 highlights
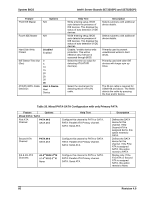
System BIOS Intel® Server Boards SE7320SP2 and SE7525GP2 4.4 Entering BIOS Setup The BIOS Setup utility is accessed by pressing the hot-key during POST. Note: Some BIOS setup options are based on latest BIOS. If your server has an older BIOS, you may see some differences. 4.4.1 Main Menu The first screen displayed when entering the BIOS Setup Utility is the Main Menu selection screen. This screen displays the major menu selections available. The following tables describe the available options on the top level and lower level menus. Default values are in bold text. Table 22. BIOS Setup, Main Menu Options Feature System Overview AMI BIOS Version Options N/A Build Date N/A Processor Type N/A Speed N/A Count N/A System Memory Size N/A Server Board MCH Stepping Stepping N/A Help Text N/A N/A N/A N/A N/A N/A N/A Description BIOS ID string (excluding the build time and date) BIOS build date Processor brand ID string Calculated processor speed Detected number of physical processors Amount of physical memory detected Stepping of the MCH component System Time System Date HH:MM:SS DAY MM/DD/YYYY Use [ENTER], [TAB] or [SHIFTTAB] to select a field. Use [+] or [-] to configure system Time. Use [ENTER], [TAB] or [SHIFTTAB] to select a field. Use [+] or [-] to configure system Date. Configures the system time on a 24 hour clock. Default is 00:00:00 Configures the system date. Default is [Build Date]. Day of the week is automatically calculated. 62 Revision 4.0
-
 1
1 -
2
-
3
-
4
-
5
-
6
-
7
-
8
-
9
-
10
-
11
-
12
-
13
-
14
-
15
-
16
-
17
-
18
-
19
-
20
-
21
-
22
-
23
-
24
-
25
-
26
-
27
-
28
-
29
-
30
-
31
-
32
-
33
-
34
-
35
-
36
-
37
-
38
-
39
-
40
-
41
-
42
-
43
-
44
-
45
-
46
-
47
-
48
-
49
-
50
-
51
-
52
-
53
-
54
-
55
-
56
-
57
-
58
-
59
-
60
-
61
-
62
-
63
-
64
-
65
-
66
-
67
-
68
-
 69
69 -
 70
70 -
 71
71 -
 72
72 -
 73
73 -
 74
74 -
 75
75 -
 76
76 -
 77
77 -
 78
78 -
 79
79 -
80
-
81
-
82
-
83
-
84
-
85
-
86
-
87
-
88
-
89
-
90
-
91
-
92
-
93
-
94
-
95
-
96
-
97
-
98
-
99
-
100
-
101
-
102
-
103
-
104
-
105
-
106
-
107
-
108
-
109
-
110
-
111
-
112
-
113
-
114
-
115
-
116
-
117
-
118
-
119
-
120
-
121
-
122
-
123
-
124
-
125
-
126
-
127
-
128
-
129
-
130
-
131
-
132
-
133
-
134
-
135
-
136
-
137
-
138
-
139
-
140
-
141
-
142
-
143
-
144
-
145
-
146
-
147
-
148
-
149
-
150
-
151
-
152
-
153
-
154
-
155
-
156
-
157
-
158
-
159
-
160
-
161
-
162
-
163
-
164
-
165
-
166
-
167
-
168
-
169
-
170
-
171
-
172
-
173
-
174
-
175
-
176
-
177
-
178
-
179
-
180
-
181
-
182
-
183
-
184
 |
 |