Konica Minolta AccurioPress C2070/2070P IC-314 User Guide - Page 130
Printing a spot color variation, Protecting specific colors, Brightness, Select, Apply, Close
 |
View all Konica Minolta AccurioPress C2070/2070P manuals
Add to My Manuals
Save this manual to your list of manuals |
Page 130 highlights
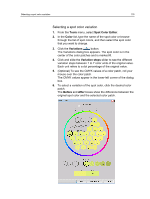
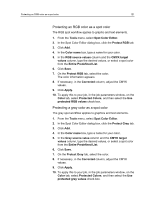
120 Chapter 7-Managing color 7. To select a different brightness setting for the selected color patch, click a color patch under Brightness. The K value of the selected color patch is increased or decreased according to your selection. 8. Click Select. 9. Click Apply. The spot color with the new values is added to the custom dictionary. 10. Click Close. Printing a spot color variation Print a spot color variation chart. Requirements: The printer must be connected. 1. From the Tools menu, select Spot Color Editor. 2. In the Color list, type the name of the spot color or browse to the spot color, and then select the spot color that you want to change. 3. Click the Variations button. The Variations dialog box appears. The spot color is in the center of the color patches and is marked 0. 4. Select the desired color patch. 5. Click Print Variations. 6. Do the following: ○ In the Tray list, select the desired tray. ○ In the Screening list, select the desired screening method. ○ In the Calibration list, select the desired toner coverage. ○ To print the variations without a background, clear the Print with background check box. 7. Click Print. Protecting specific colors Using the Spot Color Editor, you can protect specific colors-for example, official logos or company colors-to help produce color fidelity and color consistency between devices. When you define a specific color as an RGB, CMYK, or gray spot color and enter a fixed CMYK target for it, the IC‑314 print controller version 1.0 treats the selected color as a spot color and protects it.
-
 1
1 -
2
-
3
-
4
-
5
-
6
-
7
-
8
-
9
-
10
-
11
-
12
-
13
-
14
-
15
-
16
-
17
-
18
-
19
-
20
-
21
-
22
-
23
-
24
-
25
-
26
-
27
-
28
-
29
-
30
-
31
-
32
-
33
-
34
-
35
-
36
-
37
-
38
-
39
-
40
-
41
-
42
-
43
-
44
-
45
-
46
-
47
-
48
-
49
-
50
-
51
-
52
-
53
-
54
-
55
-
56
-
57
-
58
-
59
-
60
-
61
-
62
-
63
-
64
-
65
-
66
-
67
-
68
-
69
-
70
-
71
-
72
-
73
-
74
-
75
-
76
-
77
-
78
-
79
-
80
-
81
-
82
-
83
-
84
-
85
-
86
-
87
-
88
-
89
-
90
-
91
-
92
-
93
-
94
-
95
-
96
-
97
-
98
-
99
-
100
-
101
-
102
-
103
-
104
-
105
-
106
-
107
-
108
-
109
-
110
-
111
-
112
-
113
-
114
-
115
-
116
-
117
-
118
-
119
-
120
-
121
-
122
-
123
-
124
-
 125
125 -
 126
126 -
 127
127 -
 128
128 -
 129
129 -
 130
130 -
 131
131 -
 132
132 -
 133
133 -
 134
134 -
 135
135 -
136
-
137
-
138
-
139
-
140
-
141
-
142
-
143
-
144
-
145
-
146
-
147
-
148
-
149
-
150
-
151
-
152
-
153
-
154
-
155
-
156
-
157
-
158
-
159
-
160
-
161
-
162
-
163
-
164
-
165
-
166
-
167
-
168
-
169
-
170
-
171
-
172
-
173
-
174
-
175
-
176
-
177
-
178
-
179
-
180
-
181
-
182
-
183
-
184
-
185
-
186
-
187
-
188
-
189
-
190
-
191
-
192
-
193
-
194
-
195
-
196
-
197
-
198
-
199
-
200
-
201
-
202
-
203
-
204
-
205
-
206
-
207
-
208
-
209
-
210
-
211
-
212
-
213
-
214
-
215
-
216
-
217
-
218
-
219
-
220
-
221
-
222
-
223
-
224
-
225
-
226
-
227
-
228
-
229
-
230
-
231
-
232
-
233
-
234
-
235
-
236
-
237
-
238
-
239
-
240
-
241
-
242
-
243
-
244
-
245
-
246
-
247
-
248
-
249
-
250
-
251
-
252
-
253
-
254
-
255
-
256
-
257
-
258
-
259
-
260
-
261
-
262
-
263
-
264
-
265
-
266
-
267
-
268
-
269
-
270
-
271
-
272
-
273
-
274
-
275
-
276
-
277
-
278
-
279
-
280
-
281
 |
 |
