Konica Minolta AccurioPress C2070/2070P IC-314 User Guide - Page 54
The calibration chart prints using the standard screen and, controller version 1.0 connects to the FD
 |
View all Konica Minolta AccurioPress C2070/2070P manuals
Add to My Manuals
Save this manual to your list of manuals |
Page 54 highlights
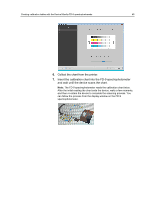
44 Chapter 3-Calibration 1. From the Tools menu, select Calibration or click the Calibration icon on the toolbar. 2. In the Measuring device list, make sure that FD-9 is selected. The following message appears while the IC‑314 print controller version 1.0 connects to the FD‑9. 3. In the Tray list, select the tray from which you want to print. The paper size in the selected tray appears. 4. In the Number of copies box, enter the number of copies that you want to print. 5. Click Print. The calibration chart prints using the standard screen and resolution of 1200 dpi.
-
 1
1 -
2
-
3
-
4
-
5
-
6
-
7
-
8
-
9
-
10
-
11
-
12
-
13
-
14
-
15
-
16
-
17
-
18
-
19
-
20
-
21
-
22
-
23
-
24
-
25
-
26
-
27
-
28
-
29
-
30
-
31
-
32
-
33
-
34
-
35
-
36
-
37
-
38
-
39
-
40
-
41
-
42
-
43
-
44
-
45
-
46
-
47
-
48
-
 49
49 -
 50
50 -
 51
51 -
 52
52 -
 53
53 -
 54
54 -
 55
55 -
 56
56 -
 57
57 -
 58
58 -
 59
59 -
60
-
61
-
62
-
63
-
64
-
65
-
66
-
67
-
68
-
69
-
70
-
71
-
72
-
73
-
74
-
75
-
76
-
77
-
78
-
79
-
80
-
81
-
82
-
83
-
84
-
85
-
86
-
87
-
88
-
89
-
90
-
91
-
92
-
93
-
94
-
95
-
96
-
97
-
98
-
99
-
100
-
101
-
102
-
103
-
104
-
105
-
106
-
107
-
108
-
109
-
110
-
111
-
112
-
113
-
114
-
115
-
116
-
117
-
118
-
119
-
120
-
121
-
122
-
123
-
124
-
125
-
126
-
127
-
128
-
129
-
130
-
131
-
132
-
133
-
134
-
135
-
136
-
137
-
138
-
139
-
140
-
141
-
142
-
143
-
144
-
145
-
146
-
147
-
148
-
149
-
150
-
151
-
152
-
153
-
154
-
155
-
156
-
157
-
158
-
159
-
160
-
161
-
162
-
163
-
164
-
165
-
166
-
167
-
168
-
169
-
170
-
171
-
172
-
173
-
174
-
175
-
176
-
177
-
178
-
179
-
180
-
181
-
182
-
183
-
184
-
185
-
186
-
187
-
188
-
189
-
190
-
191
-
192
-
193
-
194
-
195
-
196
-
197
-
198
-
199
-
200
-
201
-
202
-
203
-
204
-
205
-
206
-
207
-
208
-
209
-
210
-
211
-
212
-
213
-
214
-
215
-
216
-
217
-
218
-
219
-
220
-
221
-
222
-
223
-
224
-
225
-
226
-
227
-
228
-
229
-
230
-
231
-
232
-
233
-
234
-
235
-
236
-
237
-
238
-
239
-
240
-
241
-
242
-
243
-
244
-
245
-
246
-
247
-
248
-
249
-
250
-
251
-
252
-
253
-
254
-
255
-
256
-
257
-
258
-
259
-
260
-
261
-
262
-
263
-
264
-
265
-
266
-
267
-
268
-
269
-
270
-
271
-
272
-
273
-
274
-
275
-
276
-
277
-
278
-
279
-
280
-
281
 |
 |

1.
From the
Tools
menu, select
Calibration
or click the
Calibration
icon
on the toolbar.
2.
In the
Measuring device
list, make sure that
FD-9
is selected.
The following message appears while the IC
‑
314 print
controller version 1.0 connects to the FD
‑
9.
3.
In the
Tray
list, select the tray from which you want to print.
The paper size in the selected tray appears.
4.
In the
Number of copies
box, enter the number of copies that
you want to print.
5.
Click
Print
.
The calibration chart prints using the standard screen and
resolution of 1200 dpi.
44
Chapter 3—Calibration