Konica Minolta AccurioPress C2070/2070P IC-314 User Guide - Page 144
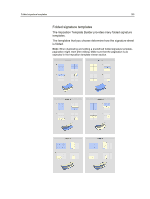
Pg. Booklet Type7, Signature Marks
 |
View all Konica Minolta AccurioPress C2070/2070P manuals
Add to My Manuals
Save this manual to your list of manuals |
Page 144 highlights
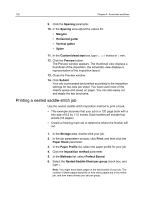
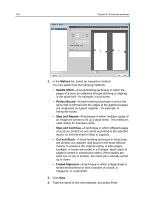
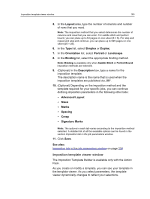
134 Chapter 8-Production workflows 1. In the Storage area, double-click your job. 2. In the job parameters window, click the Print tab, and then click the Paper Stock parameter. 3. In the Paper Stock list, select the paper profile for your job. 4. Click the Imposition tab, and then click the Imposition method parameter. 5. In the Methods list, select Folded Signature. 6. Click the Templates parameter. 7. In the Layout list, select 16 Pg. Booklet Type7. 8. Click Preview. 9. Click Thumbnail view, and verify that there are no imposition conflicts. 10. Click Close. 11. Click the Marks parameter. 12. In the Marks list, select Crop & fold marks and select the Both sides check box. 13. In the Marks color list, select a color for the marks that will be placed on the printed sheets. Note: If you want to place marks on a job that has a dark bleed, select white or gray for the marks color. 14. Select the Print hairline where sheet folds check box. 15. Click the Signature Marks parameter. 16. In the Mode list, select Auto. Note: Signature marks print marks along the spine of the book, and help to assemble printed signatures for binding in the correct order. 17. Click the Finishing tab, and then click the Marks and barcodes parameter. 18. Click Add. 19. In the Mark Set column, select the mark set you created in the Resource Center. 20. To print the finishing marks on every sheet, in the Selection Type column, select All. 21. Suspend the Print Queue , and then click Submit to process your imposed job. 22. In the Storage area, right-click your job, and select Job Preview.
-
 1
1 -
2
-
3
-
4
-
5
-
6
-
7
-
8
-
9
-
10
-
11
-
12
-
13
-
14
-
15
-
16
-
17
-
18
-
19
-
20
-
21
-
22
-
23
-
24
-
25
-
26
-
27
-
28
-
29
-
30
-
31
-
32
-
33
-
34
-
35
-
36
-
37
-
38
-
39
-
40
-
41
-
42
-
43
-
44
-
45
-
46
-
47
-
48
-
49
-
50
-
51
-
52
-
53
-
54
-
55
-
56
-
57
-
58
-
59
-
60
-
61
-
62
-
63
-
64
-
65
-
66
-
67
-
68
-
69
-
70
-
71
-
72
-
73
-
74
-
75
-
76
-
77
-
78
-
79
-
80
-
81
-
82
-
83
-
84
-
85
-
86
-
87
-
88
-
89
-
90
-
91
-
92
-
93
-
94
-
95
-
96
-
97
-
98
-
99
-
100
-
101
-
102
-
103
-
104
-
105
-
106
-
107
-
108
-
109
-
110
-
111
-
112
-
113
-
114
-
115
-
116
-
117
-
118
-
119
-
120
-
121
-
122
-
123
-
124
-
125
-
126
-
127
-
128
-
129
-
130
-
131
-
132
-
133
-
134
-
135
-
136
-
137
-
138
-
 139
139 -
 140
140 -
 141
141 -
 142
142 -
 143
143 -
 144
144 -
 145
145 -
 146
146 -
 147
147 -
 148
148 -
 149
149 -
150
-
151
-
152
-
153
-
154
-
155
-
156
-
157
-
158
-
159
-
160
-
161
-
162
-
163
-
164
-
165
-
166
-
167
-
168
-
169
-
170
-
171
-
172
-
173
-
174
-
175
-
176
-
177
-
178
-
179
-
180
-
181
-
182
-
183
-
184
-
185
-
186
-
187
-
188
-
189
-
190
-
191
-
192
-
193
-
194
-
195
-
196
-
197
-
198
-
199
-
200
-
201
-
202
-
203
-
204
-
205
-
206
-
207
-
208
-
209
-
210
-
211
-
212
-
213
-
214
-
215
-
216
-
217
-
218
-
219
-
220
-
221
-
222
-
223
-
224
-
225
-
226
-
227
-
228
-
229
-
230
-
231
-
232
-
233
-
234
-
235
-
236
-
237
-
238
-
239
-
240
-
241
-
242
-
243
-
244
-
245
-
246
-
247
-
248
-
249
-
250
-
251
-
252
-
253
-
254
-
255
-
256
-
257
-
258
-
259
-
260
-
261
-
262
-
263
-
264
-
265
-
266
-
267
-
268
-
269
-
270
-
271
-
272
-
273
-
274
-
275
-
276
-
277
-
278
-
279
-
280
-
281
 |
 |