Konica Minolta AccurioPress C2070/2070P IC-314 User Guide - Page 169
Generating a corner mark and bar code, Near-line finisher
 |
View all Konica Minolta AccurioPress C2070/2070P manuals
Add to My Manuals
Save this manual to your list of manuals |
Page 169 highlights
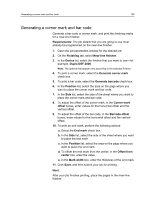
Generating a corner mark and bar code 159 Generating a corner mark and bar code Generate a bar code or corner mark, and print the finishing marks for a near-line finisher. Requirements: The job details that you are going to use must already be programmed on the near-line finisher. 1. Open the job parameters window for the desired job. 2. On the Finishing tab, select Near-line finisher. 3. In the Device list, select the finisher that you want to use-for example, Duplo DSF-2000. Note: The options that appear vary according to the selected finisher. 4. To print a corner mark, select the Generate corner mark check box. 5. To print a bar code, select the Generate barcode check box. 6. In the Position list, select the area on the page where you want to place the corner mark and bar code. 7. In the Side list, select the side of the sheet where you want to place the corner mark and bar code. 8. To adjust the offset of the corner mark, in the Corner mark offset boxes, enter values for the horizontal offset and the vertical offset. 9. To adjust the offset of the bar code, in the Barcode offset boxes, enter values for the horizontal offset and the vertical offset. 10. To print an end mark, perform the following actions: a. Select the End mark check box. b. In the Side list, select the side of the sheet where you want to place the end mark. c. In the Position list, select the area on the page where you want to place the end mark. d. To offset the end mark from the center, in the Offset from center box, enter the value. e. In the Mark width box, enter the thickness of the end mark. 11. Click Save, and then submit your job for printing. Next: After your job finishes printing, place the pages in the near-line finisher.
-
 1
1 -
2
-
3
-
4
-
5
-
6
-
7
-
8
-
9
-
10
-
11
-
12
-
13
-
14
-
15
-
16
-
17
-
18
-
19
-
20
-
21
-
22
-
23
-
24
-
25
-
26
-
27
-
28
-
29
-
30
-
31
-
32
-
33
-
34
-
35
-
36
-
37
-
38
-
39
-
40
-
41
-
42
-
43
-
44
-
45
-
46
-
47
-
48
-
49
-
50
-
51
-
52
-
53
-
54
-
55
-
56
-
57
-
58
-
59
-
60
-
61
-
62
-
63
-
64
-
65
-
66
-
67
-
68
-
69
-
70
-
71
-
72
-
73
-
74
-
75
-
76
-
77
-
78
-
79
-
80
-
81
-
82
-
83
-
84
-
85
-
86
-
87
-
88
-
89
-
90
-
91
-
92
-
93
-
94
-
95
-
96
-
97
-
98
-
99
-
100
-
101
-
102
-
103
-
104
-
105
-
106
-
107
-
108
-
109
-
110
-
111
-
112
-
113
-
114
-
115
-
116
-
117
-
118
-
119
-
120
-
121
-
122
-
123
-
124
-
125
-
126
-
127
-
128
-
129
-
130
-
131
-
132
-
133
-
134
-
135
-
136
-
137
-
138
-
139
-
140
-
141
-
142
-
143
-
144
-
145
-
146
-
147
-
148
-
149
-
150
-
151
-
152
-
153
-
154
-
155
-
156
-
157
-
158
-
159
-
160
-
161
-
162
-
163
-
 164
164 -
 165
165 -
 166
166 -
 167
167 -
 168
168 -
 169
169 -
 170
170 -
 171
171 -
 172
172 -
 173
173 -
 174
174 -
175
-
176
-
177
-
178
-
179
-
180
-
181
-
182
-
183
-
184
-
185
-
186
-
187
-
188
-
189
-
190
-
191
-
192
-
193
-
194
-
195
-
196
-
197
-
198
-
199
-
200
-
201
-
202
-
203
-
204
-
205
-
206
-
207
-
208
-
209
-
210
-
211
-
212
-
213
-
214
-
215
-
216
-
217
-
218
-
219
-
220
-
221
-
222
-
223
-
224
-
225
-
226
-
227
-
228
-
229
-
230
-
231
-
232
-
233
-
234
-
235
-
236
-
237
-
238
-
239
-
240
-
241
-
242
-
243
-
244
-
245
-
246
-
247
-
248
-
249
-
250
-
251
-
252
-
253
-
254
-
255
-
256
-
257
-
258
-
259
-
260
-
261
-
262
-
263
-
264
-
265
-
266
-
267
-
268
-
269
-
270
-
271
-
272
-
273
-
274
-
275
-
276
-
277
-
278
-
279
-
280
-
281
 |
 |
