Lenovo ThinkPad i Series 1157 ThinkPad 570 User's Reference - Page 44
Network, Enter, Click, then press, Select the first device you want for the startup, sequence., Press
 |
View all Lenovo ThinkPad i Series 1157 manuals
Add to My Manuals
Save this manual to your list of manuals |
Page 44 highlights
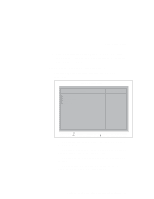
BIOS Setup Utility To change the startup sequence, do the following: 1 Click Boot or Network; then press Enter. - The "Boot" submenu sets the startup sequence when the power switch is set to ON. - The "Network" submenu sets the startup sequence when Wake on LAN is started. Wake on LAN is typically used by LAN administrators in corporate networks to access your computer remotely. For information on these options "The "Boot" submenu" on page 29 and "The "Network" submenu" on page 30. 2 Select the first device you want for the startup sequence. Use these keys to set the startup order that the BIOS will use to attempt to start an operating system: - Enter expands or collapses devices with a + or -. - Ctrl+Enter expands all. - Shift+1 enables or disables a device. You can recognize that the device is disabled by the ! mark ahead of the device name. - + or - moves the device up or down in order. 3 Press F10 to save the changes and restart the system. 28 IBM ThinkPad 570 User's Reference
-
 1
1 -
2
-
3
-
4
-
5
-
6
-
7
-
8
-
9
-
10
-
11
-
12
-
13
-
14
-
15
-
16
-
17
-
18
-
19
-
20
-
21
-
22
-
23
-
24
-
25
-
26
-
27
-
28
-
29
-
30
-
31
-
32
-
33
-
34
-
35
-
36
-
37
-
38
-
 39
39 -
 40
40 -
 41
41 -
 42
42 -
 43
43 -
 44
44 -
 45
45 -
 46
46 -
 47
47 -
 48
48 -
 49
49 -
50
-
51
-
52
-
53
-
54
-
55
-
56
-
57
-
58
-
59
-
60
-
61
-
62
-
63
-
64
-
65
-
66
-
67
-
68
-
69
-
70
-
71
-
72
-
73
-
74
-
75
-
76
-
77
-
78
-
79
-
80
-
81
-
82
-
83
-
84
-
85
-
86
-
87
-
88
-
89
-
90
-
91
-
92
-
93
-
94
-
95
-
96
-
97
-
98
-
99
-
100
-
101
-
102
-
103
-
104
-
105
-
106
-
107
-
108
-
109
-
110
-
111
-
112
-
113
-
114
-
115
-
116
-
117
-
118
-
119
-
120
-
121
-
122
-
123
-
124
-
125
-
126
-
127
-
128
-
129
-
130
-
131
-
132
-
133
-
134
-
135
-
136
-
137
-
138
-
139
-
140
-
141
-
142
-
143
-
144
-
145
-
146
-
147
-
148
-
149
-
150
-
151
-
152
-
153
-
154
-
155
-
156
-
157
-
158
-
159
-
160
-
161
-
162
-
163
-
164
-
165
-
166
-
167
-
168
-
169
-
170
-
171
-
172
-
173
-
174
-
175
-
176
-
177
-
178
-
179
-
180
-
181
-
182
-
183
-
184
-
185
-
186
-
187
-
188
-
189
-
190
-
191
-
192
-
193
-
194
-
195
-
196
-
197
-
198
-
199
-
200
-
201
-
202
-
203
-
204
-
205
-
206
-
207
-
208
-
209
-
210
-
211
-
212
-
213
-
214
-
215
-
216
-
217
-
218
-
219
-
220
-
221
-
222
-
223
-
224
-
225
-
226
-
227
-
228
-
229
-
230
-
231
-
232
-
233
 |
 |