Netgear SRX5308 SRX5308 Reference Manual - Page 213
Configuring the Client IP Address Range, SSL VPN, SSL VPN Client
 |
UPC - 606449065145
View all Netgear SRX5308 manuals
Add to My Manuals
Save this manual to your list of manuals |
Page 213 highlights
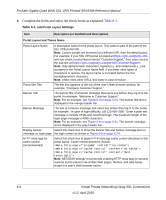
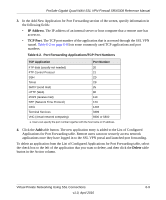
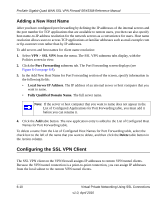
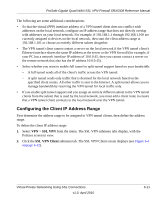
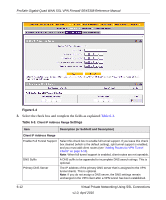
ProSafe Gigabit Quad WAN SSL VPN Firewall SRX5308 Reference Manual The following are some additional considerations: • So that the virtual (PPP) interface address of a VPN tunnel client does not conflict with addresses on the local network, configure an IP address range that does not directly overlap with addresses on your local network. For example, if 192.168.1.1 through 192.168.1.100 are currently assigned to devices on the local network, then start the client address range at 192.168.1.101 or choose an entirely different subnet altogether. • The VPN tunnel client cannot contact a server on the local network if the VPN tunnel client's Ethernet interface shares the same IP address as the server or the VPN firewall (for example, if your PC has a network interface IP address of 10.0.0.45, then you cannot contact a server on the remote network that also has the IP address 10.0.0.45). • Select whether you want to enable full tunnel or split tunnel support based on your bandwidth: - A full tunnel sends all of the client's traffic across the VPN tunnel. - A split tunnel sends only traffic that is destined for the local network based on the specified client routes. All other traffic is sent to the Internet. A split tunnel allows you to manage bandwidth by reserving the VPN tunnel for local traffic only. • If you enable split tunnel support and you assign an entirely different subnet to the VPN tunnel clients from the subnet that is used by the local network, you must add a client route to ensure that a VPN tunnel client connects to the local network over the VPN tunnel. Configuring the Client IP Address Range First determine the address range to be assigned to VPN tunnel clients, then define the address range. To define the client IP address range: 1. Select VPN > SSL VPN from the menu. The SSL VPN submenu tabs display, with the Policies screen in view. 2. Click the SSL VPN Client submenu tab. The SSL VPN Client screen displays (see Figure 6-4 on page 6-12). Virtual Private Networking Using SSL Connections v1.0, April 2010 6-11
-
 1
1 -
2
-
3
-
4
-
5
-
6
-
7
-
8
-
9
-
10
-
11
-
12
-
13
-
14
-
15
-
16
-
17
-
18
-
19
-
20
-
21
-
22
-
23
-
24
-
25
-
26
-
27
-
28
-
29
-
30
-
31
-
32
-
33
-
34
-
35
-
36
-
37
-
38
-
39
-
40
-
41
-
42
-
43
-
44
-
45
-
46
-
47
-
48
-
49
-
50
-
51
-
52
-
53
-
54
-
55
-
56
-
57
-
58
-
59
-
60
-
61
-
62
-
63
-
64
-
65
-
66
-
67
-
68
-
69
-
70
-
71
-
72
-
73
-
74
-
75
-
76
-
77
-
78
-
79
-
80
-
81
-
82
-
83
-
84
-
85
-
86
-
87
-
88
-
89
-
90
-
91
-
92
-
93
-
94
-
95
-
96
-
97
-
98
-
99
-
100
-
101
-
102
-
103
-
104
-
105
-
106
-
107
-
108
-
109
-
110
-
111
-
112
-
113
-
114
-
115
-
116
-
117
-
118
-
119
-
120
-
121
-
122
-
123
-
124
-
125
-
126
-
127
-
128
-
129
-
130
-
131
-
132
-
133
-
134
-
135
-
136
-
137
-
138
-
139
-
140
-
141
-
142
-
143
-
144
-
145
-
146
-
147
-
148
-
149
-
150
-
151
-
152
-
153
-
154
-
155
-
156
-
157
-
158
-
159
-
160
-
161
-
162
-
163
-
164
-
165
-
166
-
167
-
168
-
169
-
170
-
171
-
172
-
173
-
174
-
175
-
176
-
177
-
178
-
179
-
180
-
181
-
182
-
183
-
184
-
185
-
186
-
187
-
188
-
189
-
190
-
191
-
192
-
193
-
194
-
195
-
196
-
197
-
198
-
199
-
200
-
201
-
202
-
203
-
204
-
205
-
206
-
207
-
 208
208 -
 209
209 -
 210
210 -
 211
211 -
 212
212 -
 213
213 -
 214
214 -
 215
215 -
 216
216 -
 217
217 -
 218
218 -
219
-
220
-
221
-
222
-
223
-
224
-
225
-
226
-
227
-
228
-
229
-
230
-
231
-
232
-
233
-
234
-
235
-
236
-
237
-
238
-
239
-
240
-
241
-
242
-
243
-
244
-
245
-
246
-
247
-
248
-
249
-
250
-
251
-
252
-
253
-
254
-
255
-
256
-
257
-
258
-
259
-
260
-
261
-
262
-
263
-
264
-
265
-
266
-
267
-
268
-
269
-
270
-
271
-
272
-
273
-
274
-
275
-
276
-
277
-
278
-
279
-
280
-
281
-
282
-
283
-
284
-
285
-
286
-
287
-
288
-
289
-
290
-
291
-
292
-
293
-
294
-
295
-
296
-
297
-
298
-
299
-
300
-
301
-
302
-
303
-
304
-
305
-
306
-
307
-
308
-
309
-
310
-
311
-
312
-
313
-
314
-
315
-
316
-
317
-
318
-
319
-
320
-
321
-
322
-
323
-
324
-
325
-
326
-
327
-
328
-
329
-
330
-
331
-
332
-
333
-
334
-
335
-
336
-
337
-
338
-
339
-
340
-
341
-
342
-
343
-
344
-
345
-
346
-
347
-
348
-
349
-
350
-
351
-
352
-
353
-
354
-
355
-
356
-
357
-
358
-
359
-
360
-
361
-
362
-
363
-
364
-
365
-
366
-
367
-
368
-
369
-
370
-
371
-
372
-
373
-
374
-
375
-
376
-
377
-
378
-
379
-
380
-
381
-
382
-
383
-
384
 |
 |
