Netgear SRX5308 SRX5308 Reference Manual - Page 41
Configuring Classical Routing, Network Configuration, WAN Settings, WAN Mode, Apply, Classical Routing - multiple wan ip
 |
UPC - 606449065145
View all Netgear SRX5308 manuals
Add to My Manuals
Save this manual to your list of manuals |
Page 41 highlights
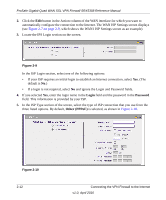
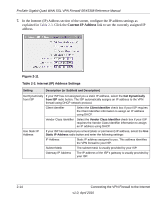
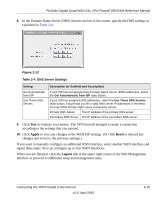
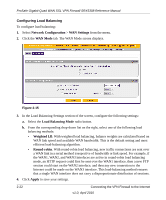
ProSafe Gigabit Quad WAN SSL VPN Firewall SRX5308 Reference Manual Note the following about NAT: • The VPN firewall uses NAT to select the correct PC (on your LAN) to receive any incoming data. • If you have only a single public Internet IP address, you must use NAT (the default setting). • If your ISP has provided you with multiple public IP addresses, you can use one address as the primary shared address for Internet access by your PCs, and you can map incoming traffic on the other public IP addresses to specific PCs on your LAN. This one-to-one inbound mapping is configured using an inbound firewall rule. To configure NAT: 1. Select Network Configuration > WAN Settings from the menu. 2. Click the WAN Mode tab. The WAN Mode screen displays (see Figure 2-13 on page 2-19). 3. In the NAT (Network Address Translation) section of the screen select the NAT radio button. 4. Click Apply to save your settings. Configuring Classical Routing In classical routing mode, the VPN firewall performs routing, but without NAT. To gain Internet access, each PC on your LAN must have a valid static Internet IP address. If your ISP has allocated a number of static IP addresses to you, and you have assigned one of these addresses to each PC, you can choose classical routing. Or, you can use classical routing for routing private IP addresses within a campus environment. To learn the status of the WAN ports, you can view the Router Status screen (see "Viewing the System (Router) Status and Statistics" on page 9-10). To configure classical routing: 1. Select Network Configuration > WAN Settings from the menu. 2. Click the WAN Mode tab. The WAN Mode screen displays (see Figure 2-13 on page 2-19). 3. In the NAT (Network Address Translation) section of the screen select the Classical Routing radio button. 4. Click Apply to save your settings. Connecting the VPN Firewall to the Internet v1.0, April 2010 2-17
-
 1
1 -
2
-
3
-
4
-
5
-
6
-
7
-
8
-
9
-
10
-
11
-
12
-
13
-
14
-
15
-
16
-
17
-
18
-
19
-
20
-
21
-
22
-
23
-
24
-
25
-
26
-
27
-
28
-
29
-
30
-
31
-
32
-
33
-
34
-
35
-
 36
36 -
 37
37 -
 38
38 -
 39
39 -
 40
40 -
 41
41 -
 42
42 -
 43
43 -
 44
44 -
 45
45 -
 46
46 -
47
-
48
-
49
-
50
-
51
-
52
-
53
-
54
-
55
-
56
-
57
-
58
-
59
-
60
-
61
-
62
-
63
-
64
-
65
-
66
-
67
-
68
-
69
-
70
-
71
-
72
-
73
-
74
-
75
-
76
-
77
-
78
-
79
-
80
-
81
-
82
-
83
-
84
-
85
-
86
-
87
-
88
-
89
-
90
-
91
-
92
-
93
-
94
-
95
-
96
-
97
-
98
-
99
-
100
-
101
-
102
-
103
-
104
-
105
-
106
-
107
-
108
-
109
-
110
-
111
-
112
-
113
-
114
-
115
-
116
-
117
-
118
-
119
-
120
-
121
-
122
-
123
-
124
-
125
-
126
-
127
-
128
-
129
-
130
-
131
-
132
-
133
-
134
-
135
-
136
-
137
-
138
-
139
-
140
-
141
-
142
-
143
-
144
-
145
-
146
-
147
-
148
-
149
-
150
-
151
-
152
-
153
-
154
-
155
-
156
-
157
-
158
-
159
-
160
-
161
-
162
-
163
-
164
-
165
-
166
-
167
-
168
-
169
-
170
-
171
-
172
-
173
-
174
-
175
-
176
-
177
-
178
-
179
-
180
-
181
-
182
-
183
-
184
-
185
-
186
-
187
-
188
-
189
-
190
-
191
-
192
-
193
-
194
-
195
-
196
-
197
-
198
-
199
-
200
-
201
-
202
-
203
-
204
-
205
-
206
-
207
-
208
-
209
-
210
-
211
-
212
-
213
-
214
-
215
-
216
-
217
-
218
-
219
-
220
-
221
-
222
-
223
-
224
-
225
-
226
-
227
-
228
-
229
-
230
-
231
-
232
-
233
-
234
-
235
-
236
-
237
-
238
-
239
-
240
-
241
-
242
-
243
-
244
-
245
-
246
-
247
-
248
-
249
-
250
-
251
-
252
-
253
-
254
-
255
-
256
-
257
-
258
-
259
-
260
-
261
-
262
-
263
-
264
-
265
-
266
-
267
-
268
-
269
-
270
-
271
-
272
-
273
-
274
-
275
-
276
-
277
-
278
-
279
-
280
-
281
-
282
-
283
-
284
-
285
-
286
-
287
-
288
-
289
-
290
-
291
-
292
-
293
-
294
-
295
-
296
-
297
-
298
-
299
-
300
-
301
-
302
-
303
-
304
-
305
-
306
-
307
-
308
-
309
-
310
-
311
-
312
-
313
-
314
-
315
-
316
-
317
-
318
-
319
-
320
-
321
-
322
-
323
-
324
-
325
-
326
-
327
-
328
-
329
-
330
-
331
-
332
-
333
-
334
-
335
-
336
-
337
-
338
-
339
-
340
-
341
-
342
-
343
-
344
-
345
-
346
-
347
-
348
-
349
-
350
-
351
-
352
-
353
-
354
-
355
-
356
-
357
-
358
-
359
-
360
-
361
-
362
-
363
-
364
-
365
-
366
-
367
-
368
-
369
-
370
-
371
-
372
-
373
-
374
-
375
-
376
-
377
-
378
-
379
-
380
-
381
-
382
-
383
-
384
 |
 |
