Netgear SRX5308 SRX5308 Reference Manual - Page 266
IP_address>, FullyQualifiedDomainName>, Table 8-1. Remote Management Settings
 |
UPC - 606449065145
View all Netgear SRX5308 manuals
Add to My Manuals
Save this manual to your list of manuals |
Page 266 highlights
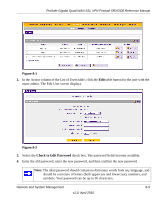
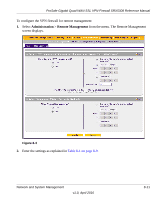
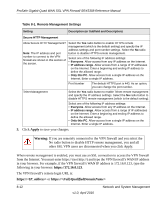
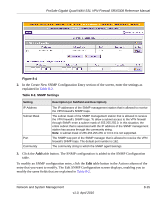
ProSafe Gigabit Quad WAN SSL VPN Firewall SRX5308 Reference Manual Table 8-1. Remote Management Settings Setting Description (or Subfield and Description) Secure HTTP Management Allow Secure HTTP Management? Note: The IP address and port number to connect to the VPN firewall are shown in this section of the screen. Select the Yes radio button to enable HTTPS remote management (which is the default setting) and specify the IP address settings and port number settings. Select the No radio button to disable HTTPS remote management. Select one of the following IP address settings: • Everyone. Allow access from any IP address on the Internet. • IP address range. Allow access from a range of IP addresses on the Internet. Enter a beginning and ending IP address to define the allowed range. • Only this PC. Allow access from a single IP address on the Internet. Enter a single IP address. Port Number The default HTTPS port is 443. As an option, you can change the port number. Telnet Management Select the Yes radio button to enable Telnet remote management and specify the IP address settings. Select the No radio button to disable HTTPS remote management (which is the default setting). Select one of the following IP address settings: • Everyone. Allow access from any IP address on the Internet. • IP address range. Allow access from a range of IP addresses on the Internet. Enter a beginning and ending IP address to define the allowed range. • Only this PC. Allow access from a single IP address on the Internet. Enter a single IP address. 3. Click Apply to save your changes. Warning: If you are remotely connected to the VPN firewall and you select the No radio button to disable HTTP remote management, you and all other SSL VPN users are disconnected when you click Apply. When remote management is enabled, you must use an SSL connection to access the VPN firewall from the Internet. You must enter https:// (not http://) and type the VPN firewall's WAN IP address in your browser. For example, if the VPN firewall's WAN IP address is 172.16.0.123, type the following in your browser: https://172.16.0.123. The VPN firewall's remote login URL is: https:// or https:// 8-12 v1.0, April 2010 Network and System Management
-
 1
1 -
2
-
3
-
4
-
5
-
6
-
7
-
8
-
9
-
10
-
11
-
12
-
13
-
14
-
15
-
16
-
17
-
18
-
19
-
20
-
21
-
22
-
23
-
24
-
25
-
26
-
27
-
28
-
29
-
30
-
31
-
32
-
33
-
34
-
35
-
36
-
37
-
38
-
39
-
40
-
41
-
42
-
43
-
44
-
45
-
46
-
47
-
48
-
49
-
50
-
51
-
52
-
53
-
54
-
55
-
56
-
57
-
58
-
59
-
60
-
61
-
62
-
63
-
64
-
65
-
66
-
67
-
68
-
69
-
70
-
71
-
72
-
73
-
74
-
75
-
76
-
77
-
78
-
79
-
80
-
81
-
82
-
83
-
84
-
85
-
86
-
87
-
88
-
89
-
90
-
91
-
92
-
93
-
94
-
95
-
96
-
97
-
98
-
99
-
100
-
101
-
102
-
103
-
104
-
105
-
106
-
107
-
108
-
109
-
110
-
111
-
112
-
113
-
114
-
115
-
116
-
117
-
118
-
119
-
120
-
121
-
122
-
123
-
124
-
125
-
126
-
127
-
128
-
129
-
130
-
131
-
132
-
133
-
134
-
135
-
136
-
137
-
138
-
139
-
140
-
141
-
142
-
143
-
144
-
145
-
146
-
147
-
148
-
149
-
150
-
151
-
152
-
153
-
154
-
155
-
156
-
157
-
158
-
159
-
160
-
161
-
162
-
163
-
164
-
165
-
166
-
167
-
168
-
169
-
170
-
171
-
172
-
173
-
174
-
175
-
176
-
177
-
178
-
179
-
180
-
181
-
182
-
183
-
184
-
185
-
186
-
187
-
188
-
189
-
190
-
191
-
192
-
193
-
194
-
195
-
196
-
197
-
198
-
199
-
200
-
201
-
202
-
203
-
204
-
205
-
206
-
207
-
208
-
209
-
210
-
211
-
212
-
213
-
214
-
215
-
216
-
217
-
218
-
219
-
220
-
221
-
222
-
223
-
224
-
225
-
226
-
227
-
228
-
229
-
230
-
231
-
232
-
233
-
234
-
235
-
236
-
237
-
238
-
239
-
240
-
241
-
242
-
243
-
244
-
245
-
246
-
247
-
248
-
249
-
250
-
251
-
252
-
253
-
254
-
255
-
256
-
257
-
258
-
259
-
260
-
 261
261 -
 262
262 -
 263
263 -
 264
264 -
 265
265 -
 266
266 -
 267
267 -
 268
268 -
 269
269 -
 270
270 -
 271
271 -
272
-
273
-
274
-
275
-
276
-
277
-
278
-
279
-
280
-
281
-
282
-
283
-
284
-
285
-
286
-
287
-
288
-
289
-
290
-
291
-
292
-
293
-
294
-
295
-
296
-
297
-
298
-
299
-
300
-
301
-
302
-
303
-
304
-
305
-
306
-
307
-
308
-
309
-
310
-
311
-
312
-
313
-
314
-
315
-
316
-
317
-
318
-
319
-
320
-
321
-
322
-
323
-
324
-
325
-
326
-
327
-
328
-
329
-
330
-
331
-
332
-
333
-
334
-
335
-
336
-
337
-
338
-
339
-
340
-
341
-
342
-
343
-
344
-
345
-
346
-
347
-
348
-
349
-
350
-
351
-
352
-
353
-
354
-
355
-
356
-
357
-
358
-
359
-
360
-
361
-
362
-
363
-
364
-
365
-
366
-
367
-
368
-
369
-
370
-
371
-
372
-
373
-
374
-
375
-
376
-
377
-
378
-
379
-
380
-
381
-
382
-
383
-
384
 |
 |
