Netgear SRX5308 SRX5308 Reference Manual - Page 274
Administration, Settings Backup & Firmware Upgrade, Browse, Upload, Monitoring, Warning - firmware release notes
 |
UPC - 606449065145
View all Netgear SRX5308 manuals
Add to My Manuals
Save this manual to your list of manuals |
Page 274 highlights
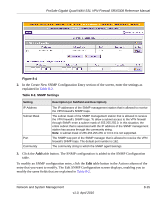
ProSafe Gigabit Quad WAN SSL VPN Firewall SRX5308 Reference Manual To download a firmware version and upgrade the VPN firewall: 1. Go to the NETGEAR website at http://www.netgear.com/support: a. In the Product Support & Downloads field in the middle of the screen, where it says "Enter model number", enter and then select SRX5308. b. Click the orange Downloads tab. c. Click the desired firmware version to reach the download page. Be sure to read the release notes on the download page before upgrading the VPN firewall's software. 2. Download the firmware file to your computer. Note the following: • If your browser is not configured to save downloaded files automatically, locate the folder in which you want to save the file, specify the file name, and save the file. • If your browser is configured to save downloaded files automatically, the file is saved to your browser's download location on the hard disk. 3. Select Administration > Settings Backup & Firmware Upgrade from the menu. The Settings Backup and Firmware Upgrade screen displays (see Figure 8-6 on page 8-17). 4. In the Router Upgrade section of the screen, click the Browse button. 5. Locate and select the firmware file that you have downloaded. 6. After you have selected the file, click the Upload button to start the software upgrade to your VPN firewall. The upgrade process might take some time, at the conclusion of which the VPN firewall reboots automatically. The reboot process is complete after several minutes when the Test LED on the front panel goes off. Warning: Do not try to go online, turn off the VPN firewall, shut down the computer or do anything else to the VPN firewall until the VPN firewall finishes the upgrade! When the Test light turns off, wait a few more seconds before doing anything. 7. After the VPN firewall has completed its reboot process, log in to the Web Management Interface, click Monitoring to display the Router Status screen, and then verify that the VPN firewall has the new software installed. Note: In some cases, such as a major upgrade, it might be necessary to erase the configuration and manually reconfigure your VPN firewall after upgrading it. Refer to the release notes included with the software to find out if this is required. 8-20 v1.0, April 2010 Network and System Management
-
 1
1 -
2
-
3
-
4
-
5
-
6
-
7
-
8
-
9
-
10
-
11
-
12
-
13
-
14
-
15
-
16
-
17
-
18
-
19
-
20
-
21
-
22
-
23
-
24
-
25
-
26
-
27
-
28
-
29
-
30
-
31
-
32
-
33
-
34
-
35
-
36
-
37
-
38
-
39
-
40
-
41
-
42
-
43
-
44
-
45
-
46
-
47
-
48
-
49
-
50
-
51
-
52
-
53
-
54
-
55
-
56
-
57
-
58
-
59
-
60
-
61
-
62
-
63
-
64
-
65
-
66
-
67
-
68
-
69
-
70
-
71
-
72
-
73
-
74
-
75
-
76
-
77
-
78
-
79
-
80
-
81
-
82
-
83
-
84
-
85
-
86
-
87
-
88
-
89
-
90
-
91
-
92
-
93
-
94
-
95
-
96
-
97
-
98
-
99
-
100
-
101
-
102
-
103
-
104
-
105
-
106
-
107
-
108
-
109
-
110
-
111
-
112
-
113
-
114
-
115
-
116
-
117
-
118
-
119
-
120
-
121
-
122
-
123
-
124
-
125
-
126
-
127
-
128
-
129
-
130
-
131
-
132
-
133
-
134
-
135
-
136
-
137
-
138
-
139
-
140
-
141
-
142
-
143
-
144
-
145
-
146
-
147
-
148
-
149
-
150
-
151
-
152
-
153
-
154
-
155
-
156
-
157
-
158
-
159
-
160
-
161
-
162
-
163
-
164
-
165
-
166
-
167
-
168
-
169
-
170
-
171
-
172
-
173
-
174
-
175
-
176
-
177
-
178
-
179
-
180
-
181
-
182
-
183
-
184
-
185
-
186
-
187
-
188
-
189
-
190
-
191
-
192
-
193
-
194
-
195
-
196
-
197
-
198
-
199
-
200
-
201
-
202
-
203
-
204
-
205
-
206
-
207
-
208
-
209
-
210
-
211
-
212
-
213
-
214
-
215
-
216
-
217
-
218
-
219
-
220
-
221
-
222
-
223
-
224
-
225
-
226
-
227
-
228
-
229
-
230
-
231
-
232
-
233
-
234
-
235
-
236
-
237
-
238
-
239
-
240
-
241
-
242
-
243
-
244
-
245
-
246
-
247
-
248
-
249
-
250
-
251
-
252
-
253
-
254
-
255
-
256
-
257
-
258
-
259
-
260
-
261
-
262
-
263
-
264
-
265
-
266
-
267
-
268
-
 269
269 -
 270
270 -
 271
271 -
 272
272 -
 273
273 -
 274
274 -
 275
275 -
 276
276 -
 277
277 -
 278
278 -
 279
279 -
280
-
281
-
282
-
283
-
284
-
285
-
286
-
287
-
288
-
289
-
290
-
291
-
292
-
293
-
294
-
295
-
296
-
297
-
298
-
299
-
300
-
301
-
302
-
303
-
304
-
305
-
306
-
307
-
308
-
309
-
310
-
311
-
312
-
313
-
314
-
315
-
316
-
317
-
318
-
319
-
320
-
321
-
322
-
323
-
324
-
325
-
326
-
327
-
328
-
329
-
330
-
331
-
332
-
333
-
334
-
335
-
336
-
337
-
338
-
339
-
340
-
341
-
342
-
343
-
344
-
345
-
346
-
347
-
348
-
349
-
350
-
351
-
352
-
353
-
354
-
355
-
356
-
357
-
358
-
359
-
360
-
361
-
362
-
363
-
364
-
365
-
366
-
367
-
368
-
369
-
370
-
371
-
372
-
373
-
374
-
375
-
376
-
377
-
378
-
379
-
380
-
381
-
382
-
383
-
384
 |
 |
