Netgear SRX5308 SRX5308 Reference Manual - Page 68
Table 3-1. VLAN Profile Settings - dhcp reservation
 |
UPC - 606449065145
View all Netgear SRX5308 manuals
Add to My Manuals
Save this manual to your list of manuals |
Page 68 highlights
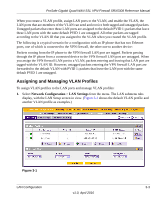
ProSafe Gigabit Quad WAN SSL VPN Firewall SRX5308 Reference Manual 3. Enter the settings as explained in Table 3-1. Table 3-1. VLAN Profile Settings Setting Description (or Subfield and Description) VLAN Profile Profile Name VLAN ID Port Membership Port 1 Port 2 Port 3 Port 4 / DMZ IP Setup IP Address Subnet Mask DHCP Disable DHCP Server Enter a unique name for the VLAN profile. Note: You can also change the profile name of the default VLAN. Enter a unique ID number for the VLAN profile. No two VLANs can have the same VLAN ID number. Note: You can enter VLAN IDs from 2 to 4093. VLAN ID 1 is reserved for the default VLAN; VLAN ID 4094 is reserved for the DMZ interface. Select one, several, or all port check boxes to make the ports members of this VLAN. Note: A port that is defined as a member of a VLAN profile can send and receive data frames that are tagged with the VLAN ID. Enter the IP address of the VPN firewall (the factory default is 192.168.1.1). Note: Always make sure that the LAN port IP address and DMZ port IP address are in different subnets. Note: If you change the LAN IP address of the VLAN while being connected through the browser to the VLAN, you will be disconnected. You must then open a new connection to the new IP address and log in again. For example, if you change the default IP address 192.168.1.1 to 10.0.0.1, you must now enter https://10.0.0.1 in your browser to reconnect to the Web Management Interface. Enter the IP subnet mask. The subnet mask specifies the network number portion of an IP address. Based on the IP address that you assign, the VPN firewall automatically calculates the subnet mask. Unless you are implementing subnetting, use 255.255.255.0 as the subnet mask (computed by the VPN firewall). If another device on your network is the DHCP server for the VLAN, or if you will manually configure the network settings of all of your computers, select the Disable DHCP Server radio button to disable the DHCP server. This is the default setting. 3-8 LAN Configuration v1.0, April 2010
-
 1
1 -
2
-
3
-
4
-
5
-
6
-
7
-
8
-
9
-
10
-
11
-
12
-
13
-
14
-
15
-
16
-
17
-
18
-
19
-
20
-
21
-
22
-
23
-
24
-
25
-
26
-
27
-
28
-
29
-
30
-
31
-
32
-
33
-
34
-
35
-
36
-
37
-
38
-
39
-
40
-
41
-
42
-
43
-
44
-
45
-
46
-
47
-
48
-
49
-
50
-
51
-
52
-
53
-
54
-
55
-
56
-
57
-
58
-
59
-
60
-
61
-
62
-
 63
63 -
 64
64 -
 65
65 -
 66
66 -
 67
67 -
 68
68 -
 69
69 -
 70
70 -
 71
71 -
 72
72 -
 73
73 -
74
-
75
-
76
-
77
-
78
-
79
-
80
-
81
-
82
-
83
-
84
-
85
-
86
-
87
-
88
-
89
-
90
-
91
-
92
-
93
-
94
-
95
-
96
-
97
-
98
-
99
-
100
-
101
-
102
-
103
-
104
-
105
-
106
-
107
-
108
-
109
-
110
-
111
-
112
-
113
-
114
-
115
-
116
-
117
-
118
-
119
-
120
-
121
-
122
-
123
-
124
-
125
-
126
-
127
-
128
-
129
-
130
-
131
-
132
-
133
-
134
-
135
-
136
-
137
-
138
-
139
-
140
-
141
-
142
-
143
-
144
-
145
-
146
-
147
-
148
-
149
-
150
-
151
-
152
-
153
-
154
-
155
-
156
-
157
-
158
-
159
-
160
-
161
-
162
-
163
-
164
-
165
-
166
-
167
-
168
-
169
-
170
-
171
-
172
-
173
-
174
-
175
-
176
-
177
-
178
-
179
-
180
-
181
-
182
-
183
-
184
-
185
-
186
-
187
-
188
-
189
-
190
-
191
-
192
-
193
-
194
-
195
-
196
-
197
-
198
-
199
-
200
-
201
-
202
-
203
-
204
-
205
-
206
-
207
-
208
-
209
-
210
-
211
-
212
-
213
-
214
-
215
-
216
-
217
-
218
-
219
-
220
-
221
-
222
-
223
-
224
-
225
-
226
-
227
-
228
-
229
-
230
-
231
-
232
-
233
-
234
-
235
-
236
-
237
-
238
-
239
-
240
-
241
-
242
-
243
-
244
-
245
-
246
-
247
-
248
-
249
-
250
-
251
-
252
-
253
-
254
-
255
-
256
-
257
-
258
-
259
-
260
-
261
-
262
-
263
-
264
-
265
-
266
-
267
-
268
-
269
-
270
-
271
-
272
-
273
-
274
-
275
-
276
-
277
-
278
-
279
-
280
-
281
-
282
-
283
-
284
-
285
-
286
-
287
-
288
-
289
-
290
-
291
-
292
-
293
-
294
-
295
-
296
-
297
-
298
-
299
-
300
-
301
-
302
-
303
-
304
-
305
-
306
-
307
-
308
-
309
-
310
-
311
-
312
-
313
-
314
-
315
-
316
-
317
-
318
-
319
-
320
-
321
-
322
-
323
-
324
-
325
-
326
-
327
-
328
-
329
-
330
-
331
-
332
-
333
-
334
-
335
-
336
-
337
-
338
-
339
-
340
-
341
-
342
-
343
-
344
-
345
-
346
-
347
-
348
-
349
-
350
-
351
-
352
-
353
-
354
-
355
-
356
-
357
-
358
-
359
-
360
-
361
-
362
-
363
-
364
-
365
-
366
-
367
-
368
-
369
-
370
-
371
-
372
-
373
-
374
-
375
-
376
-
377
-
378
-
379
-
380
-
381
-
382
-
383
-
384
 |
 |
