Netgear SRX5308 SRX5308 Reference Manual - Page 215
Adding Routes for VPN Tunnel Clients, Apply, SSL VPN, SSL VPN Client, Destination Network, Subnet Mask
 |
UPC - 606449065145
View all Netgear SRX5308 manuals
Add to My Manuals
Save this manual to your list of manuals |
Page 215 highlights
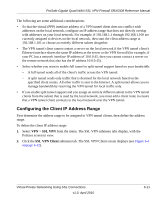
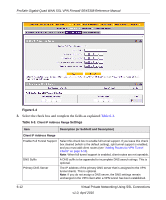
ProSafe Gigabit Quad WAN SSL VPN Firewall SRX5308 Reference Manual Table 6-3. Client IP Address Range Settings (continued) Item Description (or Subfield and Description) Secondary DNS Server The IP address of the secondary DNS server that is assigned to the VPN tunnel clients. This is optional. Client Address Range Begin The first IP address of the IP address range that you want to assign to the VPN tunnel clients. Client Address Range End The last IP address of the IP address range that you want to assign to the VPN tunnel clients. 4. Click Apply to save your settings. VPN tunnel clients are now able to connect to the VPN firewall and receive a virtual IP address in the client address range. Adding Routes for VPN Tunnel Clients The VPN tunnel clients assume that the following networks are located across the VPN-over-SSL tunnel: • The subnet that contains the client IP address (that is, PPP interface), as determined by the class of the address (Class A, B, or C). • Subnets that are specified in the Configured Client Routes table on the SSL VPN Client screen. If the assigned client IP address range is in a different subnet from the local network, or if the local network has multiple subnets, or if you select split mode tunnel operation, you must define client routes. To add an SSL VPN tunnel client route: 1. Select VPN > SSL VPN from the menu. The SSL VPN submenu tabs display, with the Policies screen in view. 2. Click the SSL VPN Client submenu tab. The SSL VPN Client screen displays (see Figure 6-4 on page 6-12). 3. In the Add Routes for VPN Tunnel Clients section of the screen, specify information in the following fields: • Destination Network. The destination network IP address of a local network or subnet. For example, enter 192.168.1.60. • Subnet Mask. The address of the appropriate subnet mask. 4. Click the Add table button. The new client route is added to the Configured Client Routes table. Virtual Private Networking Using SSL Connections v1.0, April 2010 6-13
-
 1
1 -
2
-
3
-
4
-
5
-
6
-
7
-
8
-
9
-
10
-
11
-
12
-
13
-
14
-
15
-
16
-
17
-
18
-
19
-
20
-
21
-
22
-
23
-
24
-
25
-
26
-
27
-
28
-
29
-
30
-
31
-
32
-
33
-
34
-
35
-
36
-
37
-
38
-
39
-
40
-
41
-
42
-
43
-
44
-
45
-
46
-
47
-
48
-
49
-
50
-
51
-
52
-
53
-
54
-
55
-
56
-
57
-
58
-
59
-
60
-
61
-
62
-
63
-
64
-
65
-
66
-
67
-
68
-
69
-
70
-
71
-
72
-
73
-
74
-
75
-
76
-
77
-
78
-
79
-
80
-
81
-
82
-
83
-
84
-
85
-
86
-
87
-
88
-
89
-
90
-
91
-
92
-
93
-
94
-
95
-
96
-
97
-
98
-
99
-
100
-
101
-
102
-
103
-
104
-
105
-
106
-
107
-
108
-
109
-
110
-
111
-
112
-
113
-
114
-
115
-
116
-
117
-
118
-
119
-
120
-
121
-
122
-
123
-
124
-
125
-
126
-
127
-
128
-
129
-
130
-
131
-
132
-
133
-
134
-
135
-
136
-
137
-
138
-
139
-
140
-
141
-
142
-
143
-
144
-
145
-
146
-
147
-
148
-
149
-
150
-
151
-
152
-
153
-
154
-
155
-
156
-
157
-
158
-
159
-
160
-
161
-
162
-
163
-
164
-
165
-
166
-
167
-
168
-
169
-
170
-
171
-
172
-
173
-
174
-
175
-
176
-
177
-
178
-
179
-
180
-
181
-
182
-
183
-
184
-
185
-
186
-
187
-
188
-
189
-
190
-
191
-
192
-
193
-
194
-
195
-
196
-
197
-
198
-
199
-
200
-
201
-
202
-
203
-
204
-
205
-
206
-
207
-
208
-
209
-
 210
210 -
 211
211 -
 212
212 -
 213
213 -
 214
214 -
 215
215 -
 216
216 -
 217
217 -
 218
218 -
 219
219 -
 220
220 -
221
-
222
-
223
-
224
-
225
-
226
-
227
-
228
-
229
-
230
-
231
-
232
-
233
-
234
-
235
-
236
-
237
-
238
-
239
-
240
-
241
-
242
-
243
-
244
-
245
-
246
-
247
-
248
-
249
-
250
-
251
-
252
-
253
-
254
-
255
-
256
-
257
-
258
-
259
-
260
-
261
-
262
-
263
-
264
-
265
-
266
-
267
-
268
-
269
-
270
-
271
-
272
-
273
-
274
-
275
-
276
-
277
-
278
-
279
-
280
-
281
-
282
-
283
-
284
-
285
-
286
-
287
-
288
-
289
-
290
-
291
-
292
-
293
-
294
-
295
-
296
-
297
-
298
-
299
-
300
-
301
-
302
-
303
-
304
-
305
-
306
-
307
-
308
-
309
-
310
-
311
-
312
-
313
-
314
-
315
-
316
-
317
-
318
-
319
-
320
-
321
-
322
-
323
-
324
-
325
-
326
-
327
-
328
-
329
-
330
-
331
-
332
-
333
-
334
-
335
-
336
-
337
-
338
-
339
-
340
-
341
-
342
-
343
-
344
-
345
-
346
-
347
-
348
-
349
-
350
-
351
-
352
-
353
-
354
-
355
-
356
-
357
-
358
-
359
-
360
-
361
-
362
-
363
-
364
-
365
-
366
-
367
-
368
-
369
-
370
-
371
-
372
-
373
-
374
-
375
-
376
-
377
-
378
-
379
-
380
-
381
-
382
-
383
-
384
 |
 |
