Lenovo ThinkServer RD330 MegaRAID SAS Software User Guide - Page 141
CAUTION, Next.
 |
View all Lenovo ThinkServer RD330 manuals
Add to My Manuals
Save this manual to your list of manuals |
Page 141 highlights
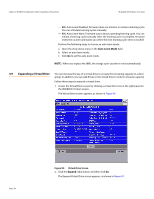
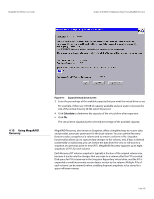
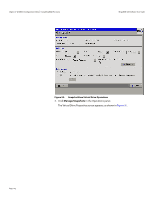
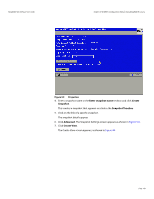
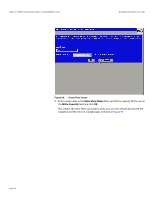
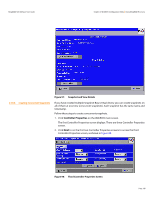
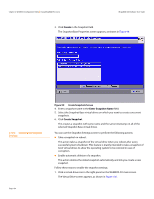
MegaRAID SAS Software User Guide Chapter 4: WebBIOS Configuration Utility | Using MegaRAID Recovery The capacity is dependent on how write-intensive the application is that you are taking snapshots of. The available capacity is the largest free block of capacity on the Snapshot Repository virtual drive. NOTE: If you use all of the space of the Repository virtual drive, there will be insufficient space to create a snapshot and a view. CAUTION: Copy all of your data to another virtual drive before you select this option. If there is any existing data on this virtual drive, it will be lost. 7. Click Next. The snapshot settings screen appears as shown in Figure 101. 8. Click Finish. A confirmation dialog box appears. 9. Confirm that you want to make these selections. This virtual drive becomes a snapshot repository. Use it only for storing snapshot-related data. CAUTION: After you enable snapshots on this virtual drive, you cannot change the allocated percentage of capacity or the snapshot repository without first disabling snapshots and losing any snapshot data. 4.10.3 Creating Snapshots and Views You can use WebBIOS to create up to eight snapshots of a volume. WebBIOS shows the snapshots in chronological order from the oldest to the newest. Each snapshot is a PiT snapshot of the virtual drive that is the Snapshot Base. First, create the Snapshot Base virtual drive and then create the snapshot. After you create the snapshots, you can create views of the PiT snapshots. You can search the views to find a snapshot that does not contain the corrupt data or a snapshot that contains the deleted data, depending on the situation. After you create a snapshot, you can reboot and roll back to a snapshot to restore data. Follow these steps to create a snapshot. 1. Enable MegaRAID Recovery. See Section 4.10.2, Enabling the Recovery Advanced Software, for the procedure used to enable MegaRAID Recovery in WebBIOS. 2. Click on the virtual drive in the Logical View on the main screen to go to the operations for the virtual drive. The Virtual Drive screen appears, as shown in Figure 94. Page 141
-
 1
1 -
2
-
3
-
4
-
5
-
6
-
7
-
8
-
9
-
10
-
11
-
12
-
13
-
14
-
15
-
16
-
17
-
18
-
19
-
20
-
21
-
22
-
23
-
24
-
25
-
26
-
27
-
28
-
29
-
30
-
31
-
32
-
33
-
34
-
35
-
36
-
37
-
38
-
39
-
40
-
41
-
42
-
43
-
44
-
45
-
46
-
47
-
48
-
49
-
50
-
51
-
52
-
53
-
54
-
55
-
56
-
57
-
58
-
59
-
60
-
61
-
62
-
63
-
64
-
65
-
66
-
67
-
68
-
69
-
70
-
71
-
72
-
73
-
74
-
75
-
76
-
77
-
78
-
79
-
80
-
81
-
82
-
83
-
84
-
85
-
86
-
87
-
88
-
89
-
90
-
91
-
92
-
93
-
94
-
95
-
96
-
97
-
98
-
99
-
100
-
101
-
102
-
103
-
104
-
105
-
106
-
107
-
108
-
109
-
110
-
111
-
112
-
113
-
114
-
115
-
116
-
117
-
118
-
119
-
120
-
121
-
122
-
123
-
124
-
125
-
126
-
127
-
128
-
129
-
130
-
131
-
132
-
133
-
134
-
135
-
 136
136 -
 137
137 -
 138
138 -
 139
139 -
 140
140 -
 141
141 -
 142
142 -
 143
143 -
 144
144 -
 145
145 -
 146
146 -
147
-
148
-
149
-
150
-
151
-
152
-
153
-
154
-
155
-
156
-
157
-
158
-
159
-
160
-
161
-
162
-
163
-
164
-
165
-
166
-
167
-
168
-
169
-
170
-
171
-
172
-
173
-
174
-
175
-
176
-
177
-
178
-
179
-
180
-
181
-
182
-
183
-
184
-
185
-
186
-
187
-
188
-
189
-
190
-
191
-
192
-
193
-
194
-
195
-
196
-
197
-
198
-
199
-
200
-
201
-
202
-
203
-
204
-
205
-
206
-
207
-
208
-
209
-
210
-
211
-
212
-
213
-
214
-
215
-
216
-
217
-
218
-
219
-
220
-
221
-
222
-
223
-
224
-
225
-
226
-
227
-
228
-
229
-
230
-
231
-
232
-
233
-
234
-
235
-
236
-
237
-
238
-
239
-
240
-
241
-
242
-
243
-
244
-
245
-
246
-
247
-
248
-
249
-
250
-
251
-
252
-
253
-
254
-
255
-
256
-
257
-
258
-
259
-
260
-
261
-
262
-
263
-
264
-
265
-
266
-
267
-
268
-
269
-
270
-
271
-
272
-
273
-
274
-
275
-
276
-
277
-
278
-
279
-
280
-
281
-
282
-
283
-
284
-
285
-
286
-
287
-
288
-
289
-
290
-
291
-
292
-
293
-
294
-
295
-
296
-
297
-
298
-
299
-
300
-
301
-
302
-
303
-
304
-
305
-
306
-
307
-
308
-
309
-
310
-
311
-
312
-
313
-
314
-
315
-
316
-
317
-
318
-
319
-
320
-
321
-
322
-
323
-
324
-
325
-
326
-
327
-
328
-
329
-
330
-
331
-
332
-
333
-
334
-
335
-
336
-
337
-
338
-
339
-
340
-
341
-
342
-
343
-
344
-
345
-
346
-
347
-
348
-
349
-
350
-
351
-
352
-
353
-
354
-
355
-
356
-
357
-
358
-
359
-
360
-
361
-
362
-
363
-
364
-
365
-
366
-
367
-
368
-
369
-
370
-
371
-
372
-
373
-
374
-
375
-
376
-
377
-
378
-
379
-
380
-
381
-
382
-
383
-
384
-
385
-
386
-
387
-
388
-
389
-
390
-
391
-
392
-
393
-
394
-
395
-
396
-
397
-
398
-
399
-
400
-
401
 |
 |