Lenovo ThinkServer RD330 MegaRAID SAS Software User Guide - Page 302
filename.xml, Alert Setting, Server, E-mail, Load Backup
 |
View all Lenovo ThinkServer RD330 manuals
Add to My Manuals
Save this manual to your list of manuals |
Page 302 highlights
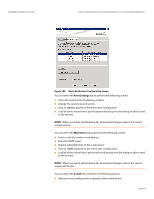
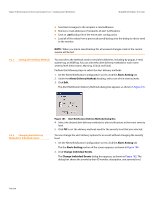
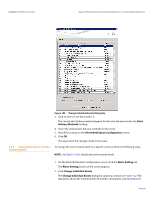
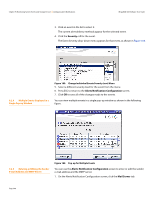
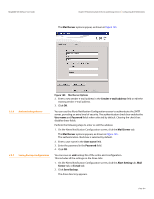
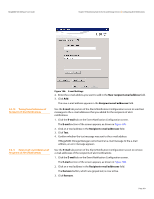
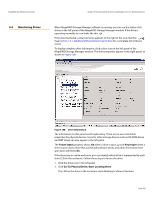
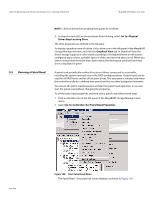
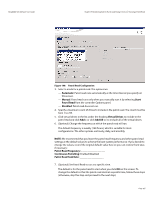
Chapter 9: Monitoring System Events and Storage Devices | Configuring Alert Notifications MegaRAID SAS Software User Guide 9.2.8 Loading Backup Configurations 9.2.9 Adding E-mail Addresses of Recipients of Alert Notifications 3. Enter a filename with an .xml extension for the backup configuration (in the format filename.xml). 4. Click Save. The drive directory disappears. 5. Click OK. The backup configuration is saved and the Alert Notification Configuration screen closes. You can load all of the values from a previously saved backup into the dialog (all tabs) to edit or send to the monitor. NOTE: If you choose to load a backup configuration and the Configure Alerts dialog currently contains changes that have not yet been sent to the monitor, the changes will be lost. You are prompted to confirm your choice. 1. On the Alerts Notification Configuration screen, click the Alert Setting tab, Mail Server tab, or E-mail tab. 2. Click Load Backup. A message warns that when you load a saved backup file, all unsaved changes made in the current session will be lost. 3. Click Yes. The drive directory appears, from which you can select a backup configuration to load. 4. Select the backup configuration file (it should be in .xml format). 5. Click Open. The drive directory disappears. 6. Click OK. The backup configuration is loaded and the Alerts Notification Configuration screen closes. The E-mail tab portion of the Alerts Notification Configuration screen shows the e-mail addresses of recipients of the alert notifications. MegaRAID Storage Manager sends alert notifications to those e-mail addresses. Use the screen to add or remove e-mail addresses of recipients, and to send test messages to recipients that you add. To add e-mail addresses of recipients of the alert notifications, perform the following steps: 1. Click the E-mail tab on the Event Notification Configuration screen. The E-mail section of the screen appears, as shown in Figure 186. Page 302
-
 1
1 -
2
-
3
-
4
-
5
-
6
-
7
-
8
-
9
-
10
-
11
-
12
-
13
-
14
-
15
-
16
-
17
-
18
-
19
-
20
-
21
-
22
-
23
-
24
-
25
-
26
-
27
-
28
-
29
-
30
-
31
-
32
-
33
-
34
-
35
-
36
-
37
-
38
-
39
-
40
-
41
-
42
-
43
-
44
-
45
-
46
-
47
-
48
-
49
-
50
-
51
-
52
-
53
-
54
-
55
-
56
-
57
-
58
-
59
-
60
-
61
-
62
-
63
-
64
-
65
-
66
-
67
-
68
-
69
-
70
-
71
-
72
-
73
-
74
-
75
-
76
-
77
-
78
-
79
-
80
-
81
-
82
-
83
-
84
-
85
-
86
-
87
-
88
-
89
-
90
-
91
-
92
-
93
-
94
-
95
-
96
-
97
-
98
-
99
-
100
-
101
-
102
-
103
-
104
-
105
-
106
-
107
-
108
-
109
-
110
-
111
-
112
-
113
-
114
-
115
-
116
-
117
-
118
-
119
-
120
-
121
-
122
-
123
-
124
-
125
-
126
-
127
-
128
-
129
-
130
-
131
-
132
-
133
-
134
-
135
-
136
-
137
-
138
-
139
-
140
-
141
-
142
-
143
-
144
-
145
-
146
-
147
-
148
-
149
-
150
-
151
-
152
-
153
-
154
-
155
-
156
-
157
-
158
-
159
-
160
-
161
-
162
-
163
-
164
-
165
-
166
-
167
-
168
-
169
-
170
-
171
-
172
-
173
-
174
-
175
-
176
-
177
-
178
-
179
-
180
-
181
-
182
-
183
-
184
-
185
-
186
-
187
-
188
-
189
-
190
-
191
-
192
-
193
-
194
-
195
-
196
-
197
-
198
-
199
-
200
-
201
-
202
-
203
-
204
-
205
-
206
-
207
-
208
-
209
-
210
-
211
-
212
-
213
-
214
-
215
-
216
-
217
-
218
-
219
-
220
-
221
-
222
-
223
-
224
-
225
-
226
-
227
-
228
-
229
-
230
-
231
-
232
-
233
-
234
-
235
-
236
-
237
-
238
-
239
-
240
-
241
-
242
-
243
-
244
-
245
-
246
-
247
-
248
-
249
-
250
-
251
-
252
-
253
-
254
-
255
-
256
-
257
-
258
-
259
-
260
-
261
-
262
-
263
-
264
-
265
-
266
-
267
-
268
-
269
-
270
-
271
-
272
-
273
-
274
-
275
-
276
-
277
-
278
-
279
-
280
-
281
-
282
-
283
-
284
-
285
-
286
-
287
-
288
-
289
-
290
-
291
-
292
-
293
-
294
-
295
-
296
-
 297
297 -
 298
298 -
 299
299 -
 300
300 -
 301
301 -
 302
302 -
 303
303 -
 304
304 -
 305
305 -
 306
306 -
 307
307 -
308
-
309
-
310
-
311
-
312
-
313
-
314
-
315
-
316
-
317
-
318
-
319
-
320
-
321
-
322
-
323
-
324
-
325
-
326
-
327
-
328
-
329
-
330
-
331
-
332
-
333
-
334
-
335
-
336
-
337
-
338
-
339
-
340
-
341
-
342
-
343
-
344
-
345
-
346
-
347
-
348
-
349
-
350
-
351
-
352
-
353
-
354
-
355
-
356
-
357
-
358
-
359
-
360
-
361
-
362
-
363
-
364
-
365
-
366
-
367
-
368
-
369
-
370
-
371
-
372
-
373
-
374
-
375
-
376
-
377
-
378
-
379
-
380
-
381
-
382
-
383
-
384
-
385
-
386
-
387
-
388
-
389
-
390
-
391
-
392
-
393
-
394
-
395
-
396
-
397
-
398
-
399
-
400
-
401
 |
 |
