Lenovo ThinkServer RD330 MegaRAID SAS Software User Guide - Page 243
etc/init.d/snmpd start/stop, etc/init.d/lsi_mrdsnmpd start/stop, etc/init.d/lsi_mrdsnmpd status,
 |
View all Lenovo ThinkServer RD330 manuals
Add to My Manuals
Save this manual to your list of manuals |
Page 243 highlights
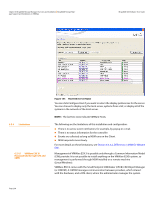
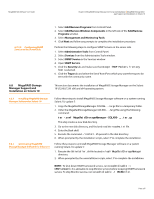
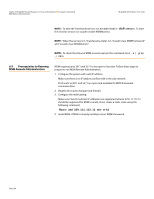
MegaRAID SAS Software User Guide Chapter 6: MegaRAID Storage Manager Overview and Installation | Installing and Configur- ing an SNMP Agent RPM makes the necessary modification needed in the snmpd.conf file to run the agent. NOTE: Before installation, check whether there is any pass command that starts with 1.3.6.1.4.1.3582 OID in snmpd.conf. If so, delete all of the old pass commands that start with 1.3.6.1.4.1.3582 OID. (This situation could occur if an earlier version of SNMP Agent was installed in the system.) The snmpd.conf file structure should be the same as lsi_mrdsnmpd.conf. For reference, a sample conf file (lsi_mrdsnmpd.conf) is in the /etc/lsi_mrdsnmp directory. 2. To run an SNMP query from a remote machine, add the IP address of that machine in the snmpd.conf file, as in this example: com2sec snmpclient 172.28.136.112 public Here, the IP address of the remote machine is 172.28.136.112. 3. To receive an SNMP trap to a particular machine, add the IP address of that machine in the com2sec section of the snmpd.conf file. For example, to get a trap in 10.0.0.144, add the following to snmpd.conf. # com2sec sec.name snmpclient source 10.0.0.144 community public 4. To run/stop the snmpd daemon, enter the following command: /etc/init.d/snmpd start/stop 5. To start/stop the SAS SNMP Agent daemon before issuing a SNMP query, enter the following command: /etc/init.d/lsi_mrdsnmpd start/stop You can check the status of the SAS SNMP Agent daemon by checked by issuing the following command: /etc/init.d/lsi_mrdsnmpd status 6. Issue an SNMP query in this format: snmpwalk -v1 -c public localhost .1.3.6.1.4.1.3582 7. You can get the SNMP trap from local machine by issuing the following command: snmptrapd -P -F "%02.2h:%02.2j TRAP%w.%q from %A %v\n" NOTE: To receive a trap in a local machine with Net-SNMP version 5.3, you must modify the snmptrapd.conf file (generally located at /var/net-snmp/snmptrapd.conf). Add "disableAuthorization yes" in snmptrapd.conf and then execute "sudo snmptrapd -P -F "%02.2h:%02.2j TRAP%w.%q from %A %v\n". Page 243
-
 1
1 -
2
-
3
-
4
-
5
-
6
-
7
-
8
-
9
-
10
-
11
-
12
-
13
-
14
-
15
-
16
-
17
-
18
-
19
-
20
-
21
-
22
-
23
-
24
-
25
-
26
-
27
-
28
-
29
-
30
-
31
-
32
-
33
-
34
-
35
-
36
-
37
-
38
-
39
-
40
-
41
-
42
-
43
-
44
-
45
-
46
-
47
-
48
-
49
-
50
-
51
-
52
-
53
-
54
-
55
-
56
-
57
-
58
-
59
-
60
-
61
-
62
-
63
-
64
-
65
-
66
-
67
-
68
-
69
-
70
-
71
-
72
-
73
-
74
-
75
-
76
-
77
-
78
-
79
-
80
-
81
-
82
-
83
-
84
-
85
-
86
-
87
-
88
-
89
-
90
-
91
-
92
-
93
-
94
-
95
-
96
-
97
-
98
-
99
-
100
-
101
-
102
-
103
-
104
-
105
-
106
-
107
-
108
-
109
-
110
-
111
-
112
-
113
-
114
-
115
-
116
-
117
-
118
-
119
-
120
-
121
-
122
-
123
-
124
-
125
-
126
-
127
-
128
-
129
-
130
-
131
-
132
-
133
-
134
-
135
-
136
-
137
-
138
-
139
-
140
-
141
-
142
-
143
-
144
-
145
-
146
-
147
-
148
-
149
-
150
-
151
-
152
-
153
-
154
-
155
-
156
-
157
-
158
-
159
-
160
-
161
-
162
-
163
-
164
-
165
-
166
-
167
-
168
-
169
-
170
-
171
-
172
-
173
-
174
-
175
-
176
-
177
-
178
-
179
-
180
-
181
-
182
-
183
-
184
-
185
-
186
-
187
-
188
-
189
-
190
-
191
-
192
-
193
-
194
-
195
-
196
-
197
-
198
-
199
-
200
-
201
-
202
-
203
-
204
-
205
-
206
-
207
-
208
-
209
-
210
-
211
-
212
-
213
-
214
-
215
-
216
-
217
-
218
-
219
-
220
-
221
-
222
-
223
-
224
-
225
-
226
-
227
-
228
-
229
-
230
-
231
-
232
-
233
-
234
-
235
-
236
-
237
-
 238
238 -
 239
239 -
 240
240 -
 241
241 -
 242
242 -
 243
243 -
 244
244 -
 245
245 -
 246
246 -
 247
247 -
 248
248 -
249
-
250
-
251
-
252
-
253
-
254
-
255
-
256
-
257
-
258
-
259
-
260
-
261
-
262
-
263
-
264
-
265
-
266
-
267
-
268
-
269
-
270
-
271
-
272
-
273
-
274
-
275
-
276
-
277
-
278
-
279
-
280
-
281
-
282
-
283
-
284
-
285
-
286
-
287
-
288
-
289
-
290
-
291
-
292
-
293
-
294
-
295
-
296
-
297
-
298
-
299
-
300
-
301
-
302
-
303
-
304
-
305
-
306
-
307
-
308
-
309
-
310
-
311
-
312
-
313
-
314
-
315
-
316
-
317
-
318
-
319
-
320
-
321
-
322
-
323
-
324
-
325
-
326
-
327
-
328
-
329
-
330
-
331
-
332
-
333
-
334
-
335
-
336
-
337
-
338
-
339
-
340
-
341
-
342
-
343
-
344
-
345
-
346
-
347
-
348
-
349
-
350
-
351
-
352
-
353
-
354
-
355
-
356
-
357
-
358
-
359
-
360
-
361
-
362
-
363
-
364
-
365
-
366
-
367
-
368
-
369
-
370
-
371
-
372
-
373
-
374
-
375
-
376
-
377
-
378
-
379
-
380
-
381
-
382
-
383
-
384
-
385
-
386
-
387
-
388
-
389
-
390
-
391
-
392
-
393
-
394
-
395
-
396
-
397
-
398
-
399
-
400
-
401
 |
 |