Ricoh Aficio MP C4502 General Settings Guide - Page 122
Program Memory Lock ID, Select Dial / Push Phone, Reception File Setting
 |
View all Ricoh Aficio MP C4502 manuals
Add to My Manuals
Save this manual to your list of manuals |
Page 122 highlights
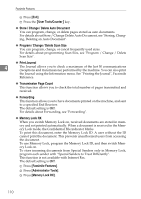
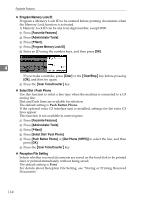
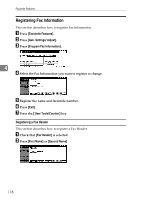
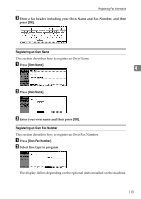
Facsimile Features ❖ Program Memory Lock ID Program a Memory Lock ID to be entered before printing documents when the Memory Lock function is activated. A Memory Lock ID can be any four-digit number, except 0000. A Press [Facsimile Features]. B Press [Administrator Tools]. C Press [TNext]. D Press [Program Memory Lock ID]. E Enter an ID using the number keys, and then press [OK]. 4 If you make a mistake, press [Clear] or the {Clear/Stop} key before pressing [OK], and then try again. F Press the {User Tools/Counter} key. ❖ Select Dial / Push Phone Use this function to select a line type when the machine is connected to a G3 analog line. Dial and Push lines are available for selection. The default setting is Push Button Phone. If the optional extra G3 interface unit is installed, settings for the extra G3 lines appear. This function is not available in some regions. A Press [Facsimile Features]. B Press [Administrator Tools]. C Press [TNext]. D Press [Select Dial / Push Phone]. E Press [Push Button Phone] or [Dial Phone (10PPS)] to select the line, and then press [OK]. F Press the {User Tools/Counter} key. ❖ Reception File Setting Selects whether received documents are saved on the hard disk to be printed later or printed immediately without being saved. The default setting is Print. For details about Reception File Setting, see "Storing or Printing Received Documents". 114
-
 1
1 -
2
-
3
-
4
-
5
-
6
-
7
-
8
-
9
-
10
-
11
-
12
-
13
-
14
-
15
-
16
-
17
-
18
-
19
-
20
-
21
-
22
-
23
-
24
-
25
-
26
-
27
-
28
-
29
-
30
-
31
-
32
-
33
-
34
-
35
-
36
-
37
-
38
-
39
-
40
-
41
-
42
-
43
-
44
-
45
-
46
-
47
-
48
-
49
-
50
-
51
-
52
-
53
-
54
-
55
-
56
-
57
-
58
-
59
-
60
-
61
-
62
-
63
-
64
-
65
-
66
-
67
-
68
-
69
-
70
-
71
-
72
-
73
-
74
-
75
-
76
-
77
-
78
-
79
-
80
-
81
-
82
-
83
-
84
-
85
-
86
-
87
-
88
-
89
-
90
-
91
-
92
-
93
-
94
-
95
-
96
-
97
-
98
-
99
-
100
-
101
-
102
-
103
-
104
-
105
-
106
-
107
-
108
-
109
-
110
-
111
-
112
-
113
-
114
-
115
-
116
-
 117
117 -
 118
118 -
 119
119 -
 120
120 -
 121
121 -
 122
122 -
 123
123 -
 124
124 -
 125
125 -
 126
126 -
 127
127 -
128
-
129
-
130
-
131
-
132
-
133
-
134
-
135
-
136
-
137
-
138
-
139
-
140
-
141
-
142
-
143
-
144
-
145
-
146
-
147
-
148
-
149
-
150
-
151
-
152
-
153
-
154
-
155
-
156
-
157
-
158
-
159
-
160
-
161
-
162
-
163
-
164
-
165
-
166
-
167
-
168
-
169
-
170
-
171
-
172
-
173
-
174
-
175
-
176
-
177
-
178
-
179
-
180
-
181
-
182
-
183
-
184
-
185
-
186
-
187
-
188
-
189
-
190
-
191
-
192
-
193
-
194
-
195
-
196
-
197
-
198
-
199
-
200
-
201
-
202
-
203
-
204
-
205
-
206
-
207
-
208
-
209
-
210
-
211
-
212
-
213
-
214
-
215
-
216
-
217
-
218
-
219
-
220
-
221
-
222
-
223
-
224
-
225
-
226
-
227
-
228
-
229
-
230
-
231
-
232
-
233
-
234
-
235
-
236
-
237
-
238
-
239
-
240
-
241
-
242
-
243
-
244
-
245
-
246
-
247
-
248
-
249
-
250
-
251
-
252
-
253
-
254
-
255
-
256
-
257
-
258
-
259
-
260
-
261
-
262
-
263
-
264
-
265
-
266
-
267
-
268
-
269
-
270
-
271
-
272
-
273
-
274
-
275
-
276
-
277
-
278
-
279
-
280
-
281
-
282
-
283
-
284
-
285
-
286
-
287
-
288
-
289
-
290
-
291
-
292
-
293
-
294
-
295
-
296
 |
 |
