Ricoh Aficio MP C4502 General Settings Guide - Page 155
Print 2 Sided, Same as Basic Settings, Memory Lock, Paper Tray
 |
View all Ricoh Aficio MP C4502 manuals
Add to My Manuals
Save this manual to your list of manuals |
Page 155 highlights
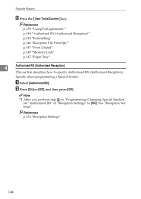
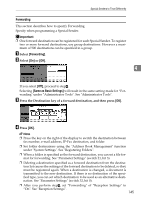
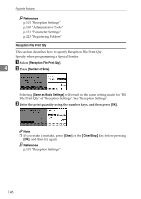
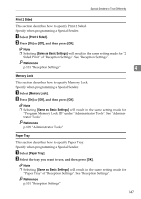
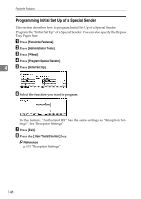
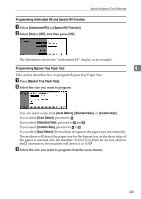
Special Senders to Treat Differently Print 2 Sided This section describes how to specify Print 2 Sided. Specify when programming a Special Sender. A Select [Print 2 Sided]. B Press [On] or [Off], and then press [OK]. Note ❒ Selecting [Same as Basic Settings] will result in the same setting made for "2 Sided Print" of "Reception Settings". See "Reception Settings". Reference p.101 "Reception Settings" 4 Memory Lock This section describes how to specify Memory Lock. Specify when programming a Special Sender. A Select [Memory Lock]. B Press [On] or [Off], and then press [OK]. Note ❒ Selecting [Same as Basic Settings] will result in the same setting made for "Program Memory Lock ID" under "Administrator Tools". See "Administrator Tools". Reference p.109 "Administrator Tools" Paper Tray This section describes how to specify Paper Tray. Specify when programming a Special Sender. A Select [Paper Tray]. B Select the tray you want to use, and then press [OK]. Note ❒ Selecting [Same as Basic Settings] will result in the same setting made for "Paper Tray" of "Reception Settings". See "Reception Settings". Reference p.101 "Reception Settings" 147
-
 1
1 -
2
-
3
-
4
-
5
-
6
-
7
-
8
-
9
-
10
-
11
-
12
-
13
-
14
-
15
-
16
-
17
-
18
-
19
-
20
-
21
-
22
-
23
-
24
-
25
-
26
-
27
-
28
-
29
-
30
-
31
-
32
-
33
-
34
-
35
-
36
-
37
-
38
-
39
-
40
-
41
-
42
-
43
-
44
-
45
-
46
-
47
-
48
-
49
-
50
-
51
-
52
-
53
-
54
-
55
-
56
-
57
-
58
-
59
-
60
-
61
-
62
-
63
-
64
-
65
-
66
-
67
-
68
-
69
-
70
-
71
-
72
-
73
-
74
-
75
-
76
-
77
-
78
-
79
-
80
-
81
-
82
-
83
-
84
-
85
-
86
-
87
-
88
-
89
-
90
-
91
-
92
-
93
-
94
-
95
-
96
-
97
-
98
-
99
-
100
-
101
-
102
-
103
-
104
-
105
-
106
-
107
-
108
-
109
-
110
-
111
-
112
-
113
-
114
-
115
-
116
-
117
-
118
-
119
-
120
-
121
-
122
-
123
-
124
-
125
-
126
-
127
-
128
-
129
-
130
-
131
-
132
-
133
-
134
-
135
-
136
-
137
-
138
-
139
-
140
-
141
-
142
-
143
-
144
-
145
-
146
-
147
-
148
-
149
-
 150
150 -
 151
151 -
 152
152 -
 153
153 -
 154
154 -
 155
155 -
 156
156 -
 157
157 -
 158
158 -
 159
159 -
 160
160 -
161
-
162
-
163
-
164
-
165
-
166
-
167
-
168
-
169
-
170
-
171
-
172
-
173
-
174
-
175
-
176
-
177
-
178
-
179
-
180
-
181
-
182
-
183
-
184
-
185
-
186
-
187
-
188
-
189
-
190
-
191
-
192
-
193
-
194
-
195
-
196
-
197
-
198
-
199
-
200
-
201
-
202
-
203
-
204
-
205
-
206
-
207
-
208
-
209
-
210
-
211
-
212
-
213
-
214
-
215
-
216
-
217
-
218
-
219
-
220
-
221
-
222
-
223
-
224
-
225
-
226
-
227
-
228
-
229
-
230
-
231
-
232
-
233
-
234
-
235
-
236
-
237
-
238
-
239
-
240
-
241
-
242
-
243
-
244
-
245
-
246
-
247
-
248
-
249
-
250
-
251
-
252
-
253
-
254
-
255
-
256
-
257
-
258
-
259
-
260
-
261
-
262
-
263
-
264
-
265
-
266
-
267
-
268
-
269
-
270
-
271
-
272
-
273
-
274
-
275
-
276
-
277
-
278
-
279
-
280
-
281
-
282
-
283
-
284
-
285
-
286
-
287
-
288
-
289
-
290
-
291
-
292
-
293
-
294
-
295
-
296
 |
 |