Samsung SCH-R640 User Manual (user Manual) (ver.f3) (English) - Page 74
Edit Contact, Options
 |
View all Samsung SCH-R640 manuals
Add to My Manuals
Save this manual to your list of manuals |
Page 74 highlights
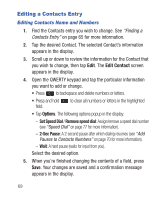
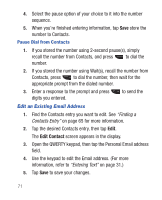
Editing a Contacts Entry Editing Contacts Name and Numbers 1. Find the Contacts entry you wish to change. See "Finding a Contacts Entry" on page 65 for more information. 2. Tap the desired Contact. The selected Contact's information appears in the display. 3. Scroll up or down to review the information for the Contact that you wish to change, then tap Edit. The Edit Contact screen appears in the display. 4. Open the QWERTY keypad and tap the particular information you want to add or change. • Press to backspace and delete numbers or letters. • Press and hold field. to clear all numbers or letters in the highlighted • Tap Options. The following options popup in the display: - Set Speed Dial / Remove speed dial: Assign/remove a speed dial number (see "Speed Dial" on page 77 for more information). - 2-Sec Pause: A 2-second pause after which dialing resumes (see "Add Pauses to Contacts Numbers" on page 70 for more information). - Wait: A hard pause (waits for input from you). Select the desired option. 5. When you're finished changing the contents of a field, press Save. Your changes are saved and a confirmation message appears in the display. 69
-
 1
1 -
2
-
3
-
4
-
5
-
6
-
7
-
8
-
9
-
10
-
11
-
12
-
13
-
14
-
15
-
16
-
17
-
18
-
19
-
20
-
21
-
22
-
23
-
24
-
25
-
26
-
27
-
28
-
29
-
30
-
31
-
32
-
33
-
34
-
35
-
36
-
37
-
38
-
39
-
40
-
41
-
42
-
43
-
44
-
45
-
46
-
47
-
48
-
49
-
50
-
51
-
52
-
53
-
54
-
55
-
56
-
57
-
58
-
59
-
60
-
61
-
62
-
63
-
64
-
65
-
66
-
67
-
68
-
 69
69 -
 70
70 -
 71
71 -
 72
72 -
 73
73 -
 74
74 -
 75
75 -
 76
76 -
 77
77 -
 78
78 -
 79
79 -
80
-
81
-
82
-
83
-
84
-
85
-
86
-
87
-
88
-
89
-
90
-
91
-
92
-
93
-
94
-
95
-
96
-
97
-
98
-
99
-
100
-
101
-
102
-
103
-
104
-
105
-
106
-
107
-
108
-
109
-
110
-
111
-
112
-
113
-
114
-
115
-
116
-
117
-
118
-
119
-
120
-
121
-
122
-
123
-
124
-
125
-
126
-
127
-
128
-
129
-
130
-
131
-
132
-
133
-
134
-
135
-
136
-
137
-
138
-
139
-
140
-
141
-
142
-
143
-
144
-
145
-
146
-
147
-
148
-
149
-
150
-
151
-
152
-
153
-
154
-
155
-
156
-
157
-
158
-
159
-
160
-
161
-
162
-
163
-
164
-
165
-
166
-
167
-
168
-
169
-
170
-
171
-
172
-
173
-
174
-
175
-
176
-
177
-
178
-
179
-
180
-
181
-
182
-
183
-
184
-
185
-
186
-
187
-
188
-
189
-
190
-
191
-
192
-
193
-
194
-
195
-
196
-
197
-
198
-
199
-
200
-
201
-
202
-
203
-
204
-
205
-
206
-
207
-
208
-
209
-
210
-
211
-
212
-
213
-
214
-
215
-
216
-
217
-
218
-
219
-
220
-
221
-
222
-
223
-
224
-
225
-
226
-
227
-
228
-
229
-
230
-
231
-
232
-
233
-
234
-
235
-
236
-
237
-
238
-
239
-
240
-
241
-
242
-
243
-
244
-
245
-
246
-
247
-
248
-
249
-
250
-
251
-
252
-
253
-
254
-
255
-
256
-
257
-
258
-
259
 |
 |