Dell PowerEdge T300 Hardware Owner's Manual (PDF) - Page 113
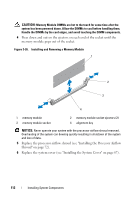
Installing Memory Modules, Press down on the memory module with your thumbs until the module is
 |
View all Dell PowerEdge T300 manuals
Add to My Manuals
Save this manual to your list of manuals |
Page 113 highlights
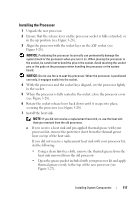
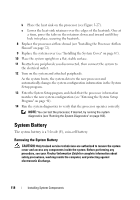
Installing Memory Modules CAUTION: Only trained service technicians are authorized to remove the system cover and access any components inside the system. Before performing any procedure, see your Product Information Guide for complete information about safety precautions, working inside the computer, and protecting against electrostatic discharge. 1 Turn off the system and attached peripherals, and disconnect the system from the electrical outlet and from the peripherals. 2 Remove the system cover (see "Removing the System Cover" on page 66). 3 Remove the processor airflow shroud (see "Removing the Processor Airflow Shroud" on page 70). 4 Press the ejectors on the memory module connector down and out (see Figure 3-26) to allow the memory module to be inserted into the connector. 5 Align the memory module's edge connector with the alignment key on the memory module connector, and insert the memory module into the connector (see Figure 3-26). NOTICE: To avoid damage to the memory module, press the module straight down into the connector while applying equal force to each end of the module. 6 Press down on the memory module with your thumbs until the module is firmly seated in the connector (see Figure 3-26). When the memory module is properly seated, the ejectors on the memory module connector snap into the cutouts at each end of the memory module. NOTICE: Never operate your system with the processor airflow shroud removed. Overheating of the system can develop quickly, resulting in shutdown of the system and loss of data. 7 Replace the processor airflow shroud (see "Installing the Processor Airflow Shroud" on page 72). 8 Replace the system cover (see "Installing the System Cover" on page 67). 9 Reattach any peripherals you disconnected, then connect the system to the electrical outlet. 10 Turn on the system and attached peripherals. Installing System Components 113
-
 1
1 -
2
-
3
-
4
-
5
-
6
-
7
-
8
-
9
-
10
-
11
-
12
-
13
-
14
-
15
-
16
-
17
-
18
-
19
-
20
-
21
-
22
-
23
-
24
-
25
-
26
-
27
-
28
-
29
-
30
-
31
-
32
-
33
-
34
-
35
-
36
-
37
-
38
-
39
-
40
-
41
-
42
-
43
-
44
-
45
-
46
-
47
-
48
-
49
-
50
-
51
-
52
-
53
-
54
-
55
-
56
-
57
-
58
-
59
-
60
-
61
-
62
-
63
-
64
-
65
-
66
-
67
-
68
-
69
-
70
-
71
-
72
-
73
-
74
-
75
-
76
-
77
-
78
-
79
-
80
-
81
-
82
-
83
-
84
-
85
-
86
-
87
-
88
-
89
-
90
-
91
-
92
-
93
-
94
-
95
-
96
-
97
-
98
-
99
-
100
-
101
-
102
-
103
-
104
-
105
-
106
-
107
-
 108
108 -
 109
109 -
 110
110 -
 111
111 -
 112
112 -
 113
113 -
 114
114 -
 115
115 -
 116
116 -
 117
117 -
 118
118 -
119
-
120
-
121
-
122
-
123
-
124
-
125
-
126
-
127
-
128
-
129
-
130
-
131
-
132
-
133
-
134
-
135
-
136
-
137
-
138
-
139
-
140
-
141
-
142
-
143
-
144
-
145
-
146
-
147
-
148
-
149
-
150
-
151
-
152
-
153
-
154
-
155
-
156
-
157
-
158
-
159
-
160
-
161
-
162
-
163
-
164
-
165
-
166
-
167
-
168
-
169
-
170
-
171
-
172
-
173
-
174
-
175
-
176
-
177
-
178
-
179
-
180
-
181
-
182
-
183
-
184
-
185
-
186
-
187
-
188
-
189
-
190
-
191
-
192
-
193
-
194
 |
 |
