Dell PowerEdge T300 Hardware Owner's Manual (PDF) - Page 97
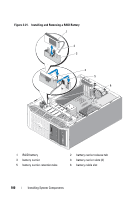
Installing a SAS Controller Card, Open the expansion card latch adjacent to the slot see - raid battery
 |
View all Dell PowerEdge T300 manuals
Add to My Manuals
Save this manual to your list of manuals |
Page 97 highlights
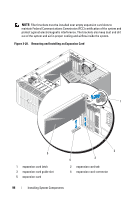
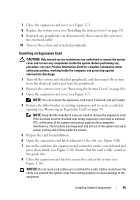
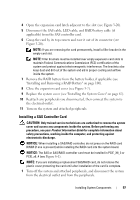
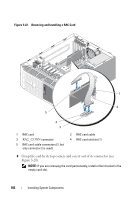
4 Open the expansion card latch adjacent to the slot (see Figure 3-20). 5 Disconnect the SAS cable, LED cable, and RAID battery cable (if applicable) from the SAS controller card. 6 Grasp the card by its top corners and ease it out of its connector (see Figure 3-20). NOTE: If you are removing the card permanently, install a filler bracket in the empty card slot. NOTE: Filler brackets must be installed over empty expansion card slots to maintain Federal Communications Commission (FCC) certification of the system and protect against electromagnetic interference. The brackets also keep dust and dirt out of the system and aid in proper cooling and airflow inside the system. 7 Remove the RAID battery from the battery holder, if applicable (see "Installing and Removing a RAID Battery" on page 100). 8 Close the expansion card cover (see Figure 3-7). 9 Replace the system cover (see "Installing the System Cover" on page 67). 10 Reattach any peripherals you disconnected, then connect the system to the electrical outlet. 11 Turn on the system and attached peripherals. Installing a SAS Controller Card CAUTION: Only trained service technicians are authorized to remove the system cover and access any components inside the system. Before performing any procedure, see your Product Information Guide for complete information about safety precautions, working inside the computer, and protecting against electrostatic discharge. NOTICE: When installing a SAS/RAID controller, do not press on the RAID card DIMM (if one is present) while installing the RAID card into the system board. NOTICE: The SAS or SAS/RAID controller card must be installed in PCIE_X8_3 or PCIE_x8_4 (see Figure 6-1). NOTE: If you are installing a replacement SAS/RAID card, do not remove the plastic cover protecting the card until after installation of the card is complete. 1 Turn off the system and attached peripherals, and disconnect the system from the electrical outlet and from the peripherals. Installing System Components 97
-
 1
1 -
2
-
3
-
4
-
5
-
6
-
7
-
8
-
9
-
10
-
11
-
12
-
13
-
14
-
15
-
16
-
17
-
18
-
19
-
20
-
21
-
22
-
23
-
24
-
25
-
26
-
27
-
28
-
29
-
30
-
31
-
32
-
33
-
34
-
35
-
36
-
37
-
38
-
39
-
40
-
41
-
42
-
43
-
44
-
45
-
46
-
47
-
48
-
49
-
50
-
51
-
52
-
53
-
54
-
55
-
56
-
57
-
58
-
59
-
60
-
61
-
62
-
63
-
64
-
65
-
66
-
67
-
68
-
69
-
70
-
71
-
72
-
73
-
74
-
75
-
76
-
77
-
78
-
79
-
80
-
81
-
82
-
83
-
84
-
85
-
86
-
87
-
88
-
89
-
90
-
91
-
 92
92 -
 93
93 -
 94
94 -
 95
95 -
 96
96 -
 97
97 -
 98
98 -
 99
99 -
 100
100 -
 101
101 -
 102
102 -
103
-
104
-
105
-
106
-
107
-
108
-
109
-
110
-
111
-
112
-
113
-
114
-
115
-
116
-
117
-
118
-
119
-
120
-
121
-
122
-
123
-
124
-
125
-
126
-
127
-
128
-
129
-
130
-
131
-
132
-
133
-
134
-
135
-
136
-
137
-
138
-
139
-
140
-
141
-
142
-
143
-
144
-
145
-
146
-
147
-
148
-
149
-
150
-
151
-
152
-
153
-
154
-
155
-
156
-
157
-
158
-
159
-
160
-
161
-
162
-
163
-
164
-
165
-
166
-
167
-
168
-
169
-
170
-
171
-
172
-
173
-
174
-
175
-
176
-
177
-
178
-
179
-
180
-
181
-
182
-
183
-
184
-
185
-
186
-
187
-
188
-
189
-
190
-
191
-
192
-
193
-
194
 |
 |
