Dell PowerEdge T300 Hardware Owner's Manual (PDF) - Page 66
Installing a Front Bezel Insert, System Cover, Removing the System Cover
 |
View all Dell PowerEdge T300 manuals
Add to My Manuals
Save this manual to your list of manuals |
Page 66 highlights
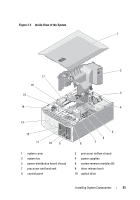
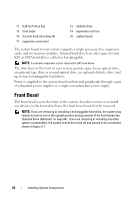
Installing a Front Bezel Insert NOTE: If you remove a drive from one or more of the front drive bays, replace the corresponding insert(s) on the front bezel. 1 From the back of the front bezel, align one of the insert tabs with the corresponding notch on the bezel, then press the insert into the bezel until the opposite tab snaps into place (see Figure 3-4). 2 Replace the front bezel (see "Installing the Front Bezel" on page 64). System Cover Removing the System Cover CAUTION: Only trained service technicians are authorized to remove the system cover and access any components inside the system. Before performing any procedure, see your Product Information Guide for complete information about safety precautions, working inside the computer, and protecting against electrostatic discharge. 1 Ensure that your work surface is flat and clean to prevent the system cover from being scratched. 2 Turn off the system and all attached peripherals. 3 Disconnect the system from the electrical outlet, then disconnect all peripherals from the system. 4 Press the power button to ground the system board. 5 Rotate the system feet inward into the closed position (see Figure 3-5). 6 Lay the system on a flat surface with the system cover facing up (see Figure 3-5). 7 Using a small flat-blade screwdriver, turn the release latch lock on the cover release latch counterclockwise to the unlocked position (see Figure 3-5). 8 Lift the cover release latch, then rotate the latch towards the back of the system to release the cover (see Figure 3-5). 9 Grasp the cover on both sides and carefully lift the cover away from the system. 66 Installing System Components
-
 1
1 -
2
-
3
-
4
-
5
-
6
-
7
-
8
-
9
-
10
-
11
-
12
-
13
-
14
-
15
-
16
-
17
-
18
-
19
-
20
-
21
-
22
-
23
-
24
-
25
-
26
-
27
-
28
-
29
-
30
-
31
-
32
-
33
-
34
-
35
-
36
-
37
-
38
-
39
-
40
-
41
-
42
-
43
-
44
-
45
-
46
-
47
-
48
-
49
-
50
-
51
-
52
-
53
-
54
-
55
-
56
-
57
-
58
-
59
-
60
-
 61
61 -
 62
62 -
 63
63 -
 64
64 -
 65
65 -
 66
66 -
 67
67 -
 68
68 -
 69
69 -
 70
70 -
 71
71 -
72
-
73
-
74
-
75
-
76
-
77
-
78
-
79
-
80
-
81
-
82
-
83
-
84
-
85
-
86
-
87
-
88
-
89
-
90
-
91
-
92
-
93
-
94
-
95
-
96
-
97
-
98
-
99
-
100
-
101
-
102
-
103
-
104
-
105
-
106
-
107
-
108
-
109
-
110
-
111
-
112
-
113
-
114
-
115
-
116
-
117
-
118
-
119
-
120
-
121
-
122
-
123
-
124
-
125
-
126
-
127
-
128
-
129
-
130
-
131
-
132
-
133
-
134
-
135
-
136
-
137
-
138
-
139
-
140
-
141
-
142
-
143
-
144
-
145
-
146
-
147
-
148
-
149
-
150
-
151
-
152
-
153
-
154
-
155
-
156
-
157
-
158
-
159
-
160
-
161
-
162
-
163
-
164
-
165
-
166
-
167
-
168
-
169
-
170
-
171
-
172
-
173
-
174
-
175
-
176
-
177
-
178
-
179
-
180
-
181
-
182
-
183
-
184
-
185
-
186
-
187
-
188
-
189
-
190
-
191
-
192
-
193
-
194
 |
 |
