Dell PowerEdge T300 Hardware Owner's Manual (PDF) - Page 87
Replace the system cover see Installing the System Cover on Shroud
 |
View all Dell PowerEdge T300 manuals
Add to My Manuals
Save this manual to your list of manuals |
Page 87 highlights
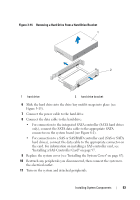
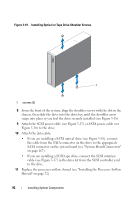
Figure 3-16. Installing Diskette Drive Shoulder Screws 1 1 shoulder screws (4) 8 From the front of the system, align the shoulder screws with the slot in the chassis, then slide the diskette drive into the drive bay until the shoulder screw snaps into place or you feel the drive securely installed (see Figure 3-15). 9 Connect the power cable to the diskette drive. 10 Connect one end of the data cable to the diskette drive connector on the system board (see Figure 6-1), then connect the other end of the data cable to the diskette drive. 11 Replace the processor airflow shroud (see "Installing the Processor Airflow Shroud" on page 72). 12 Replace the system cover (see "Installing the System Cover" on page 67). 13 Replace the front bezel (see "Installing the Front Bezel" on page 64). 14 Enter the System Setup program and ensure that the diskette drive's controller is enabled (see "Entering the System Setup Program" on page 41). Installing System Components 87
-
 1
1 -
2
-
3
-
4
-
5
-
6
-
7
-
8
-
9
-
10
-
11
-
12
-
13
-
14
-
15
-
16
-
17
-
18
-
19
-
20
-
21
-
22
-
23
-
24
-
25
-
26
-
27
-
28
-
29
-
30
-
31
-
32
-
33
-
34
-
35
-
36
-
37
-
38
-
39
-
40
-
41
-
42
-
43
-
44
-
45
-
46
-
47
-
48
-
49
-
50
-
51
-
52
-
53
-
54
-
55
-
56
-
57
-
58
-
59
-
60
-
61
-
62
-
63
-
64
-
65
-
66
-
67
-
68
-
69
-
70
-
71
-
72
-
73
-
74
-
75
-
76
-
77
-
78
-
79
-
80
-
81
-
 82
82 -
 83
83 -
 84
84 -
 85
85 -
 86
86 -
 87
87 -
 88
88 -
 89
89 -
 90
90 -
 91
91 -
 92
92 -
93
-
94
-
95
-
96
-
97
-
98
-
99
-
100
-
101
-
102
-
103
-
104
-
105
-
106
-
107
-
108
-
109
-
110
-
111
-
112
-
113
-
114
-
115
-
116
-
117
-
118
-
119
-
120
-
121
-
122
-
123
-
124
-
125
-
126
-
127
-
128
-
129
-
130
-
131
-
132
-
133
-
134
-
135
-
136
-
137
-
138
-
139
-
140
-
141
-
142
-
143
-
144
-
145
-
146
-
147
-
148
-
149
-
150
-
151
-
152
-
153
-
154
-
155
-
156
-
157
-
158
-
159
-
160
-
161
-
162
-
163
-
164
-
165
-
166
-
167
-
168
-
169
-
170
-
171
-
172
-
173
-
174
-
175
-
176
-
177
-
178
-
179
-
180
-
181
-
182
-
183
-
184
-
185
-
186
-
187
-
188
-
189
-
190
-
191
-
192
-
193
-
194
 |
 |
