Dell PowerEdge T300 Hardware Owner's Manual (PDF) - Page 83
Installing a SAS Controller Card,
 |
View all Dell PowerEdge T300 manuals
Add to My Manuals
Save this manual to your list of manuals |
Page 83 highlights
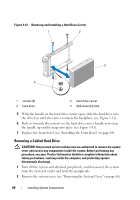
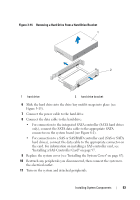
Figure 3-14. Removing a Hard Drive From a Hard Drive Bracket 1 2 1 hard drive 2 hard drive bracket 6 Slide the hard drive into the drive bay until it snaps into place (see Figure 3-13). 7 Connect the power cable to the hard drive. 8 Connect the data cable to the hard drive: • For connection to the integrated SATA controller (SATA hard drives only), connect the SATA data cable to the appropriate SATA connector on the system board (see Figure 6-1). • For connection to a SAS or SAS/RAID controller card (SAS or SATA hard drives), connect the data cable to the appropriate connector on the card. For information on installing a SAS controller card, see "Installing a SAS Controller Card" on page 97. 9 Replace the system cover (see "Installing the System Cover" on page 67). 10 Reattach any peripherals you disconnected, then connect the system to the electrical outlet. 11 Turn on the system and attached peripherals. Installing System Components 83
-
 1
1 -
2
-
3
-
4
-
5
-
6
-
7
-
8
-
9
-
10
-
11
-
12
-
13
-
14
-
15
-
16
-
17
-
18
-
19
-
20
-
21
-
22
-
23
-
24
-
25
-
26
-
27
-
28
-
29
-
30
-
31
-
32
-
33
-
34
-
35
-
36
-
37
-
38
-
39
-
40
-
41
-
42
-
43
-
44
-
45
-
46
-
47
-
48
-
49
-
50
-
51
-
52
-
53
-
54
-
55
-
56
-
57
-
58
-
59
-
60
-
61
-
62
-
63
-
64
-
65
-
66
-
67
-
68
-
69
-
70
-
71
-
72
-
73
-
74
-
75
-
76
-
77
-
 78
78 -
 79
79 -
 80
80 -
 81
81 -
 82
82 -
 83
83 -
 84
84 -
 85
85 -
 86
86 -
 87
87 -
 88
88 -
89
-
90
-
91
-
92
-
93
-
94
-
95
-
96
-
97
-
98
-
99
-
100
-
101
-
102
-
103
-
104
-
105
-
106
-
107
-
108
-
109
-
110
-
111
-
112
-
113
-
114
-
115
-
116
-
117
-
118
-
119
-
120
-
121
-
122
-
123
-
124
-
125
-
126
-
127
-
128
-
129
-
130
-
131
-
132
-
133
-
134
-
135
-
136
-
137
-
138
-
139
-
140
-
141
-
142
-
143
-
144
-
145
-
146
-
147
-
148
-
149
-
150
-
151
-
152
-
153
-
154
-
155
-
156
-
157
-
158
-
159
-
160
-
161
-
162
-
163
-
164
-
165
-
166
-
167
-
168
-
169
-
170
-
171
-
172
-
173
-
174
-
175
-
176
-
177
-
178
-
179
-
180
-
181
-
182
-
183
-
184
-
185
-
186
-
187
-
188
-
189
-
190
-
191
-
192
-
193
-
194
 |
 |
