Dell PowerEdge T610 Hardware Owner's Manual - Page 112
Integrated Storage Controller Card - raid configuration
 |
View all Dell PowerEdge T610 manuals
Add to My Manuals
Save this manual to your list of manuals |
Page 112 highlights
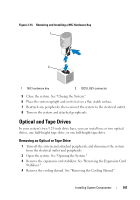
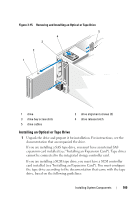
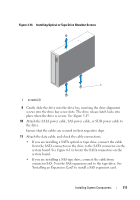
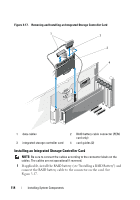
• If you are installing a SCSI tape drive, connect the SCSI interface cable in the drive kit from the SCSI controller expansion card to the drive. See "Installing an Expansion Card" to install the SCSI expansion card. 12 Replace the cooling shroud. See "Installing the Cooling Shroud." 13 Replace the expansion card stabilizer. See "Installing the Expansion Card Stabilizer." 14 Close the system. See "Closing the System." 15 Place the system upright and on its feet on a flat, stable surface. 16 Reattach any peripherals, then connect the system to the electrical outlet. 17 Turn on the system and attached peripherals. 18 (Optional) Test the drive by running the system diagnostics. See "Running the System Diagnostics." Integrated Storage Controller Card Your system includes a dedicated slot on the system board for an integrated storage controller card that provides the storage subsystem for your system's internal hard drives. The controller supports SAS and SATA hard drives and also enables you to set up the hard drives in RAID configurations as supported by the version of the storage controller included with your system. Removing an Integrated Storage Controller Card 1 Turn off the system, including any attached peripherals, and disconnect the system from the electrical outlet and peripherals. 2 Open the system. See "Opening the System." 3 Remove the expansion card stabilizer. See "Removing the Expansion Card Stabilizer." 4 Disconnect the data cables from the storage card. See Figure 3-17. To disconnect a cable, press the blue latches on both sides of the cable connector and ease it out from the connector on the card. 5 Remove the card from the storage-card slot. a Pull and hold the blue card guide away from upper corner of the card to unlock it. 112 Installing System Components
-
 1
1 -
2
-
3
-
4
-
5
-
6
-
7
-
8
-
9
-
10
-
11
-
12
-
13
-
14
-
15
-
16
-
17
-
18
-
19
-
20
-
21
-
22
-
23
-
24
-
25
-
26
-
27
-
28
-
29
-
30
-
31
-
32
-
33
-
34
-
35
-
36
-
37
-
38
-
39
-
40
-
41
-
42
-
43
-
44
-
45
-
46
-
47
-
48
-
49
-
50
-
51
-
52
-
53
-
54
-
55
-
56
-
57
-
58
-
59
-
60
-
61
-
62
-
63
-
64
-
65
-
66
-
67
-
68
-
69
-
70
-
71
-
72
-
73
-
74
-
75
-
76
-
77
-
78
-
79
-
80
-
81
-
82
-
83
-
84
-
85
-
86
-
87
-
88
-
89
-
90
-
91
-
92
-
93
-
94
-
95
-
96
-
97
-
98
-
99
-
100
-
101
-
102
-
103
-
104
-
105
-
106
-
 107
107 -
 108
108 -
 109
109 -
 110
110 -
 111
111 -
 112
112 -
 113
113 -
 114
114 -
 115
115 -
 116
116 -
 117
117 -
118
-
119
-
120
-
121
-
122
-
123
-
124
-
125
-
126
-
127
-
128
-
129
-
130
-
131
-
132
-
133
-
134
-
135
-
136
-
137
-
138
-
139
-
140
-
141
-
142
-
143
-
144
-
145
-
146
-
147
-
148
-
149
-
150
-
151
-
152
-
153
-
154
-
155
-
156
-
157
-
158
-
159
-
160
-
161
-
162
-
163
-
164
-
165
-
166
-
167
-
168
-
169
-
170
-
171
-
172
-
173
-
174
-
175
-
176
-
177
-
178
-
179
-
180
-
181
-
182
-
183
-
184
-
185
-
186
-
187
-
188
-
189
-
190
-
191
-
192
-
193
-
194
-
195
-
196
-
197
-
198
-
199
-
200
-
201
-
202
-
203
-
204
-
205
-
206
 |
 |