Dell PowerEdge T610 Hardware Owner's Manual - Page 116
Installing the Expansion Card Stabilizer Bracket, Storage Controller Card. - raid controller battery
 |
View all Dell PowerEdge T610 manuals
Add to My Manuals
Save this manual to your list of manuals |
Page 116 highlights
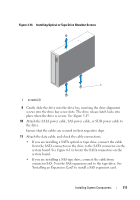
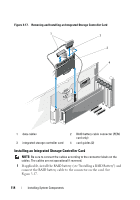
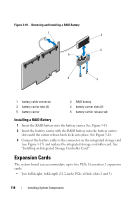
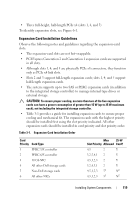
3 Remove the expansion card stabilizer. See "Removing the Expansion Card Stabilizer." 4 Disconnect the data cables from the integrated storage card. See Figure 3-17. To disconnect a cable, press the blue latches on both sides of the cable connector and ease it out from the connector on the card. 5 Remove the integrated storage card. See "Removing an Integrated Storage Controller Card." CAUTION: Disconnecting the RAID battery cable from a PERC card can cause data loss if the "dirty cache" LED on the card is lit. The LED indicates that data is still cached in controller memory and the data was not cleared at system shutdown. 6 If applicable and necessary, disconnect the RAID battery cable from the integrated storage card. See Figure 3-17. 7 If applicable, remove any full-length expansion cards installed in slot 2 or slot 3 and disconnect any attached cables. See "Removing an Expansion Card." 8 Pull the blue release tab on the expansion card stabilizer bracket, and slide the bracket up and out of the chassis. See Figure 3-27. Installing the Expansion Card Stabilizer Bracket 1 Fit the four slots on the expansion card stabilizer bracket over the four metal guides in the chassis, and slide the bracket downwards until the blue release tab locks into place. See Figure 3-27. 2 If applicable, install the full-length expansion cards in slots 2 and 3 and reconnect the applicable cables. See "Installing an Expansion Card." 3 If applicable, reconnect the RAID battery cable to the integrated storage card. See Figure 3-17. 4 Install the integrated storage controller card. See "Installing an Integrated Storage Controller Card." 5 Reconnect the data cables to the integrated storage card. See Figure 3-17. 6 Install the expansion card stabilizer. See "Installing the Expansion Card Stabilizer." 7 Close the system. See "Closing the System." 116 Installing System Components
-
 1
1 -
2
-
3
-
4
-
5
-
6
-
7
-
8
-
9
-
10
-
11
-
12
-
13
-
14
-
15
-
16
-
17
-
18
-
19
-
20
-
21
-
22
-
23
-
24
-
25
-
26
-
27
-
28
-
29
-
30
-
31
-
32
-
33
-
34
-
35
-
36
-
37
-
38
-
39
-
40
-
41
-
42
-
43
-
44
-
45
-
46
-
47
-
48
-
49
-
50
-
51
-
52
-
53
-
54
-
55
-
56
-
57
-
58
-
59
-
60
-
61
-
62
-
63
-
64
-
65
-
66
-
67
-
68
-
69
-
70
-
71
-
72
-
73
-
74
-
75
-
76
-
77
-
78
-
79
-
80
-
81
-
82
-
83
-
84
-
85
-
86
-
87
-
88
-
89
-
90
-
91
-
92
-
93
-
94
-
95
-
96
-
97
-
98
-
99
-
100
-
101
-
102
-
103
-
104
-
105
-
106
-
107
-
108
-
109
-
110
-
 111
111 -
 112
112 -
 113
113 -
 114
114 -
 115
115 -
 116
116 -
 117
117 -
 118
118 -
 119
119 -
 120
120 -
 121
121 -
122
-
123
-
124
-
125
-
126
-
127
-
128
-
129
-
130
-
131
-
132
-
133
-
134
-
135
-
136
-
137
-
138
-
139
-
140
-
141
-
142
-
143
-
144
-
145
-
146
-
147
-
148
-
149
-
150
-
151
-
152
-
153
-
154
-
155
-
156
-
157
-
158
-
159
-
160
-
161
-
162
-
163
-
164
-
165
-
166
-
167
-
168
-
169
-
170
-
171
-
172
-
173
-
174
-
175
-
176
-
177
-
178
-
179
-
180
-
181
-
182
-
183
-
184
-
185
-
186
-
187
-
188
-
189
-
190
-
191
-
192
-
193
-
194
-
195
-
196
-
197
-
198
-
199
-
200
-
201
-
202
-
203
-
204
-
205
-
206
 |
 |