Dell PowerEdge T610 Hardware Owner's Manual - Page 98
Internal SD Flash Card, Removing the Internal SD Module, Installing an Internal SD Flash Card
 |
View all Dell PowerEdge T610 manuals
Add to My Manuals
Save this manual to your list of manuals |
Page 98 highlights
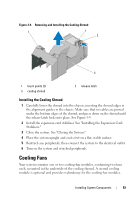
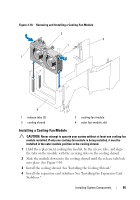
8 Install the expansion card stabilizer. See "Installing the Expansion Card Stabilizer." 9 Close the system. See "Closing the System." 10 Place the system upright and on its feet on a flat, stable surface. 11 Reattach any peripherals, then connect the system to the electrical outlet. 12 Turn on the system and attached peripherals. Removing the Internal SD Module 1 Turn off the system, including any attached peripherals, and disconnect the system from the electrical outlet. 2 Open the system. See "Opening the System." 3 Remove the expansion card stabilizer. See "Removing the Expansion Card Stabilizer." 4 Remove the cooling shroud. See "Removing the Cooling Shroud." 5 Disconnect the internal SD module cable from the module and from the system board. 6 Lift upwards on the latch securing the internal SD module to the chassis, then lift the module out of the chassis. See Figure 3-11. 7 Install the cooling shroud. See "Installing the Cooling Shroud." 8 Install the expansion card stabilizer. See "Installing the Expansion Card Stabilizer." 9 Close the system. See "Closing the System." 10 Place the system upright and on its feet on a flat, stable surface. 11 Reattach any peripherals, then connect the system to the electrical outlet. 12 Turn on the system and attached peripherals. Internal SD Flash Card Installing an Internal SD Flash Card NOTE: To use an SD card with your system, ensure that the internal SD card port is enabled in the System Setup program. See "Using the System Setup Program and UEFI Boot Manager." 98 Installing System Components
-
 1
1 -
2
-
3
-
4
-
5
-
6
-
7
-
8
-
9
-
10
-
11
-
12
-
13
-
14
-
15
-
16
-
17
-
18
-
19
-
20
-
21
-
22
-
23
-
24
-
25
-
26
-
27
-
28
-
29
-
30
-
31
-
32
-
33
-
34
-
35
-
36
-
37
-
38
-
39
-
40
-
41
-
42
-
43
-
44
-
45
-
46
-
47
-
48
-
49
-
50
-
51
-
52
-
53
-
54
-
55
-
56
-
57
-
58
-
59
-
60
-
61
-
62
-
63
-
64
-
65
-
66
-
67
-
68
-
69
-
70
-
71
-
72
-
73
-
74
-
75
-
76
-
77
-
78
-
79
-
80
-
81
-
82
-
83
-
84
-
85
-
86
-
87
-
88
-
89
-
90
-
91
-
92
-
 93
93 -
 94
94 -
 95
95 -
 96
96 -
 97
97 -
 98
98 -
 99
99 -
 100
100 -
 101
101 -
 102
102 -
 103
103 -
104
-
105
-
106
-
107
-
108
-
109
-
110
-
111
-
112
-
113
-
114
-
115
-
116
-
117
-
118
-
119
-
120
-
121
-
122
-
123
-
124
-
125
-
126
-
127
-
128
-
129
-
130
-
131
-
132
-
133
-
134
-
135
-
136
-
137
-
138
-
139
-
140
-
141
-
142
-
143
-
144
-
145
-
146
-
147
-
148
-
149
-
150
-
151
-
152
-
153
-
154
-
155
-
156
-
157
-
158
-
159
-
160
-
161
-
162
-
163
-
164
-
165
-
166
-
167
-
168
-
169
-
170
-
171
-
172
-
173
-
174
-
175
-
176
-
177
-
178
-
179
-
180
-
181
-
182
-
183
-
184
-
185
-
186
-
187
-
188
-
189
-
190
-
191
-
192
-
193
-
194
-
195
-
196
-
197
-
198
-
199
-
200
-
201
-
202
-
203
-
204
-
205
-
206
 |
 |