Dell PowerEdge T610 Hardware Owner's Manual - Page 187
a System Password., the bracket downwards until the release latch locks into place. See
 |
View all Dell PowerEdge T610 manuals
Add to My Manuals
Save this manual to your list of manuals |
Page 187 highlights
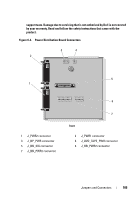
11 Reconnect your system and peripherals to their electrical outlets, and turn on the system. The existing passwords are not disabled (erased) until the system boots with the password jumper plug removed. However, before you assign a new system and/or setup password, you must reset the jumper plug to the enabled position. NOTE: If you assign a new system and/or setup password with the jumper plug still in the disabled position, the system disables the new password(s) the next time it boots. 12 Turn off the system, including any attached peripherals, and disconnect the system from the electrical outlet. 13 Open the system. See "Opening the System." 14 Remove the expansion card stabilizer. See "Removing the Expansion Card Stabilizer." 15 Move the PWRD_EN jumper plug to the enabled position (pins 2 and 4). 16 Replace the expansion-card stabilizer bracket: Fit the slots on the bracket over the metal guides in the chassis, and slide the bracket downwards until the release latch locks into place. See Figure 3-27. 17 Replace the integrated storage controller card. See "Installing an Integrated Storage Controller Card." 18 Replace the expansion card stabilizer. See "Installing the Expansion Card Stabilizer." 19 Close the system. See "Closing the System." 20 Reconnect your system and peripherals to their electrical outlets, and turn on the system. 21 Assign a new system and/or setup password. To assign a new password using the System Setup program, see "Assigning a System Password." Jumpers and Connectors 187
-
 1
1 -
2
-
3
-
4
-
5
-
6
-
7
-
8
-
9
-
10
-
11
-
12
-
13
-
14
-
15
-
16
-
17
-
18
-
19
-
20
-
21
-
22
-
23
-
24
-
25
-
26
-
27
-
28
-
29
-
30
-
31
-
32
-
33
-
34
-
35
-
36
-
37
-
38
-
39
-
40
-
41
-
42
-
43
-
44
-
45
-
46
-
47
-
48
-
49
-
50
-
51
-
52
-
53
-
54
-
55
-
56
-
57
-
58
-
59
-
60
-
61
-
62
-
63
-
64
-
65
-
66
-
67
-
68
-
69
-
70
-
71
-
72
-
73
-
74
-
75
-
76
-
77
-
78
-
79
-
80
-
81
-
82
-
83
-
84
-
85
-
86
-
87
-
88
-
89
-
90
-
91
-
92
-
93
-
94
-
95
-
96
-
97
-
98
-
99
-
100
-
101
-
102
-
103
-
104
-
105
-
106
-
107
-
108
-
109
-
110
-
111
-
112
-
113
-
114
-
115
-
116
-
117
-
118
-
119
-
120
-
121
-
122
-
123
-
124
-
125
-
126
-
127
-
128
-
129
-
130
-
131
-
132
-
133
-
134
-
135
-
136
-
137
-
138
-
139
-
140
-
141
-
142
-
143
-
144
-
145
-
146
-
147
-
148
-
149
-
150
-
151
-
152
-
153
-
154
-
155
-
156
-
157
-
158
-
159
-
160
-
161
-
162
-
163
-
164
-
165
-
166
-
167
-
168
-
169
-
170
-
171
-
172
-
173
-
174
-
175
-
176
-
177
-
178
-
179
-
180
-
181
-
 182
182 -
 183
183 -
 184
184 -
 185
185 -
 186
186 -
 187
187 -
 188
188 -
 189
189 -
 190
190 -
 191
191 -
 192
192 -
193
-
194
-
195
-
196
-
197
-
198
-
199
-
200
-
201
-
202
-
203
-
204
-
205
-
206
 |
 |