HP C8180 Windows Help - Page 108
Rotate a photo, Options, To preview your cropped photo, Print, Preview, View Photos
 |
UPC - 883585123384
View all HP C8180 manuals
Add to My Manuals
Save this manual to your list of manuals |
Page 108 highlights
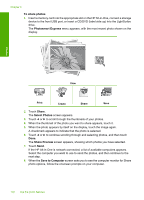
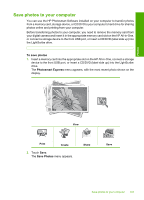
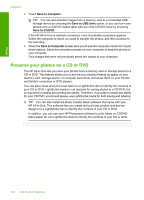
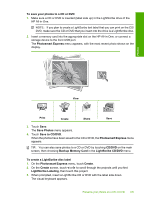
Photos 4. When the thumbnail of the photo you want to edit appears, touch it. 5. When the selected photo appears by itself on the display, touch the image or touch Options. The Options menu appears. 6. Touch Edit. The Edit menu appears. 7. Touch Crop. The Crop screen appears. 8. Touch the Zoom In or Zoom Out magnifying glass icons on the right side of the display to zoom closer to or farther away from the subject of the photo. An outline appears on the photo to show you an approximate view of the area that will print. 9. Use the arrow buttons to pan around the photo and select a specific area to print. 10. Touch Crop. To preview your cropped photo ▲ Touch the Back icon until you return to the Options menu, then touch Print Preview. To print your cropped photo ▲ Touch the Back icon until you return to the View Photos screen, then touch Print. Rotate a photo Depending how a photo is saved, the photo might appear sideways or upside down on the display. You might need to rotate the photo to make it show or print properly. NOTE: When printing more than one photo on a page, the HP All-in-One automatically adjusts the orientation of your photos to fit a maximum number of photos on the page. The rotation you apply here is ignored to accommodate the number of photos selected per page. To rotate a photo 1. Insert a memory card into the appropriate slot on the HP All-in-One, connect a storage device to the front USB port, or insert a CD/DVD (label side up) into the LightScribe drive. The Photosmart Express menu appears, with the most recent photo shown on the display. 2. Touch View. The View Photos screen appears. 3. Touch or to scroll through the thumbnails of your photos. 4. When the thumbnail of the photo you want to edit appears, touch it. 5. When the selected photo appears by itself on the display, touch the image or touch Options. The Options menu appears. Edit photos using the control panel 107
-
 1
1 -
2
-
3
-
4
-
5
-
6
-
7
-
8
-
9
-
10
-
11
-
12
-
13
-
14
-
15
-
16
-
17
-
18
-
19
-
20
-
21
-
22
-
23
-
24
-
25
-
26
-
27
-
28
-
29
-
30
-
31
-
32
-
33
-
34
-
35
-
36
-
37
-
38
-
39
-
40
-
41
-
42
-
43
-
44
-
45
-
46
-
47
-
48
-
49
-
50
-
51
-
52
-
53
-
54
-
55
-
56
-
57
-
58
-
59
-
60
-
61
-
62
-
63
-
64
-
65
-
66
-
67
-
68
-
69
-
70
-
71
-
72
-
73
-
74
-
75
-
76
-
77
-
78
-
79
-
80
-
81
-
82
-
83
-
84
-
85
-
86
-
87
-
88
-
89
-
90
-
91
-
92
-
93
-
94
-
95
-
96
-
97
-
98
-
99
-
100
-
101
-
102
-
 103
103 -
 104
104 -
 105
105 -
 106
106 -
 107
107 -
 108
108 -
 109
109 -
 110
110 -
 111
111 -
 112
112 -
 113
113 -
114
-
115
-
116
-
117
-
118
-
119
-
120
-
121
-
122
-
123
-
124
-
125
-
126
-
127
-
128
-
129
-
130
-
131
-
132
-
133
-
134
-
135
-
136
-
137
-
138
-
139
-
140
-
141
-
142
-
143
-
144
-
145
-
146
-
147
-
148
-
149
-
150
-
151
-
152
-
153
-
154
-
155
-
156
-
157
-
158
-
159
-
160
-
161
-
162
-
163
-
164
-
165
-
166
-
167
-
168
-
169
-
170
-
171
-
172
-
173
-
174
-
175
-
176
-
177
-
178
-
179
-
180
-
181
-
182
-
183
-
184
-
185
-
186
-
187
-
188
-
189
-
190
-
191
-
192
-
193
-
194
-
195
-
196
-
197
-
198
-
199
-
200
-
201
-
202
-
203
-
204
-
205
-
206
-
207
-
208
-
209
-
210
-
211
-
212
-
213
-
214
-
215
-
216
-
217
-
218
-
219
-
220
-
221
-
222
-
223
-
224
-
225
-
226
-
227
-
228
-
229
-
230
-
231
-
232
-
233
-
234
-
235
 |
 |