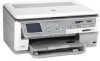
HP C8180 Windows Help - Page 117
Scan an original to a CD/DVD, Scan slides or negative film
 |
UPC - 883585123384
View all HP C8180 manuals
Add to My Manuals
Save this manual to your list of manuals |
Page 117 highlights
Scan Chapter 9 3. Touch Scan. The Scan Menu appears. 4. Touch Scan to Memory Device. The HP All-in-One scans the image and saves the file to the memory card or the storage device in the JPEG format. Scan an original to a CD/DVD You can send the scanned image as a JPEG image to a recordable CD/DVD inserted in the CD/DVD drive. This enables you to use the photo print options to print the scanned image. To save a scan to a CD/DVD 1. Make sure that a single recordable CD or DVD is loaded in the CD/DVD drive of the HP All-in-One with the label side up. NOTE: You must use LightScribe-compatible media to label the disc after scanning the original. 2. Load your original print side down on the right front corner of the glass. 3. Touch Scan. The Scan Menu appears. 4. Touch Scan to CD/DVD. The HP All-in-One scans the image and saves the file to the CD/DVD in the JPEG format. Scan slides or negative film You can scan slides and negative film from the control panel using the Slide and Negative Film holder. Before scanning slides and negatives, you must remove the lid backing and load the Slide and Negative Film holder. NOTE: The HP All-in-One automatically detects whether you are scanning color negatives, slides, or black and white negatives. You can manually change these settings in the Original Type option on the Film Menu. To scan a slide or negative 1. Load the Slide and Negative Film holder print side down in the right front corner of the glass. 2. Touch Scan. The Scan Menu appears. 3. Touch Scan Film. The Scan Film Menu appears. 116 Use the scan features
-
 1
1 -
2
-
3
-
4
-
5
-
6
-
7
-
8
-
9
-
10
-
11
-
12
-
13
-
14
-
15
-
16
-
17
-
18
-
19
-
20
-
21
-
22
-
23
-
24
-
25
-
26
-
27
-
28
-
29
-
30
-
31
-
32
-
33
-
34
-
35
-
36
-
37
-
38
-
39
-
40
-
41
-
42
-
43
-
44
-
45
-
46
-
47
-
48
-
49
-
50
-
51
-
52
-
53
-
54
-
55
-
56
-
57
-
58
-
59
-
60
-
61
-
62
-
63
-
64
-
65
-
66
-
67
-
68
-
69
-
70
-
71
-
72
-
73
-
74
-
75
-
76
-
77
-
78
-
79
-
80
-
81
-
82
-
83
-
84
-
85
-
86
-
87
-
88
-
89
-
90
-
91
-
92
-
93
-
94
-
95
-
96
-
97
-
98
-
99
-
100
-
101
-
102
-
103
-
104
-
105
-
106
-
107
-
108
-
109
-
110
-
111
-
 112
112 -
 113
113 -
 114
114 -
 115
115 -
 116
116 -
 117
117 -
 118
118 -
 119
119 -
 120
120 -
 121
121 -
 122
122 -
123
-
124
-
125
-
126
-
127
-
128
-
129
-
130
-
131
-
132
-
133
-
134
-
135
-
136
-
137
-
138
-
139
-
140
-
141
-
142
-
143
-
144
-
145
-
146
-
147
-
148
-
149
-
150
-
151
-
152
-
153
-
154
-
155
-
156
-
157
-
158
-
159
-
160
-
161
-
162
-
163
-
164
-
165
-
166
-
167
-
168
-
169
-
170
-
171
-
172
-
173
-
174
-
175
-
176
-
177
-
178
-
179
-
180
-
181
-
182
-
183
-
184
-
185
-
186
-
187
-
188
-
189
-
190
-
191
-
192
-
193
-
194
-
195
-
196
-
197
-
198
-
199
-
200
-
201
-
202
-
203
-
204
-
205
-
206
-
207
-
208
-
209
-
210
-
211
-
212
-
213
-
214
-
215
-
216
-
217
-
218
-
219
-
220
-
221
-
222
-
223
-
224
-
225
-
226
-
227
-
228
-
229
-
230
-
231
-
232
-
233
-
234
-
235
 |
 |