HP C8180 Windows Help - Page 129
Resize an original using custom settings, Crop an original, Fit
 |
UPC - 883585123384
View all HP C8180 manuals
Add to My Manuals
Save this manual to your list of manuals |
Page 129 highlights
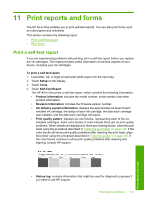
Chapter 10 4. Touch Size. The Size menu appears. 5. Touch Fit to Page. 6. Touch Done. Resize an original using custom settings You can use your own custom settings to reduce or enlarge a copy of a document. To set a custom size from the control panel 1. Make sure you have paper loaded in the input tray. 2. Load your original print side down on the right front corner of the glass. 3. Touch Copy. The Copy Menu appears. 4. Touch Size. The Size menu appears. 5. Touch Custom 100%. The Custom 100% menu appears. 6. Touch or to select a percentage to reduce or enlarge the copy. The minimum and maximum percentage to resize a copy varies by model. 7. Touch Done. Crop an original After changing settings on the HP All-in-One for making a copy, you can use the crop feature to specify a particular area of the original to copy. To crop your copy from the control panel 1. Touch Copy. The Copy Menu appears. 2. Change copy settings on the HP All-in-One to accurately reflect the copy you want to make. 3. Touch Crop. NOTE: If the menu option you want is not visible on the screen, touch or to scroll through all the menu options. The Crop screen appears. 4. Touch the Zoom In or Zoom Out magnifying glass icons on the right side of the display to zoom closer to or farther away from the original. An outline appears on the original to show you an approximate view of the area that will be copied. 5. Use the arrow buttons to pan around the original and select a specific area to copy. 6. Touch Crop. The HP All-in-One shows a preview image of the expected output on the display. 7. Touch Black or Color to accept the preview and begin copying. 128 Use the copy features Copy
-
 1
1 -
2
-
3
-
4
-
5
-
6
-
7
-
8
-
9
-
10
-
11
-
12
-
13
-
14
-
15
-
16
-
17
-
18
-
19
-
20
-
21
-
22
-
23
-
24
-
25
-
26
-
27
-
28
-
29
-
30
-
31
-
32
-
33
-
34
-
35
-
36
-
37
-
38
-
39
-
40
-
41
-
42
-
43
-
44
-
45
-
46
-
47
-
48
-
49
-
50
-
51
-
52
-
53
-
54
-
55
-
56
-
57
-
58
-
59
-
60
-
61
-
62
-
63
-
64
-
65
-
66
-
67
-
68
-
69
-
70
-
71
-
72
-
73
-
74
-
75
-
76
-
77
-
78
-
79
-
80
-
81
-
82
-
83
-
84
-
85
-
86
-
87
-
88
-
89
-
90
-
91
-
92
-
93
-
94
-
95
-
96
-
97
-
98
-
99
-
100
-
101
-
102
-
103
-
104
-
105
-
106
-
107
-
108
-
109
-
110
-
111
-
112
-
113
-
114
-
115
-
116
-
117
-
118
-
119
-
120
-
121
-
122
-
123
-
 124
124 -
 125
125 -
 126
126 -
 127
127 -
 128
128 -
 129
129 -
 130
130 -
 131
131 -
 132
132 -
 133
133 -
 134
134 -
135
-
136
-
137
-
138
-
139
-
140
-
141
-
142
-
143
-
144
-
145
-
146
-
147
-
148
-
149
-
150
-
151
-
152
-
153
-
154
-
155
-
156
-
157
-
158
-
159
-
160
-
161
-
162
-
163
-
164
-
165
-
166
-
167
-
168
-
169
-
170
-
171
-
172
-
173
-
174
-
175
-
176
-
177
-
178
-
179
-
180
-
181
-
182
-
183
-
184
-
185
-
186
-
187
-
188
-
189
-
190
-
191
-
192
-
193
-
194
-
195
-
196
-
197
-
198
-
199
-
200
-
201
-
202
-
203
-
204
-
205
-
206
-
207
-
208
-
209
-
210
-
211
-
212
-
213
-
214
-
215
-
216
-
217
-
218
-
219
-
220
-
221
-
222
-
223
-
224
-
225
-
226
-
227
-
228
-
229
-
230
-
231
-
232
-
233
-
234
-
235
 |
 |