HP C8180 Windows Help - Page 21
Adjust the volume, Set the default paper tray for PictBridge/DPOF/uPnP printing - photo tray error
 |
UPC - 883585123384
View all HP C8180 manuals
Add to My Manuals
Save this manual to your list of manuals |
Page 21 highlights
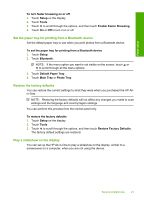
Finish setup Chapter 4 4. Touch the language you want to select. NOTE: If the menu option you want is not visible on the screen, touch or to scroll through all the menu options. 5. When prompted, touch Yes to confirm your selection, or touch No to choose another language. To set the country/region 1. Touch Setup on the display. 2. Touch Preferences. 3. Touch Set Country/Region. 4. Touch the country/region you want to select. NOTE: If the menu option you want is not visible on the screen, touch or to scroll through all the menu options. 5. When prompted, touch Yes to confirm your selection, or touch No to choose another country/region. Adjust the volume The HP All-in-One provides three levels for adjusting the volume of sounds associated with device events and errors. The default setting is Medium. To adjust the volume 1. Touch Setup on the display. 2. Touch Preferences. 3. Touch Sound Effects Volume, and then touch the volume you want to select. Set the default paper tray for PictBridge/DPOF/uPnP printing Set the default paper tray to use when you print photos from a Pictbridge device, DPOF file, or a UPnP device. The default setting is Photo Tray. To set the default paper tray 1. Touch Setup on the display. 2. Touch Preferences. 3. Touch PictBridge/DPOF/uPnP Tray Select. 4. Touch Main Tray or Photo Tray. Enable faster browsing of photos You can set up the HP All-in-One to enable faster photo browsing by writing small thumbnails to the memory card. The thumbnails take up a relatively small amount of space and are used to speed up the browsing performance of photos on the card. NOTE: This feature is on by default. 20 Finish setting up the HP All-in-One
-
 1
1 -
2
-
3
-
4
-
5
-
6
-
7
-
8
-
9
-
10
-
11
-
12
-
13
-
14
-
15
-
 16
16 -
 17
17 -
 18
18 -
 19
19 -
 20
20 -
 21
21 -
 22
22 -
 23
23 -
 24
24 -
 25
25 -
 26
26 -
27
-
28
-
29
-
30
-
31
-
32
-
33
-
34
-
35
-
36
-
37
-
38
-
39
-
40
-
41
-
42
-
43
-
44
-
45
-
46
-
47
-
48
-
49
-
50
-
51
-
52
-
53
-
54
-
55
-
56
-
57
-
58
-
59
-
60
-
61
-
62
-
63
-
64
-
65
-
66
-
67
-
68
-
69
-
70
-
71
-
72
-
73
-
74
-
75
-
76
-
77
-
78
-
79
-
80
-
81
-
82
-
83
-
84
-
85
-
86
-
87
-
88
-
89
-
90
-
91
-
92
-
93
-
94
-
95
-
96
-
97
-
98
-
99
-
100
-
101
-
102
-
103
-
104
-
105
-
106
-
107
-
108
-
109
-
110
-
111
-
112
-
113
-
114
-
115
-
116
-
117
-
118
-
119
-
120
-
121
-
122
-
123
-
124
-
125
-
126
-
127
-
128
-
129
-
130
-
131
-
132
-
133
-
134
-
135
-
136
-
137
-
138
-
139
-
140
-
141
-
142
-
143
-
144
-
145
-
146
-
147
-
148
-
149
-
150
-
151
-
152
-
153
-
154
-
155
-
156
-
157
-
158
-
159
-
160
-
161
-
162
-
163
-
164
-
165
-
166
-
167
-
168
-
169
-
170
-
171
-
172
-
173
-
174
-
175
-
176
-
177
-
178
-
179
-
180
-
181
-
182
-
183
-
184
-
185
-
186
-
187
-
188
-
189
-
190
-
191
-
192
-
193
-
194
-
195
-
196
-
197
-
198
-
199
-
200
-
201
-
202
-
203
-
204
-
205
-
206
-
207
-
208
-
209
-
210
-
211
-
212
-
213
-
214
-
215
-
216
-
217
-
218
-
219
-
220
-
221
-
222
-
223
-
224
-
225
-
226
-
227
-
228
-
229
-
230
-
231
-
232
-
233
-
234
-
235
 |
 |