HP ML370 HP ProLiant ML370 Generation 3 Setup and Installation Guide - Page 126
Rack and Server Installation Guidelines, Server Installation Procedures, Measuring with the Template
 |
UPC - 613326765616
View all HP ML370 manuals
Add to My Manuals
Save this manual to your list of manuals |
Page 126 highlights
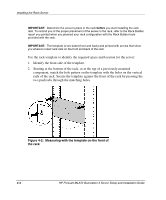
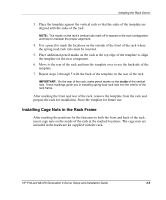
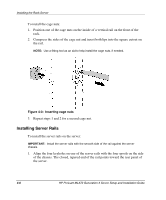
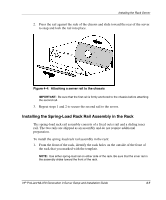
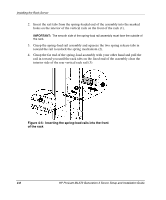
Installing the Rack Server Rack and Server Installation Guidelines Follow the guidelines in Chapter 2, "Planning the Server Installation," to plan an optimum environment and to install the server in a rack properly and safely. Be aware of all rack and server warnings listed in the Chapter and throughout this guide. IMPORTANT: Be sure that the rack meets all recommended space and airflow requirements for the server. Install any optional hardware components before installing and powering up the server for the first time. Refer to Chapter 3, "Installing Hardware Options," for instructions on installing memory, processors, hot-plug and non-hot-plug expansion boards, and other major hardware options. Server Installation Procedures To install the rack server into a rack, complete all of the installation procedures. CAUTION: For Series 7000 racks, you must install highly ventilated rack door inserts to provide proper front-to-back airflow and cooling. Measuring with the Template The rack template provides an easy and reliable way to properly position the fixed rack rails in the rack. Use the template to identify the proper locations for inserting rack rails. Mark the rack from the top and bottom edges of the template to identify where the server fits and to provide a starting point for installing the next unit. CAUTION: Always begin by mounting the heaviest item on the bottom of the rack. Continue to populate the rack from the bottom to the top. HP ProLiant ML370 Generation 3 Server Setup and Installation Guide 4-3
-
 1
1 -
2
-
3
-
4
-
5
-
6
-
7
-
8
-
9
-
10
-
11
-
12
-
13
-
14
-
15
-
16
-
17
-
18
-
19
-
20
-
21
-
22
-
23
-
24
-
25
-
26
-
27
-
28
-
29
-
30
-
31
-
32
-
33
-
34
-
35
-
36
-
37
-
38
-
39
-
40
-
41
-
42
-
43
-
44
-
45
-
46
-
47
-
48
-
49
-
50
-
51
-
52
-
53
-
54
-
55
-
56
-
57
-
58
-
59
-
60
-
61
-
62
-
63
-
64
-
65
-
66
-
67
-
68
-
69
-
70
-
71
-
72
-
73
-
74
-
75
-
76
-
77
-
78
-
79
-
80
-
81
-
82
-
83
-
84
-
85
-
86
-
87
-
88
-
89
-
90
-
91
-
92
-
93
-
94
-
95
-
96
-
97
-
98
-
99
-
100
-
101
-
102
-
103
-
104
-
105
-
106
-
107
-
108
-
109
-
110
-
111
-
112
-
113
-
114
-
115
-
116
-
117
-
118
-
119
-
120
-
 121
121 -
 122
122 -
 123
123 -
 124
124 -
 125
125 -
 126
126 -
 127
127 -
 128
128 -
 129
129 -
 130
130 -
 131
131 -
132
-
133
-
134
-
135
-
136
-
137
-
138
-
139
-
140
-
141
-
142
-
143
-
144
-
145
-
146
-
147
-
148
-
149
-
150
-
151
-
152
-
153
-
154
-
155
-
156
-
157
-
158
-
159
-
160
-
161
-
162
-
163
-
164
-
165
-
166
-
167
-
168
-
169
-
170
-
171
-
172
-
173
-
174
-
175
-
176
-
177
-
178
-
179
-
180
-
181
-
182
-
183
-
184
-
185
-
186
-
187
-
188
-
189
-
190
-
191
-
192
-
193
-
194
-
195
-
196
-
197
-
198
-
199
-
200
-
201
-
202
-
203
-
204
-
205
-
206
-
207
-
208
-
209
-
210
-
211
-
212
-
213
-
214
-
215
-
216
-
217
-
218
-
219
-
220
-
221
-
222
-
223
-
224
-
225
-
226
-
227
-
228
-
229
-
230
-
231
-
232
-
233
-
234
-
235
-
236
-
237
-
238
-
239
-
240
-
241
-
242
-
243
-
244
-
245
-
246
-
247
-
248
-
249
-
250
-
251
-
252
-
253
-
254
-
255
-
256
-
257
-
258
-
259
-
260
-
261
-
262
-
263
 |
 |
