HP ML370 HP ProLiant ML370 Generation 3 Setup and Installation Guide - Page 138
Securing the Power Cord
 |
UPC - 613326765616
View all HP ML370 manuals
Add to My Manuals
Save this manual to your list of manuals |
Page 138 highlights
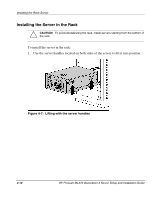
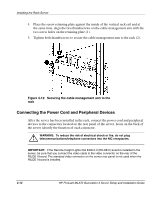
Installing the Rack Server Refer to "Rear Panel Components" in Chapter 3 to identify connectors on the rear panel of the rack server. Securing the Power Cord After you connect power cords to each AC power supply, use the power supply retaining clips to secure the AC power cords. Form a service loop in the power cord that is long enough to prevent the plug from being disengaged accidentally. To secure the power cord: 1. Push the upper tab of the power supply retaining clip to release the cord loop (1). 2. Flip the lower tab down to open the cord loop (2). Figure 4-13: Releasing the power cord retaining clip HP ProLiant ML370 Generation 3 Server Setup and Installation Guide 4-15
-
 1
1 -
2
-
3
-
4
-
5
-
6
-
7
-
8
-
9
-
10
-
11
-
12
-
13
-
14
-
15
-
16
-
17
-
18
-
19
-
20
-
21
-
22
-
23
-
24
-
25
-
26
-
27
-
28
-
29
-
30
-
31
-
32
-
33
-
34
-
35
-
36
-
37
-
38
-
39
-
40
-
41
-
42
-
43
-
44
-
45
-
46
-
47
-
48
-
49
-
50
-
51
-
52
-
53
-
54
-
55
-
56
-
57
-
58
-
59
-
60
-
61
-
62
-
63
-
64
-
65
-
66
-
67
-
68
-
69
-
70
-
71
-
72
-
73
-
74
-
75
-
76
-
77
-
78
-
79
-
80
-
81
-
82
-
83
-
84
-
85
-
86
-
87
-
88
-
89
-
90
-
91
-
92
-
93
-
94
-
95
-
96
-
97
-
98
-
99
-
100
-
101
-
102
-
103
-
104
-
105
-
106
-
107
-
108
-
109
-
110
-
111
-
112
-
113
-
114
-
115
-
116
-
117
-
118
-
119
-
120
-
121
-
122
-
123
-
124
-
125
-
126
-
127
-
128
-
129
-
130
-
131
-
132
-
 133
133 -
 134
134 -
 135
135 -
 136
136 -
 137
137 -
 138
138 -
 139
139 -
 140
140 -
 141
141 -
 142
142 -
 143
143 -
144
-
145
-
146
-
147
-
148
-
149
-
150
-
151
-
152
-
153
-
154
-
155
-
156
-
157
-
158
-
159
-
160
-
161
-
162
-
163
-
164
-
165
-
166
-
167
-
168
-
169
-
170
-
171
-
172
-
173
-
174
-
175
-
176
-
177
-
178
-
179
-
180
-
181
-
182
-
183
-
184
-
185
-
186
-
187
-
188
-
189
-
190
-
191
-
192
-
193
-
194
-
195
-
196
-
197
-
198
-
199
-
200
-
201
-
202
-
203
-
204
-
205
-
206
-
207
-
208
-
209
-
210
-
211
-
212
-
213
-
214
-
215
-
216
-
217
-
218
-
219
-
220
-
221
-
222
-
223
-
224
-
225
-
226
-
227
-
228
-
229
-
230
-
231
-
232
-
233
-
234
-
235
-
236
-
237
-
238
-
239
-
240
-
241
-
242
-
243
-
244
-
245
-
246
-
247
-
248
-
249
-
250
-
251
-
252
-
253
-
254
-
255
-
256
-
257
-
258
-
259
-
260
-
261
-
262
-
263
 |
 |

Installing the Rack Server
HP ProLiant ML370 Generation 3 Server Setup and Installation Guide
4-15
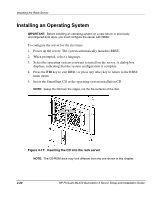
Refer to “Rear Panel Components” in Chapter 3 to identify connectors on the rear
panel of the rack server.
Securing the Power Cord
After you connect power cords to each AC power supply, use the power supply
retaining clips to secure the AC power cords. Form a service loop in the power cord
that is long enough to prevent the plug from being disengaged accidentally.
To secure the power cord:
1.
Push the upper tab of the power supply retaining clip to release the cord loop (1).
2.
Flip the lower tab down to open the cord loop (2).
Figure 4-13:
Releasing the power cord retaining clip