HP ML370 HP ProLiant ML370 Generation 3 Setup and Installation Guide - Page 154
Table 5-1, Front Panel LED Activity During the Power-Up, Sequence, When prompted, select a language.
 |
UPC - 613326765616
View all HP ML370 manuals
Add to My Manuals
Save this manual to your list of manuals |
Page 154 highlights
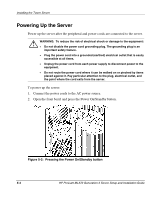
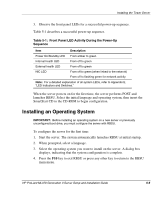
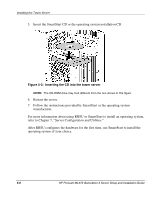
Installing the Tower Server 3. Observe the front panel LEDs for a successful power-up sequence. Table 5-1 describes a successful power-up sequence. Table 5-1: Front Panel LED Activity During the Power-Up Sequence Item Description Power On/Standby LED From amber to green Internal health LED From off to green External health LED From off to green NIC LED From off to green (when linked to the network) From off to flashing green for network activity Note: For a detailed explanation of all system LEDs, refer to Appendix E, "LED Indicators and Switches." When the server powers on for the first time, the server performs POST and launches RBSU. Select the initial language and operating system, then insert the SmartStart CD in the CD-ROM to begin configuration. Installing an Operating System IMPORTANT: Before installing an operating system on a new server or previously unconfigured boot drive, you must configure the server with RBSU. To configure the server for the first time: 1. Start the server. The system automatically launches RBSU at initial startup. 2. When prompted, select a language. 3. Select the operating system you want to install on the server. A dialog box displays, indicating that the system configuration is complete. 4. Press the F10 key to exit RBSU or press any other key to return to the RBSU main menu. HP ProLiant ML370 Generation 3 Server Setup and Installation Guide 5-5
-
 1
1 -
2
-
3
-
4
-
5
-
6
-
7
-
8
-
9
-
10
-
11
-
12
-
13
-
14
-
15
-
16
-
17
-
18
-
19
-
20
-
21
-
22
-
23
-
24
-
25
-
26
-
27
-
28
-
29
-
30
-
31
-
32
-
33
-
34
-
35
-
36
-
37
-
38
-
39
-
40
-
41
-
42
-
43
-
44
-
45
-
46
-
47
-
48
-
49
-
50
-
51
-
52
-
53
-
54
-
55
-
56
-
57
-
58
-
59
-
60
-
61
-
62
-
63
-
64
-
65
-
66
-
67
-
68
-
69
-
70
-
71
-
72
-
73
-
74
-
75
-
76
-
77
-
78
-
79
-
80
-
81
-
82
-
83
-
84
-
85
-
86
-
87
-
88
-
89
-
90
-
91
-
92
-
93
-
94
-
95
-
96
-
97
-
98
-
99
-
100
-
101
-
102
-
103
-
104
-
105
-
106
-
107
-
108
-
109
-
110
-
111
-
112
-
113
-
114
-
115
-
116
-
117
-
118
-
119
-
120
-
121
-
122
-
123
-
124
-
125
-
126
-
127
-
128
-
129
-
130
-
131
-
132
-
133
-
134
-
135
-
136
-
137
-
138
-
139
-
140
-
141
-
142
-
143
-
144
-
145
-
146
-
147
-
148
-
 149
149 -
 150
150 -
 151
151 -
 152
152 -
 153
153 -
 154
154 -
 155
155 -
 156
156 -
 157
157 -
 158
158 -
 159
159 -
160
-
161
-
162
-
163
-
164
-
165
-
166
-
167
-
168
-
169
-
170
-
171
-
172
-
173
-
174
-
175
-
176
-
177
-
178
-
179
-
180
-
181
-
182
-
183
-
184
-
185
-
186
-
187
-
188
-
189
-
190
-
191
-
192
-
193
-
194
-
195
-
196
-
197
-
198
-
199
-
200
-
201
-
202
-
203
-
204
-
205
-
206
-
207
-
208
-
209
-
210
-
211
-
212
-
213
-
214
-
215
-
216
-
217
-
218
-
219
-
220
-
221
-
222
-
223
-
224
-
225
-
226
-
227
-
228
-
229
-
230
-
231
-
232
-
233
-
234
-
235
-
236
-
237
-
238
-
239
-
240
-
241
-
242
-
243
-
244
-
245
-
246
-
247
-
248
-
249
-
250
-
251
-
252
-
253
-
254
-
255
-
256
-
257
-
258
-
259
-
260
-
261
-
262
-
263
 |
 |
