HP ML370 HP ProLiant ML370 Generation 3 Setup and Installation Guide - Page 128
Installing Cage Nuts in the Rack Frame
 |
UPC - 613326765616
View all HP ML370 manuals
Add to My Manuals
Save this manual to your list of manuals |
Page 128 highlights
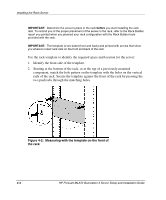
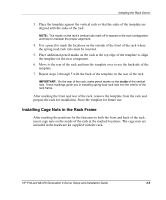
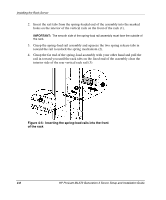
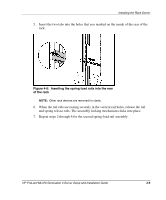
Installing the Rack Server 3. Place the template against the vertical rails so that the sides of the template are aligned with the sides of the rack. NOTE: Tick marks on the rack's vertical rails mark off U-spaces in the rack configuration and help to maintain the proper alignment. 4. Use a pencil to mark the locations on the outside of the front of the rack where the spring-load rack rails must be inserted. 5. Place additional pencil marks on the rack at the top edge of the template to align the template for the next component. 6. Move to the rear of the rack and turn the template over to use the backside of the template. 7. Repeat steps 2 through 5 with the back of the template on the rear of the rack. IMPORTANT: On the rear of the rack, make pencil marks on the inside of the vertical rails. These markings guide you in installing spring-load rack rails into the interior of the rack frame. After marking the front and rear of the rack, remove the template from the rack and prepare the rack for installation. Store the template for future use. Installing Cage Nuts in the Rack Frame After marking the positions for the fasteners in both the front and back of the rack, insert cage nuts on the inside of the rails at the marked locations. The cage nuts are included in the hardware kit supplied with the rack. HP ProLiant ML370 Generation 3 Server Setup and Installation Guide 4-5
-
 1
1 -
2
-
3
-
4
-
5
-
6
-
7
-
8
-
9
-
10
-
11
-
12
-
13
-
14
-
15
-
16
-
17
-
18
-
19
-
20
-
21
-
22
-
23
-
24
-
25
-
26
-
27
-
28
-
29
-
30
-
31
-
32
-
33
-
34
-
35
-
36
-
37
-
38
-
39
-
40
-
41
-
42
-
43
-
44
-
45
-
46
-
47
-
48
-
49
-
50
-
51
-
52
-
53
-
54
-
55
-
56
-
57
-
58
-
59
-
60
-
61
-
62
-
63
-
64
-
65
-
66
-
67
-
68
-
69
-
70
-
71
-
72
-
73
-
74
-
75
-
76
-
77
-
78
-
79
-
80
-
81
-
82
-
83
-
84
-
85
-
86
-
87
-
88
-
89
-
90
-
91
-
92
-
93
-
94
-
95
-
96
-
97
-
98
-
99
-
100
-
101
-
102
-
103
-
104
-
105
-
106
-
107
-
108
-
109
-
110
-
111
-
112
-
113
-
114
-
115
-
116
-
117
-
118
-
119
-
120
-
121
-
122
-
 123
123 -
 124
124 -
 125
125 -
 126
126 -
 127
127 -
 128
128 -
 129
129 -
 130
130 -
 131
131 -
 132
132 -
 133
133 -
134
-
135
-
136
-
137
-
138
-
139
-
140
-
141
-
142
-
143
-
144
-
145
-
146
-
147
-
148
-
149
-
150
-
151
-
152
-
153
-
154
-
155
-
156
-
157
-
158
-
159
-
160
-
161
-
162
-
163
-
164
-
165
-
166
-
167
-
168
-
169
-
170
-
171
-
172
-
173
-
174
-
175
-
176
-
177
-
178
-
179
-
180
-
181
-
182
-
183
-
184
-
185
-
186
-
187
-
188
-
189
-
190
-
191
-
192
-
193
-
194
-
195
-
196
-
197
-
198
-
199
-
200
-
201
-
202
-
203
-
204
-
205
-
206
-
207
-
208
-
209
-
210
-
211
-
212
-
213
-
214
-
215
-
216
-
217
-
218
-
219
-
220
-
221
-
222
-
223
-
224
-
225
-
226
-
227
-
228
-
229
-
230
-
231
-
232
-
233
-
234
-
235
-
236
-
237
-
238
-
239
-
240
-
241
-
242
-
243
-
244
-
245
-
246
-
247
-
248
-
249
-
250
-
251
-
252
-
253
-
254
-
255
-
256
-
257
-
258
-
259
-
260
-
261
-
262
-
263
 |
 |
