HP NetServer AA 4000 HP AA HP Netserver 4000 Reference Guide - Page 87
Disk Administrator.
 |
View all HP NetServer AA 4000 manuals
Add to My Manuals
Save this manual to your list of manuals |
Page 87 highlights
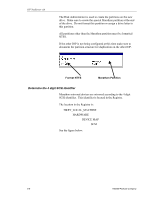
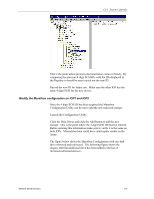
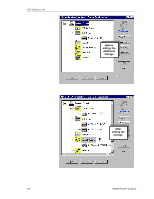
Ch 5: System Upgrades installation of the Marathon array and should still be available. If not, take the time to document it now: • How many physical drives are present in the LH3 or LH4. • What are the RAID set configurations for the drives? • What logical drive is used for the IOP NOS? • What logical drive is used for the CE? • What other logical drive sets are redirected? • What are the 4-digit SCSI ids of all logical drives? Install the additional storage Install the new drives into the disk enclosure and create the new RAID sets using the NetRAID Assistant on IOP1 and IOP2. Make sure to configure them exactly the same. Caution should be taken here to not touch the other RAID sets that are present. Doing this will cause damage to your data and may possibly bring down the whole array. Simply use the NetRAID Assistant to configure the new drives. Decision time At this point the question about downtime comes into play. A reboot is required before Windows NT will recognize the newly created drive. If the whole system can be down for awhile, then it is best to down the whole array at this time and restart both IOPs into offline mode where configuration of the disks can be completed under NT Disk Administrator. If downtime cannot be tolerated then only one IOP can be brought down at this time and rebooted into offline mode. Once this system is complete, it can be brought back online. When this is done, a remirror will begin and must complete before the second IOP can be brought down and booted to offline mode for the new disk to be configured. Reboot the IOP This is the first of two required reboots. This reboot is necessary for Windows NT to recognize the new disks. Configuring the new mirrored drive Once the IOP is booted to offline mode, launch the Windows NT Disk Administrator. Network Server Division 5-5
-
 1
1 -
2
-
3
-
4
-
5
-
6
-
7
-
8
-
9
-
10
-
11
-
12
-
13
-
14
-
15
-
16
-
17
-
18
-
19
-
20
-
21
-
22
-
23
-
24
-
25
-
26
-
27
-
28
-
29
-
30
-
31
-
32
-
33
-
34
-
35
-
36
-
37
-
38
-
39
-
40
-
41
-
42
-
43
-
44
-
45
-
46
-
47
-
48
-
49
-
50
-
51
-
52
-
53
-
54
-
55
-
56
-
57
-
58
-
59
-
60
-
61
-
62
-
63
-
64
-
65
-
66
-
67
-
68
-
69
-
70
-
71
-
72
-
73
-
74
-
75
-
76
-
77
-
78
-
79
-
80
-
81
-
 82
82 -
 83
83 -
 84
84 -
 85
85 -
 86
86 -
 87
87 -
 88
88 -
 89
89 -
 90
90 -
 91
91 -
 92
92 -
93
-
94
-
95
-
96
-
97
-
98
-
99
-
100
-
101
-
102
-
103
-
104
-
105
-
106
-
107
-
108
-
109
-
110
-
111
-
112
-
113
-
114
-
115
-
116
-
117
-
118
-
119
-
120
-
121
-
122
-
123
-
124
-
125
-
126
-
127
-
128
-
129
-
130
-
131
-
132
-
133
-
134
-
135
-
136
-
137
-
138
-
139
-
140
-
141
-
142
 |
 |