Lexmark M410 User's Guide - Page 178
Paper Jam, Open Rear Door, Jam Recovery, Short Paper, PAPER LENGTH, Short, Check MP Feeder
 |
UPC - 734646261005
View all Lexmark M410 manuals
Add to My Manuals
Save this manual to your list of manuals |
Page 178 highlights
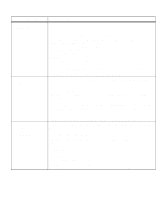
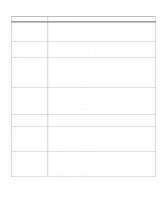
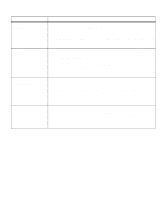
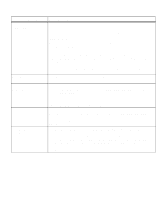
Attendance Message 202 Paper Jam Open Rear Door 203 Paper Jam Short Paper 250 Paper Jam Check MP Feeder 900-999 service messages Meaning and Required Action The printer detects a paper jam behind the rear output bin door. Open the rear output bin door and gently remove the jammed print material. Close the rear output bin door. See "202 Paper Jam - Open Rear Door" on page 186 for more information. Press Go to clear the message and continue printing. The printer prints a new copy of the page that jammed if Jam Recovery is set to On or Auto. However, the Auto setting does not guarantee the page will print. Once the print job is complete, close the rear output bin door. The printer detects a paper jam behind the rear output bin door. Open the rear output bin door and gently remove the jammed print material. Leave the rear output bin door open. Set PAPER LENGTH to Short from the operator panel. See "203 Paper Jam Short Paper" on page 190 for more information. Press Go to clear the message and continue printing. The printer prints a new copy of the page that jammed if Jam Recovery is set to On or Auto. However, the Auto setting does not guarantee the page will print. Once the print job is complete, close the rear output bin door. The printer detects a paper jam in the multipurpose feeder. If the print material is visible from the front of the multipurpose feeder, pull it out gently. If only a small portion is visible, open the upper front door, remove the print cartridge, and remove the jammed print material. Reinstall the cartridge and close the upper front door. See "250 Paper Jam - Check MP Feeder" on page 192 for more information. Press Go to clear the message and continue printing. The printer prints a new copy of the page that jammed if Jam Recovery is set to On or Auto. However, the Auto setting does not guarantee the page will print. These service messages indicate printer failures that may require service. When a service message occurs, the printer immediately stops printing. Turn the printer power Off (O), wait for about 10 seconds, and then turn the printer power On (|). If the service message recurs, call for service and report the message number and description of the problem. 166 Chapter 6: Understanding Printer Messages
-
 1
1 -
2
-
3
-
4
-
5
-
6
-
7
-
8
-
9
-
10
-
11
-
12
-
13
-
14
-
15
-
16
-
17
-
18
-
19
-
20
-
21
-
22
-
23
-
24
-
25
-
26
-
27
-
28
-
29
-
30
-
31
-
32
-
33
-
34
-
35
-
36
-
37
-
38
-
39
-
40
-
41
-
42
-
43
-
44
-
45
-
46
-
47
-
48
-
49
-
50
-
51
-
52
-
53
-
54
-
55
-
56
-
57
-
58
-
59
-
60
-
61
-
62
-
63
-
64
-
65
-
66
-
67
-
68
-
69
-
70
-
71
-
72
-
73
-
74
-
75
-
76
-
77
-
78
-
79
-
80
-
81
-
82
-
83
-
84
-
85
-
86
-
87
-
88
-
89
-
90
-
91
-
92
-
93
-
94
-
95
-
96
-
97
-
98
-
99
-
100
-
101
-
102
-
103
-
104
-
105
-
106
-
107
-
108
-
109
-
110
-
111
-
112
-
113
-
114
-
115
-
116
-
117
-
118
-
119
-
120
-
121
-
122
-
123
-
124
-
125
-
126
-
127
-
128
-
129
-
130
-
131
-
132
-
133
-
134
-
135
-
136
-
137
-
138
-
139
-
140
-
141
-
142
-
143
-
144
-
145
-
146
-
147
-
148
-
149
-
150
-
151
-
152
-
153
-
154
-
155
-
156
-
157
-
158
-
159
-
160
-
161
-
162
-
163
-
164
-
165
-
166
-
167
-
168
-
169
-
170
-
171
-
172
-
 173
173 -
 174
174 -
 175
175 -
 176
176 -
 177
177 -
 178
178 -
 179
179 -
 180
180 -
 181
181 -
 182
182 -
 183
183 -
184
-
185
-
186
-
187
-
188
-
189
-
190
-
191
-
192
-
193
-
194
-
195
-
196
-
197
-
198
-
199
-
200
-
201
-
202
-
203
-
204
-
205
-
206
-
207
-
208
-
209
-
210
-
211
-
212
-
213
-
214
-
215
-
216
-
217
-
218
-
219
-
220
-
221
-
222
-
223
-
224
-
225
-
226
-
227
-
228
-
229
-
230
-
231
-
232
-
233
-
234
-
235
-
236
-
237
-
238
-
239
-
240
-
241
-
242
-
243
-
244
-
245
-
246
-
247
-
248
-
249
-
250
-
251
-
252
-
253
-
254
-
255
-
256
-
257
-
258
-
259
-
260
-
261
-
262
-
263
-
264
-
265
-
266
-
267
-
268
-
269
-
270
-
271
-
272
-
273
-
274
-
275
-
276
-
277
-
278
-
279
-
280
-
281
-
282
-
283
-
284
-
285
-
286
-
287
-
288
-
289
-
290
-
291
-
292
-
293
-
294
-
295
-
296
-
297
-
298
-
299
-
300
-
301
-
302
-
303
-
304
-
305
-
306
-
307
-
308
-
309
-
310
-
311
-
312
 |
 |