Netgear RAXE290 User Manual - Page 107
Enable or disable flow control for Ethernet ports
 |
View all Netgear RAXE290 manuals
Add to My Manuals
Save this manual to your list of manuals |
Page 107 highlights
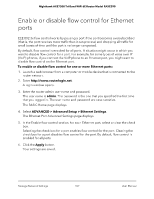
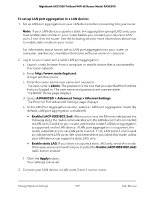
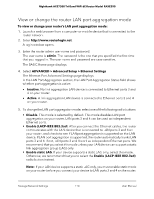
Nighthawk AXE7300 Tri-Band WiFi 6E Router Model RAXE290 Enable or disable flow control for Ethernet ports EEE 802.3x flow control works by pausing a port if the port becomes oversubscribed (that is, the port receives more traffic than it can process) and dropping all traffic for small bursts of time until the port is no longer congested. By default, flow control is enabled for all ports. A situation might occur in which you want to disable flow control for a port. For example, for some types of voice over IP (VoIP) phones, if you connect the VoIP phone to an Ethernet port, you might want to disable flow control on the Ethernet port. To enable or disable flow control for one or more Ethernet ports: 1. Launch a web browser from a computer or mobile device that is connected to the router network. 2. Enter http://www.routerlogin.net. A login window opens. 3. Enter the router admin user name and password. The user name is admin. The password is the one that you specified the first time that you logged in. The user name and password are case-sensitive. The BASIC Home page displays. 4. Select ADVANCED > Advanced Setup > Ethernet Settings. The Ethernet Port Advanced Settings page displays. 5. In the Enable flow control section, for each Ethernet port, select or clear the check box. Selecting the check box for a port enables flow control for the port. Clearing the check box for a port disables flow control for the port. By default, flow control is enabled for all ports. 6. Click the Apply button. Your settings are saved. Manage Network Settings 107 User Manual
-
 1
1 -
2
-
3
-
4
-
5
-
6
-
7
-
8
-
9
-
10
-
11
-
12
-
13
-
14
-
15
-
16
-
17
-
18
-
19
-
20
-
21
-
22
-
23
-
24
-
25
-
26
-
27
-
28
-
29
-
30
-
31
-
32
-
33
-
34
-
35
-
36
-
37
-
38
-
39
-
40
-
41
-
42
-
43
-
44
-
45
-
46
-
47
-
48
-
49
-
50
-
51
-
52
-
53
-
54
-
55
-
56
-
57
-
58
-
59
-
60
-
61
-
62
-
63
-
64
-
65
-
66
-
67
-
68
-
69
-
70
-
71
-
72
-
73
-
74
-
75
-
76
-
77
-
78
-
79
-
80
-
81
-
82
-
83
-
84
-
85
-
86
-
87
-
88
-
89
-
90
-
91
-
92
-
93
-
94
-
95
-
96
-
97
-
98
-
99
-
100
-
101
-
 102
102 -
 103
103 -
 104
104 -
 105
105 -
 106
106 -
 107
107 -
 108
108 -
 109
109 -
 110
110 -
 111
111 -
 112
112 -
113
-
114
-
115
-
116
-
117
-
118
-
119
-
120
-
121
-
122
-
123
-
124
-
125
-
126
-
127
-
128
-
129
-
130
-
131
-
132
-
133
-
134
-
135
-
136
-
137
-
138
-
139
-
140
-
141
-
142
-
143
-
144
-
145
-
146
-
147
-
148
-
149
-
150
-
151
-
152
-
153
-
154
-
155
-
156
-
157
-
158
-
159
-
160
-
161
-
162
-
163
-
164
-
165
-
166
-
167
-
168
-
169
-
170
-
171
-
172
-
173
-
174
-
175
-
176
-
177
-
178
-
179
-
180
-
181
-
182
-
183
-
184
-
185
-
186
 |
 |
