Netgear RAXE290 User Manual - Page 115
Manually update the dynamic QoS database, Wi-Fi Multimedia Quality of Service
 |
View all Netgear RAXE290 manuals
Add to My Manuals
Save this manual to your list of manuals |
Page 115 highlights
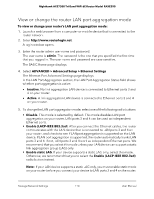
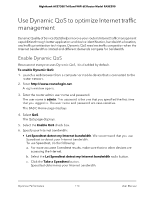
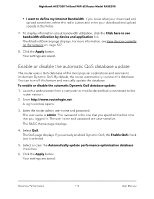
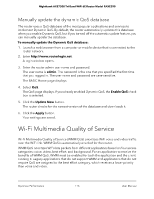
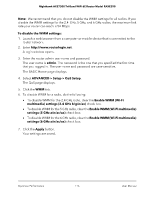
Nighthawk AXE7300 Tri-Band WiFi 6E Router Model RAXE290 Manually update the dynamic QoS database The router uses a QoS database of the most popular applications and services to implement Dynamic QoS. By default, the router automatically updates this database when you enable Dynamic QoS, but if you turned off the automatic update feature, you can manually update the database. To manually update the Dynamic QoS database: 1. Launch a web browser from a computer or mobile device that is connected to the router network. 2. Enter http://www.routerlogin.net. A login window opens. 3. Enter the router admin user name and password. The user name is admin. The password is the one that you specified the first time that you logged in. The user name and password are case-sensitive. The BASIC Home page displays. 4. Select QoS. The QoS page displays. If you already enabled Dynamic QoS, the Enable QoS check box is selected. 5. Click the Update Now button. The router checks for the newest version of the database and downloads it. 6. Click the Apply button. Your settings are saved. Wi-Fi Multimedia Quality of Service Wi-Fi Multimedia Quality of Service (WMM QoS) prioritizes WiFi voice and video traffic over the WiFi link. WMM QoS is automatically enabled for the router. WMM QoS prioritizes WiFi data packets from different applications based on four access categories: voice, video, best effort, and background. For an application to receive the benefits of WMM QoS, WMM must be enabled for both the application and the client running it. Legacy applications that do not support WMM and applications that do not require QoS are assigned to the best effort category, which receives a lower priority than voice and video. Optimize Performance 115 User Manual
-
 1
1 -
2
-
3
-
4
-
5
-
6
-
7
-
8
-
9
-
10
-
11
-
12
-
13
-
14
-
15
-
16
-
17
-
18
-
19
-
20
-
21
-
22
-
23
-
24
-
25
-
26
-
27
-
28
-
29
-
30
-
31
-
32
-
33
-
34
-
35
-
36
-
37
-
38
-
39
-
40
-
41
-
42
-
43
-
44
-
45
-
46
-
47
-
48
-
49
-
50
-
51
-
52
-
53
-
54
-
55
-
56
-
57
-
58
-
59
-
60
-
61
-
62
-
63
-
64
-
65
-
66
-
67
-
68
-
69
-
70
-
71
-
72
-
73
-
74
-
75
-
76
-
77
-
78
-
79
-
80
-
81
-
82
-
83
-
84
-
85
-
86
-
87
-
88
-
89
-
90
-
91
-
92
-
93
-
94
-
95
-
96
-
97
-
98
-
99
-
100
-
101
-
102
-
103
-
104
-
105
-
106
-
107
-
108
-
109
-
 110
110 -
 111
111 -
 112
112 -
 113
113 -
 114
114 -
 115
115 -
 116
116 -
 117
117 -
 118
118 -
 119
119 -
 120
120 -
121
-
122
-
123
-
124
-
125
-
126
-
127
-
128
-
129
-
130
-
131
-
132
-
133
-
134
-
135
-
136
-
137
-
138
-
139
-
140
-
141
-
142
-
143
-
144
-
145
-
146
-
147
-
148
-
149
-
150
-
151
-
152
-
153
-
154
-
155
-
156
-
157
-
158
-
159
-
160
-
161
-
162
-
163
-
164
-
165
-
166
-
167
-
168
-
169
-
170
-
171
-
172
-
173
-
174
-
175
-
176
-
177
-
178
-
179
-
180
-
181
-
182
-
183
-
184
-
185
-
186
 |
 |
